
How to Integrate HubSpot with PartnerPortal
Use this guide to connect HubSpot to PartnerPortal, understand how sync flows work, map the data you want on HubSpot deals, and turn on the HubSpot settings your program needs.
Connect HubSpot
Section titled “Connect HubSpot”Connecting HubSpot to PartnerPortal lets the portal create and update HubSpot deals as leads are submitted, approved, and progressed.
Before you start
Section titled “Before you start”- Admin access to PartnerPortal
- Access to the HubSpot account you want to connect
Connect your HubSpot account
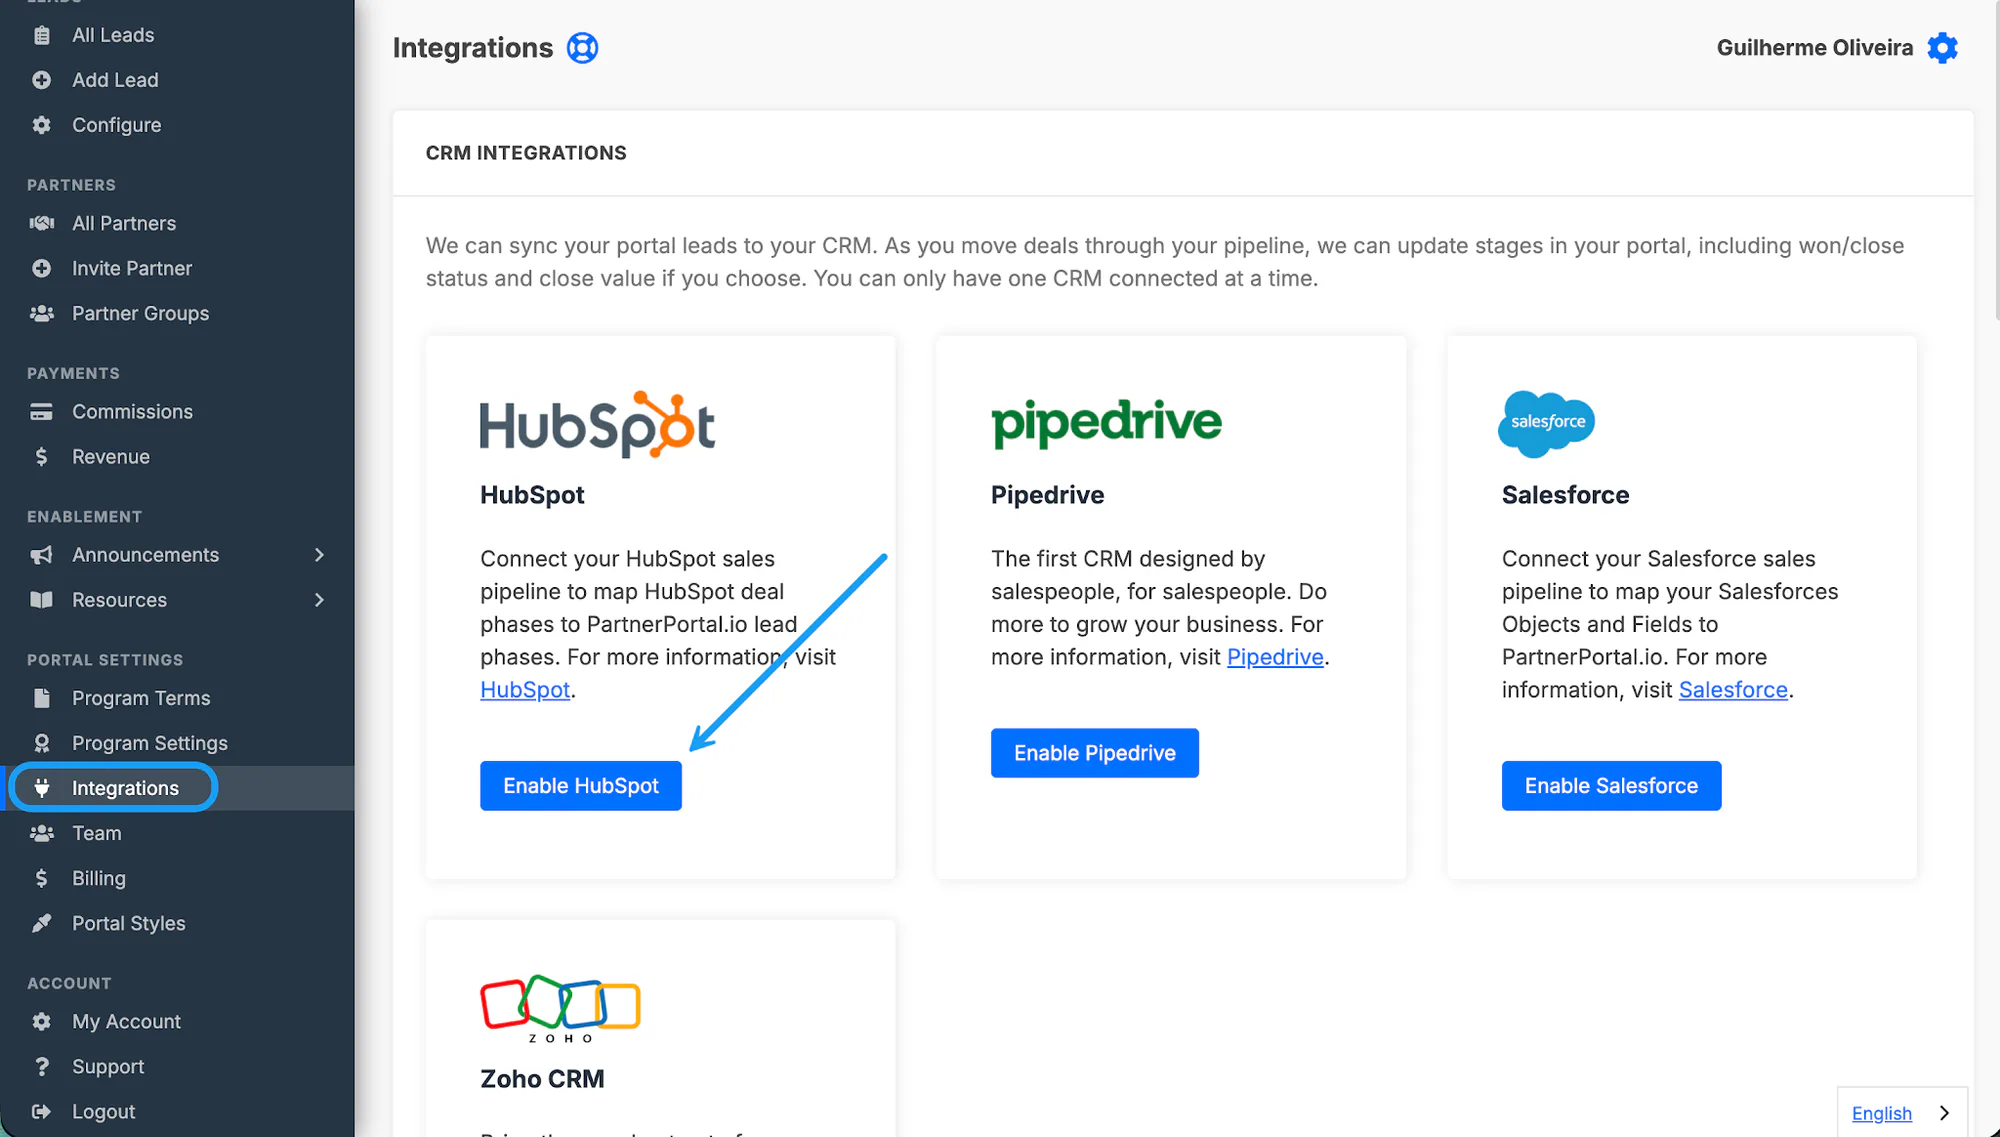
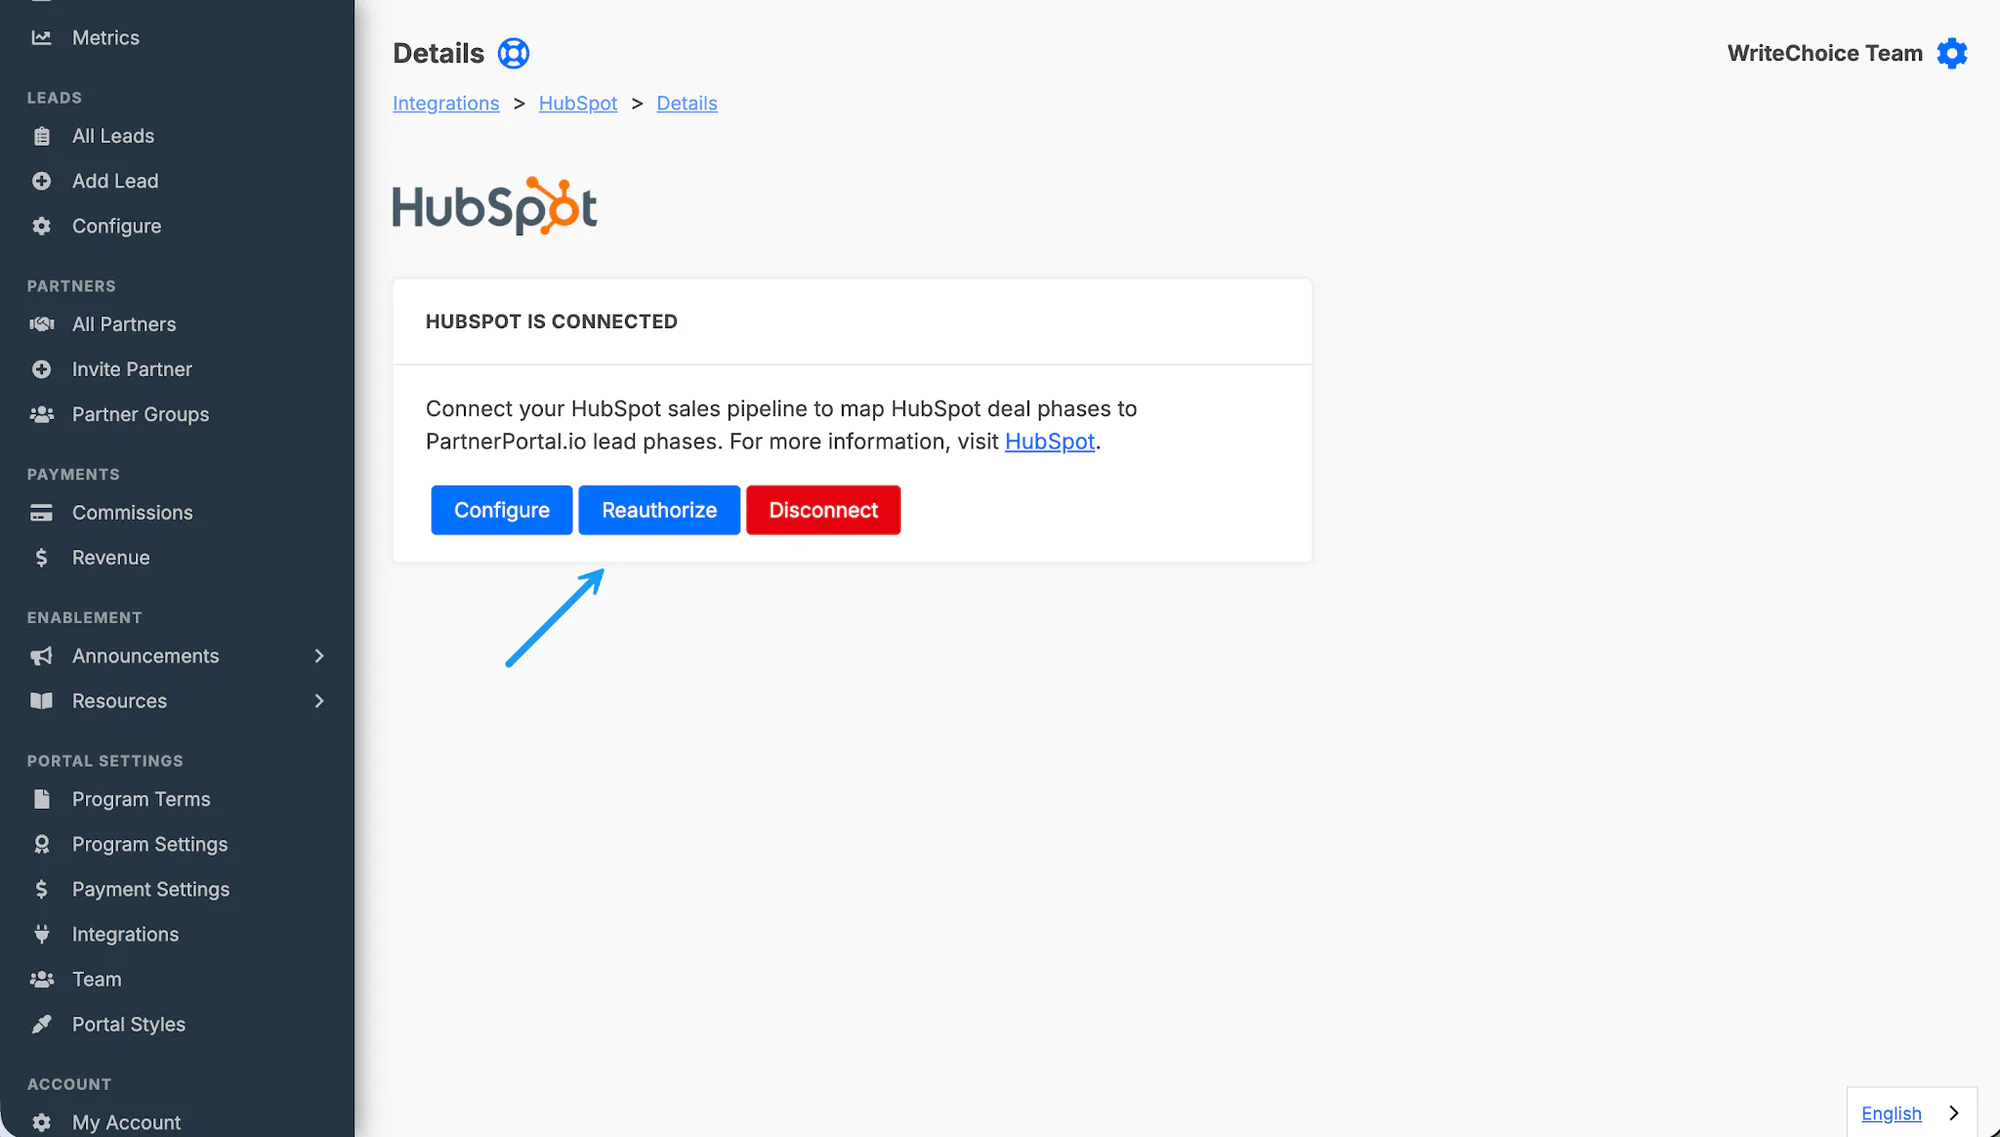
Section titled “Connect your HubSpot account”Open Integrations in the PartnerPortal sidebar.
Click Enable HubSpot.
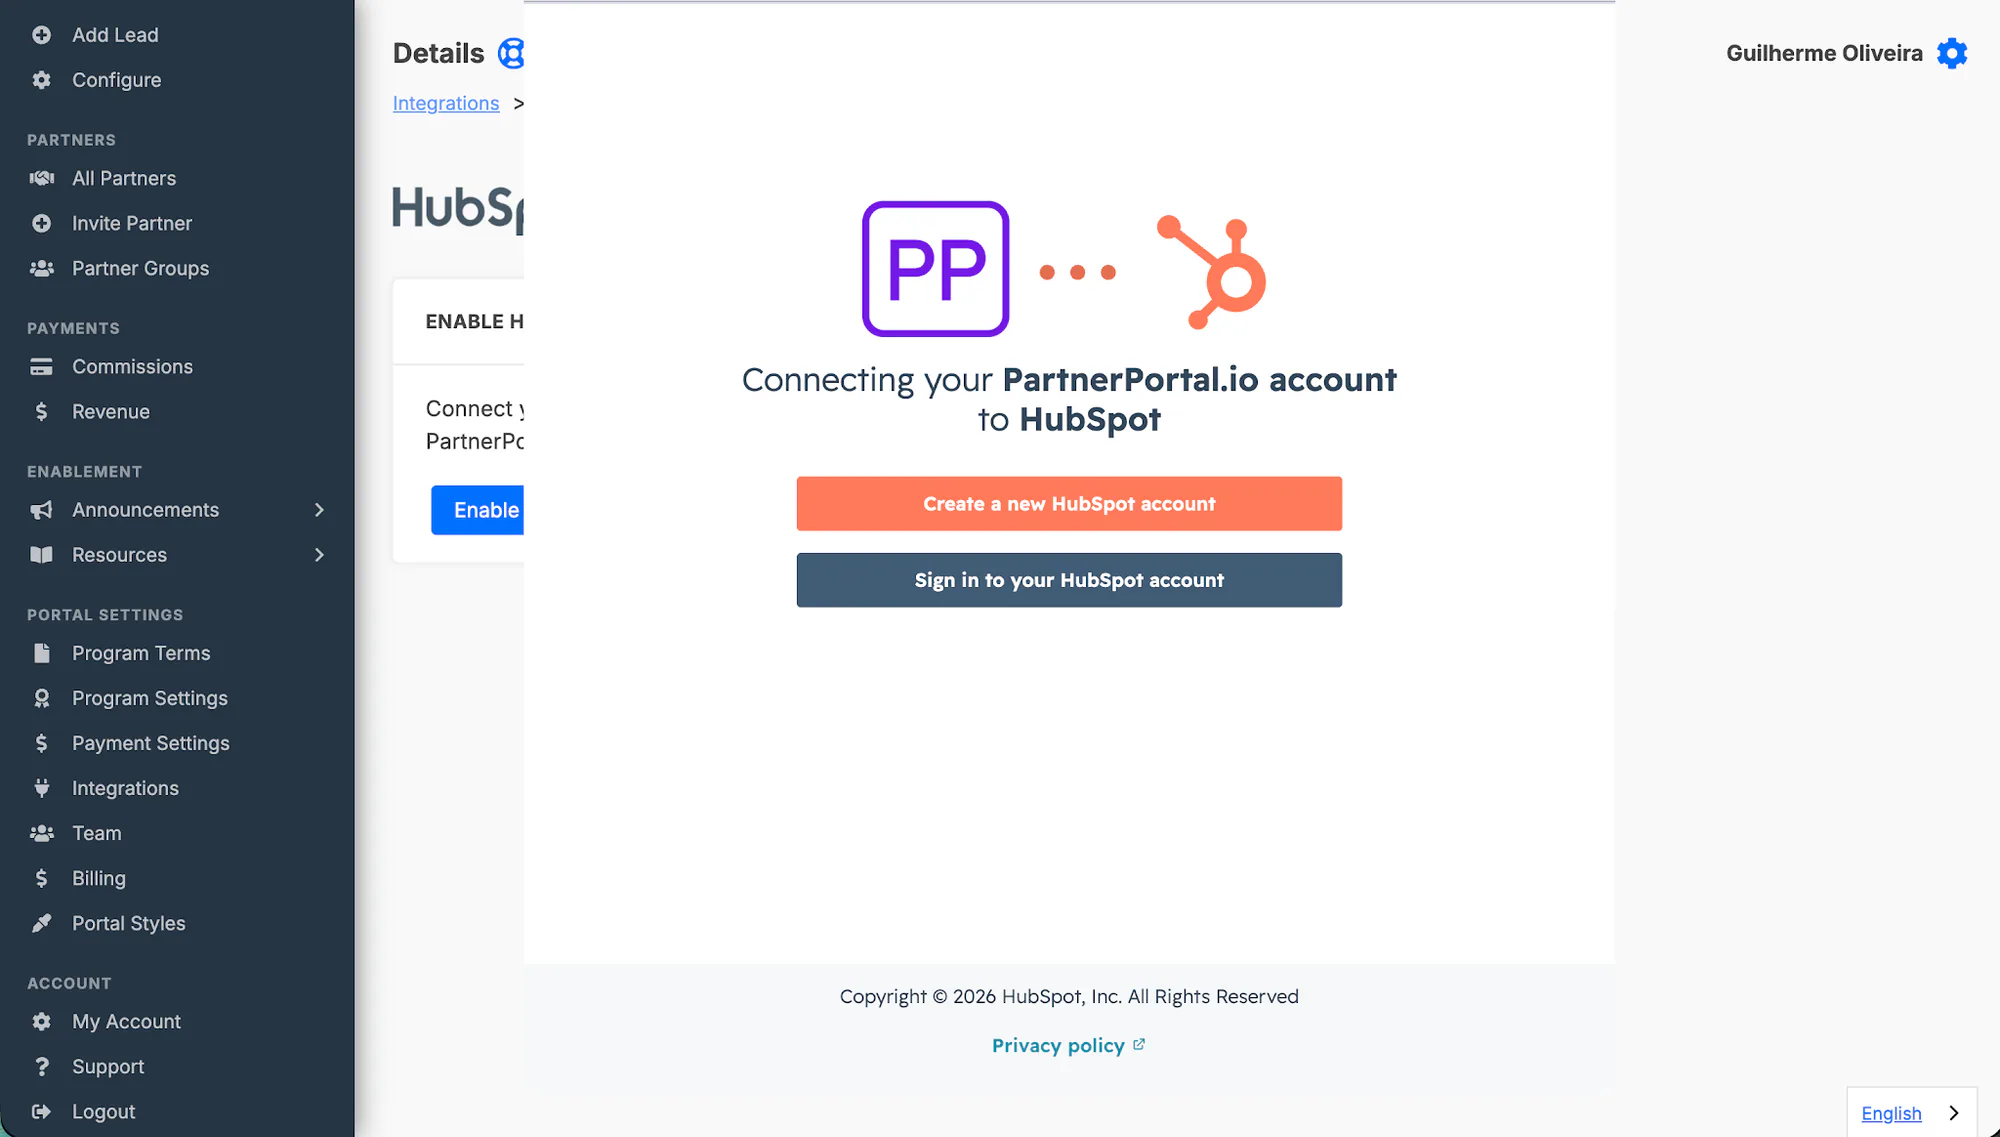
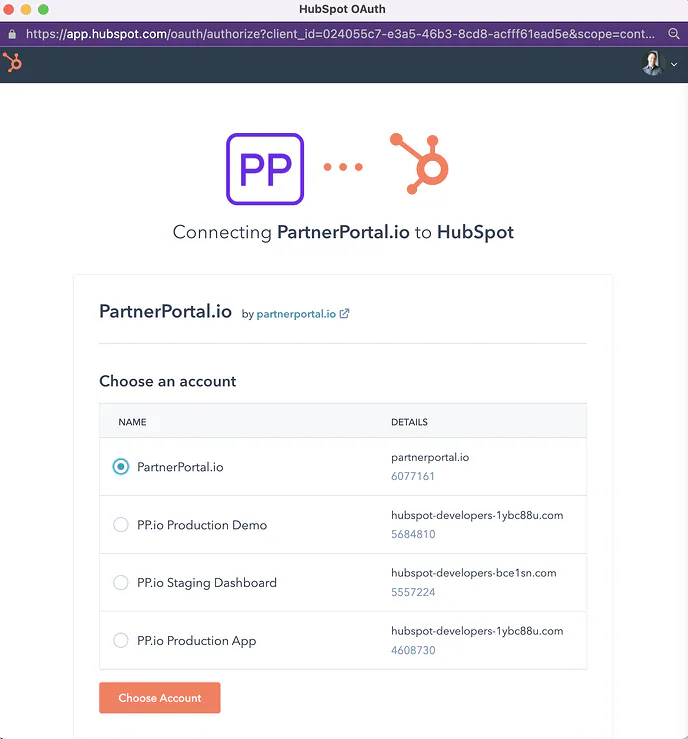
Continue through HubSpot’s authorization flow and click Connect App.
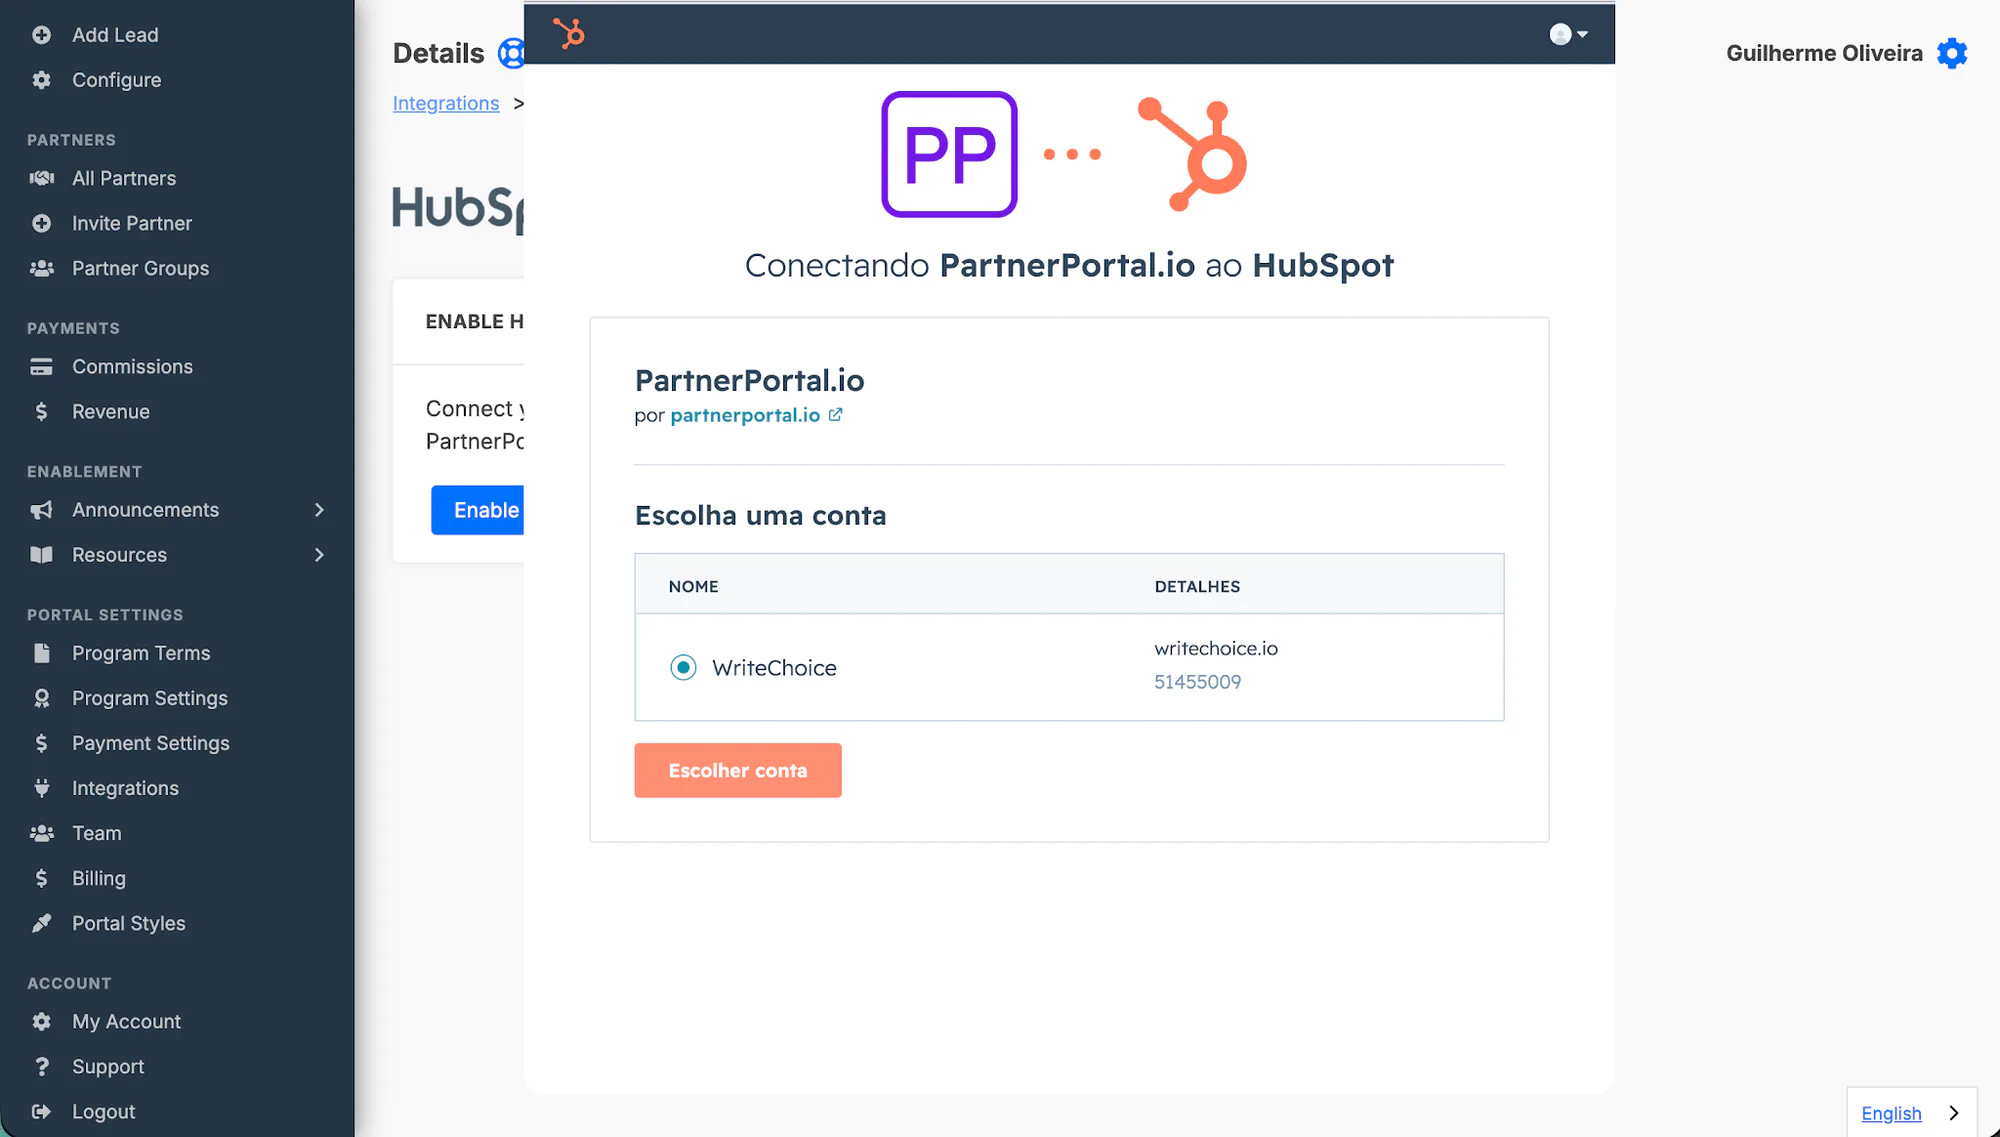
If HubSpot asks which account you want to use, select the correct account.
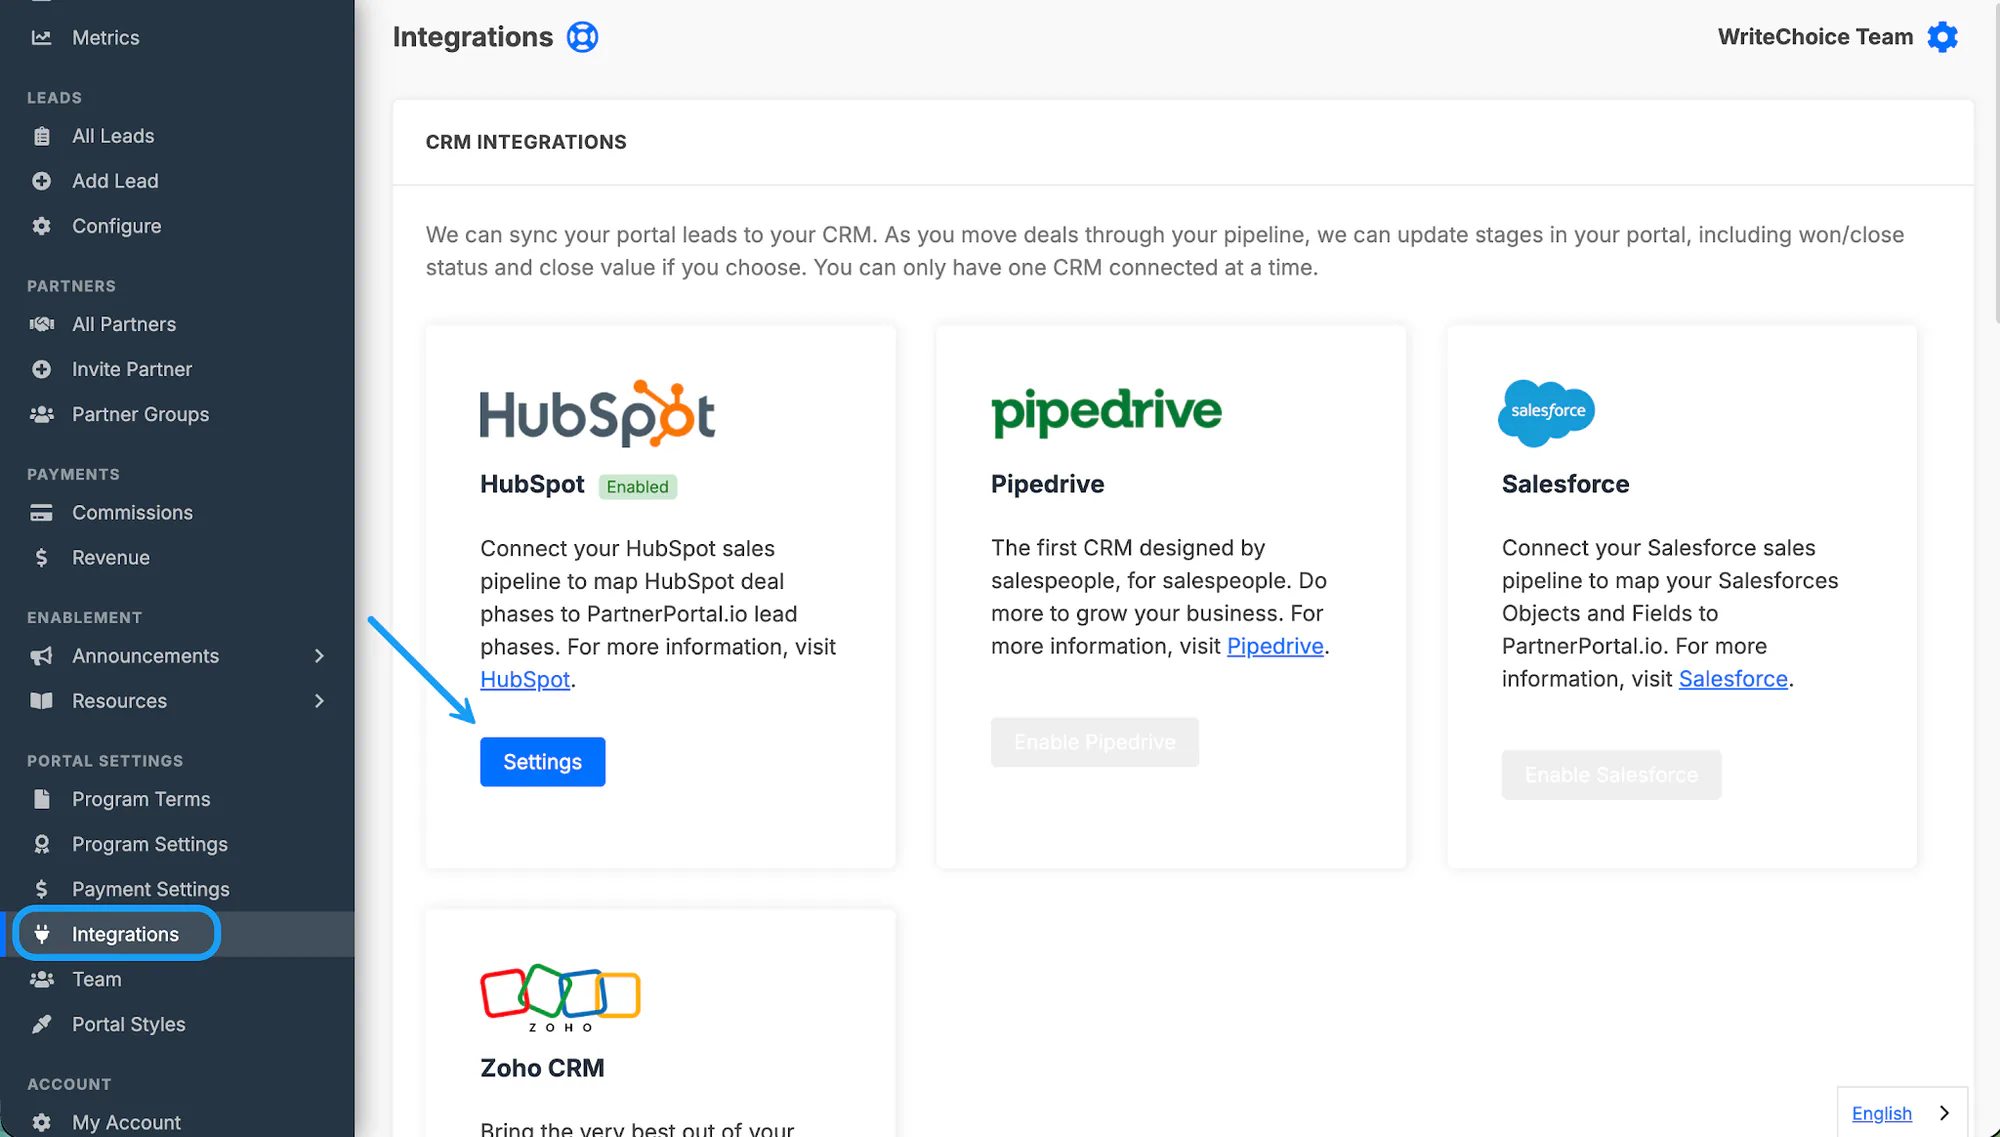
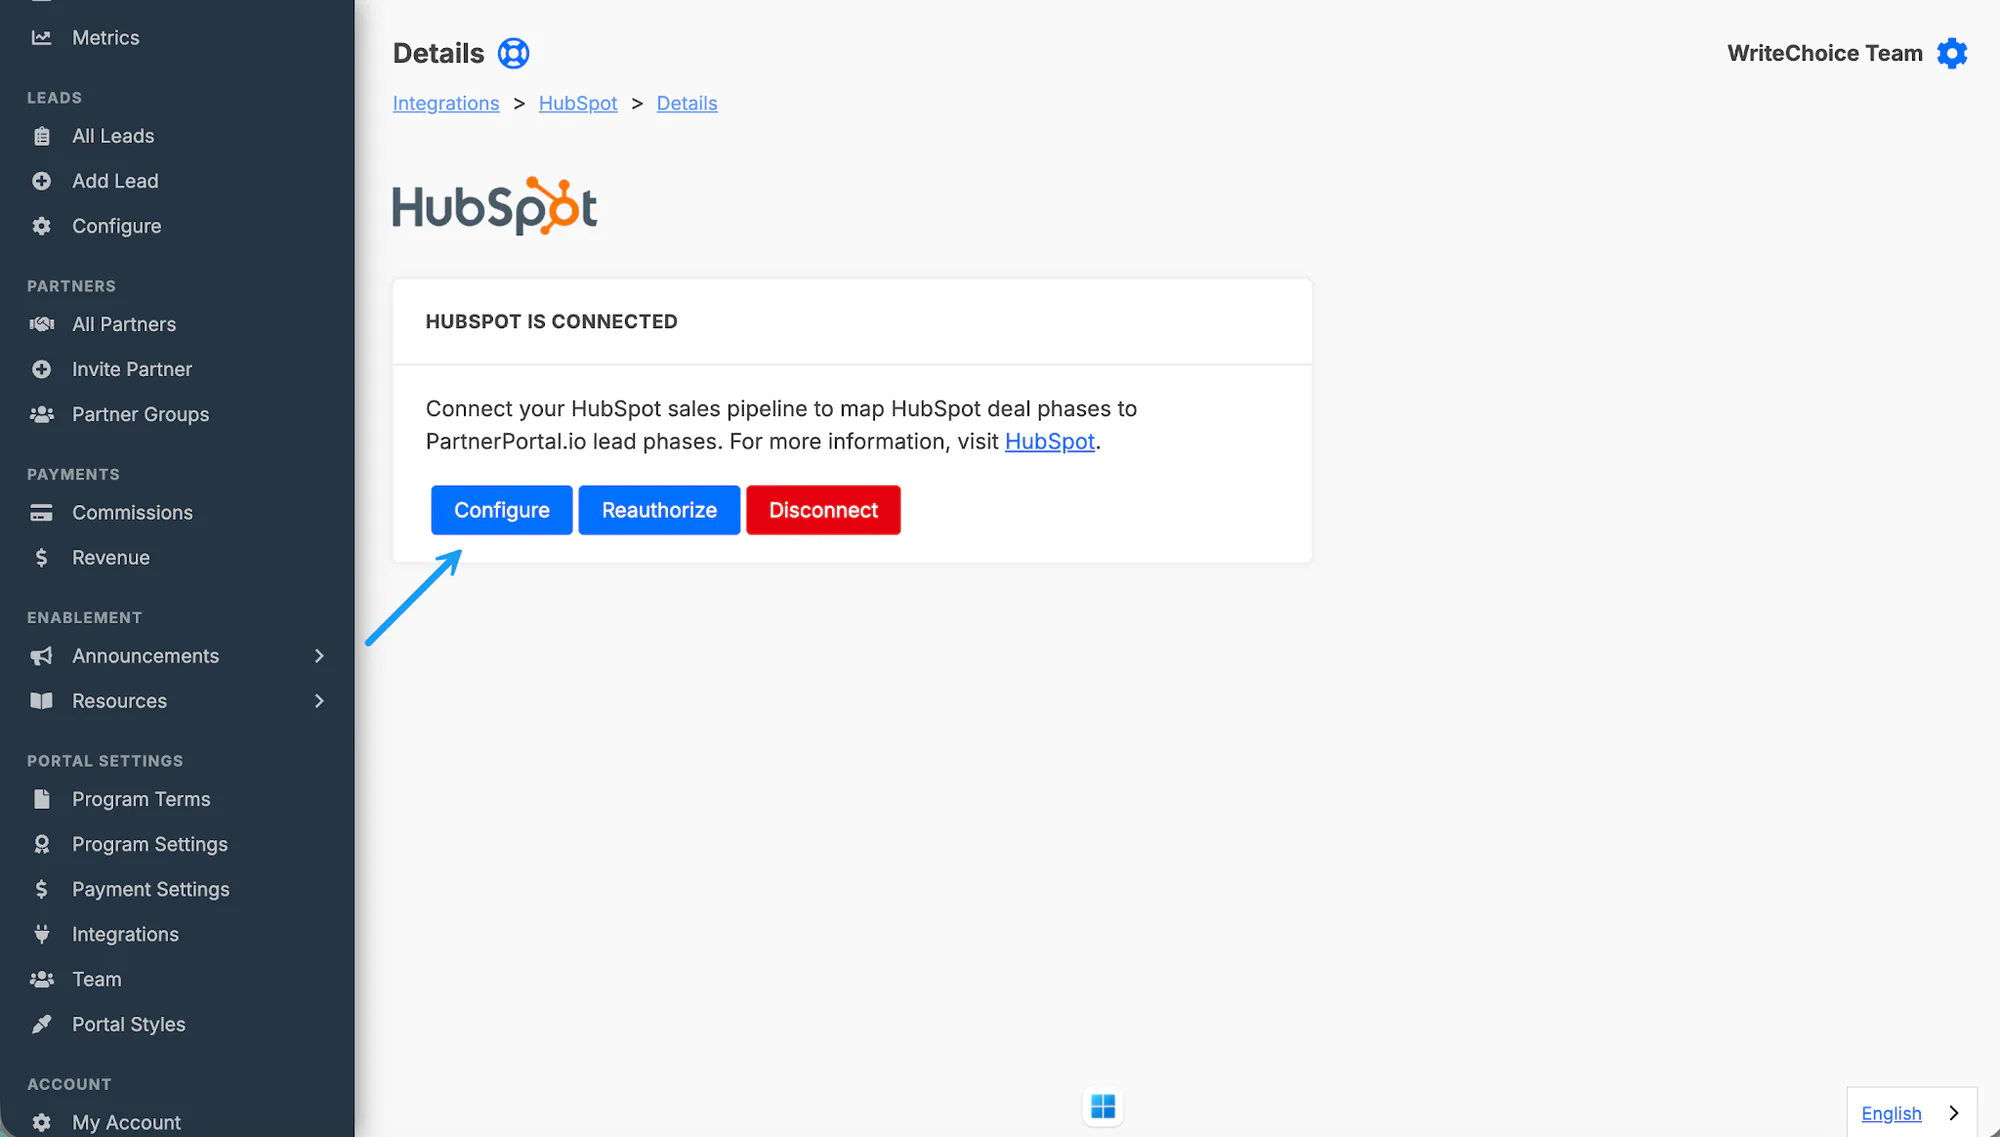
Return to PartnerPortal and click Configure to open the HubSpot settings.
Reauthorize HubSpot
Section titled “Reauthorize HubSpot”Use this if PartnerPortal asks you to reauthorize HubSpot or if HubSpot API changes invalidate the current connection.
Open Integrations and go to the HubSpot settings.
Click Reauthorize.
Confirm that you are reauthorizing the correct HubSpot account.
Finish the HubSpot Connect App flow again.
If reauthorization succeeds, PartnerPortal shows a success message. If it does not, contact [email protected].
Sync Direction
Section titled “Sync Direction”Portal to CRM
Section titled “Portal to CRM”When a lead is approved in PartnerPortal, the integration creates the mapped HubSpot records and sends the portal data into those records based on your configuration.
CRM to Portal
Section titled “CRM to Portal”For each newly connected lead, PartnerPortal creates exactly three linked HubSpot records: the Deal, the associated Contact, and the associated Company. After those records are linked, HubSpot becomes the main source of truth for ongoing synced deal changes back into the portal.
By default, changes made in PartnerPortal do not push back into HubSpot. The exception is the Two-Way Sync setting in CRM Settings below, which can push Phase, Close Value, and Close Date changes from PartnerPortal back into HubSpot.
Mapping
Section titled “Mapping”Every new synced HubSpot lead creates those same three records: a Deal, its related Contact, and its related Company. The mapping screen controls how those records are populated, which pipeline and stages they use, and what extra data is written onto the HubSpot deal.
Map the default lead fields
Section titled “Map the default lead fields”Once the connection is open, PartnerPortal maps the standard lead fields automatically. You only need extra mapping work when you want to send additional custom lead fields, partner data, or lead comments.
Map the HubSpot pipeline
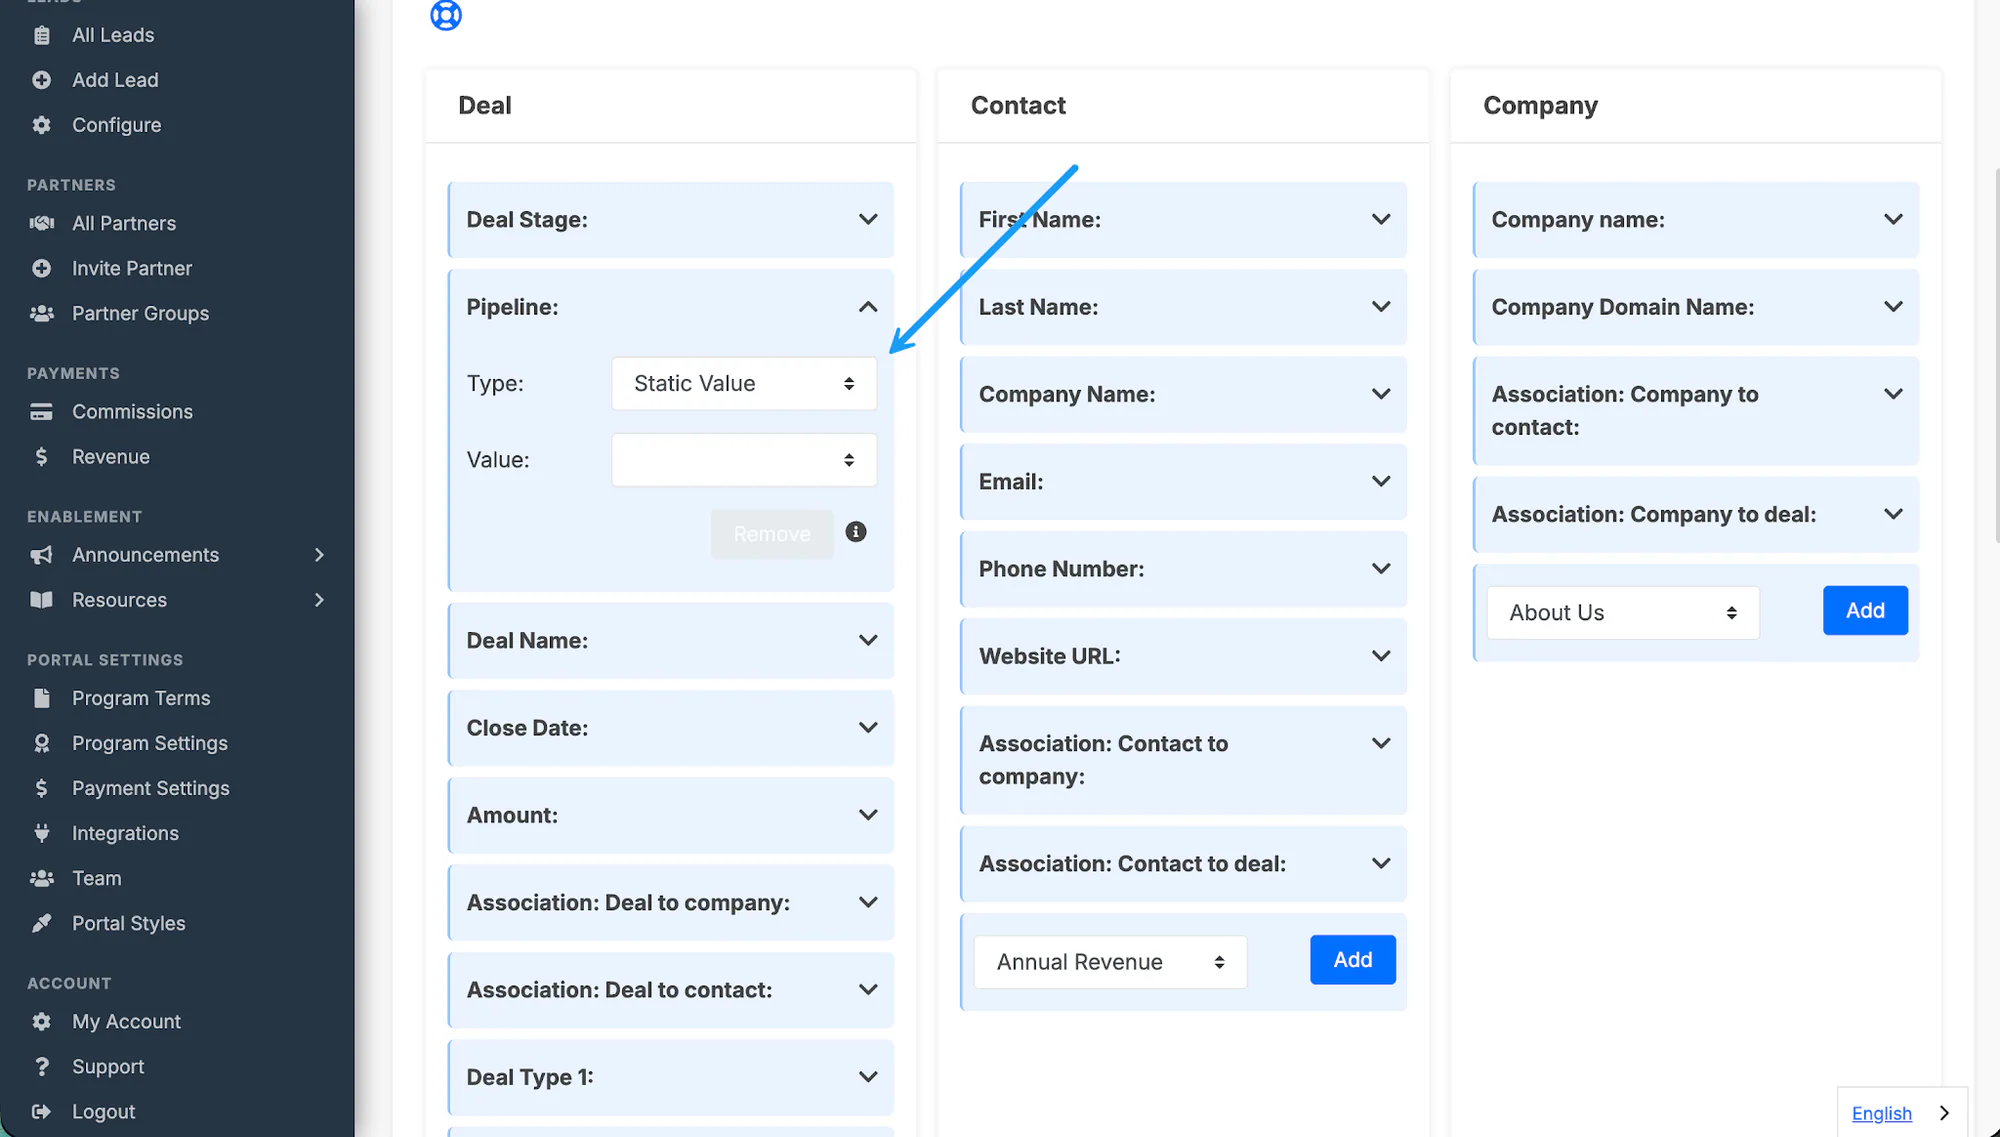
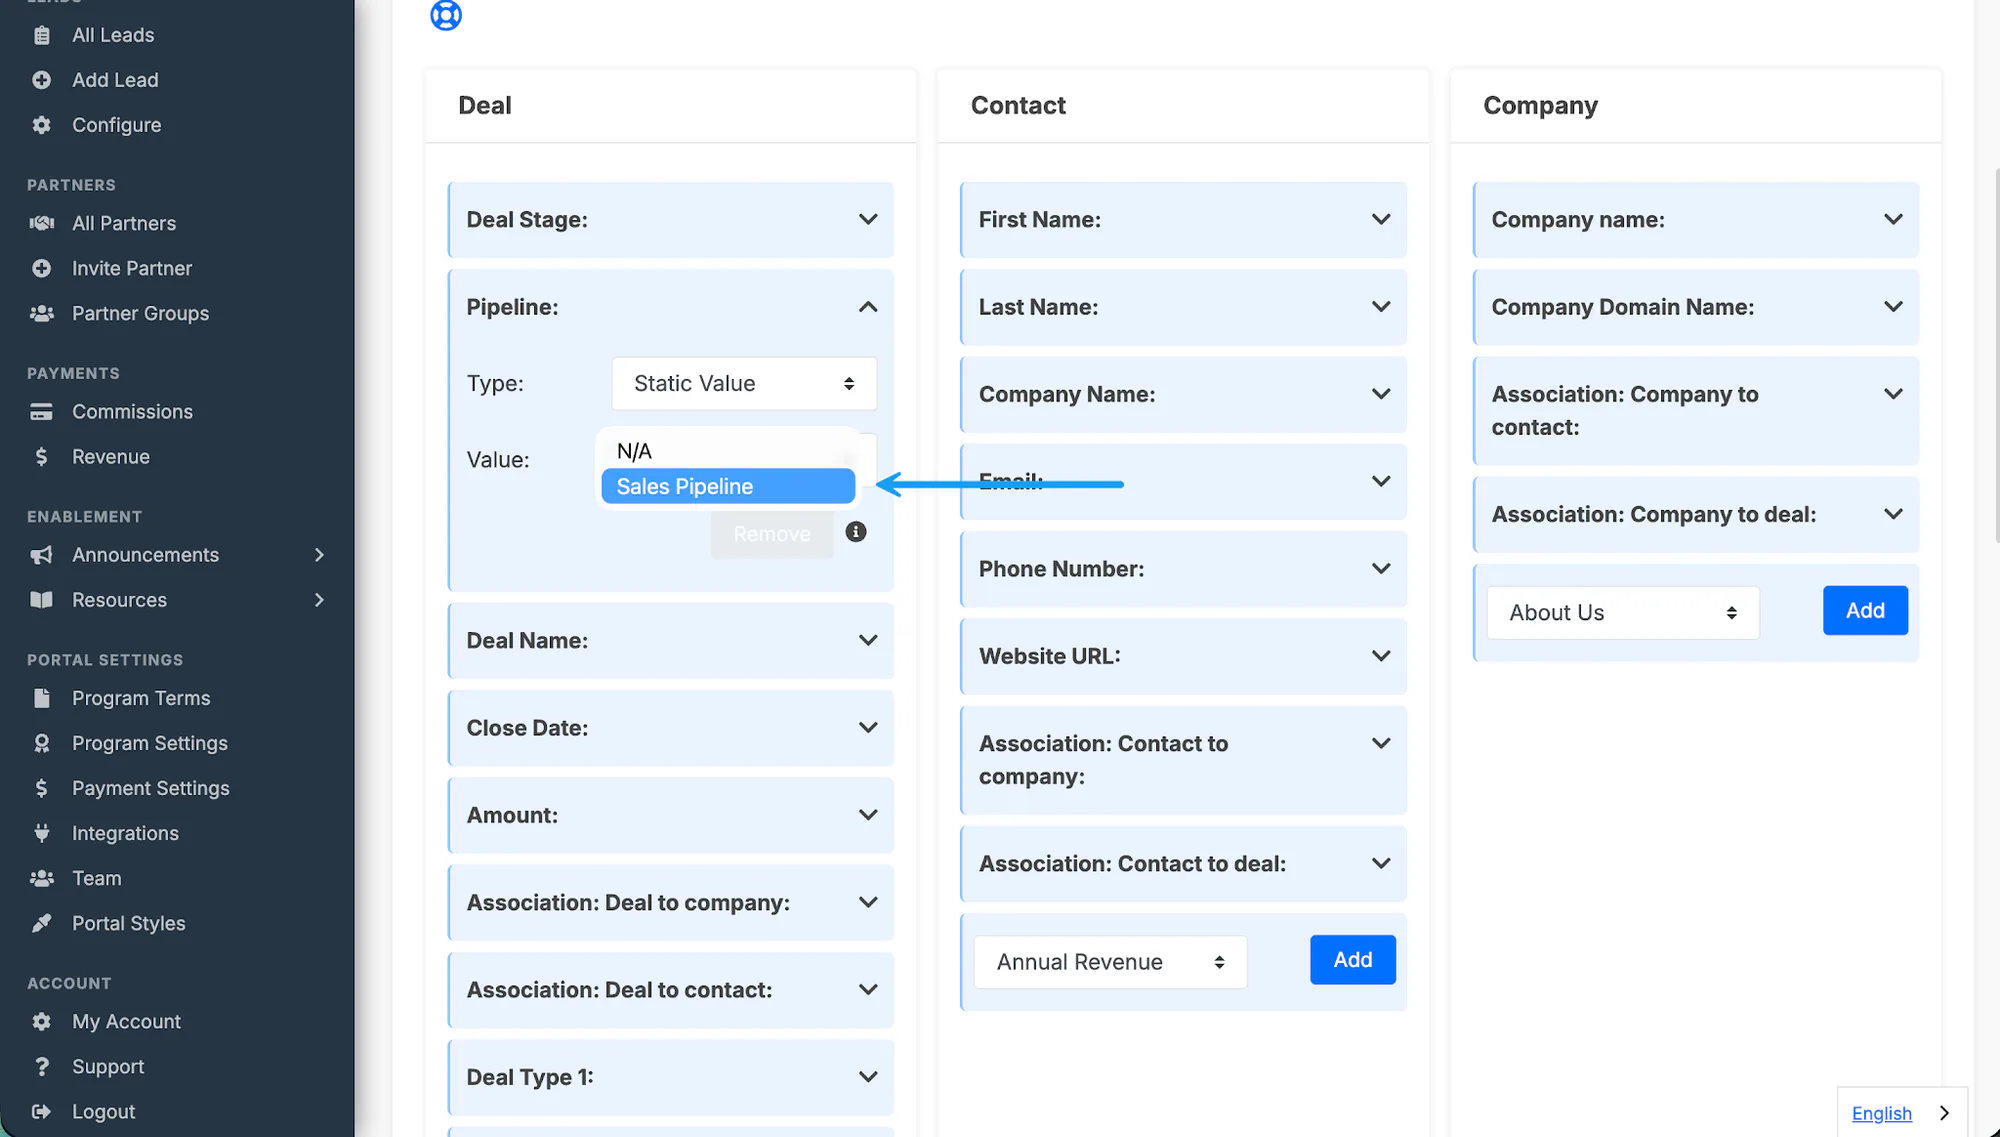
Section titled “Map the HubSpot pipeline”Use the Pipeline object to choose which HubSpot pipeline should receive portal deals by default.
Find the Pipeline object in the HubSpot configuration screen.
Set Type to Static Value.
Choose the HubSpot pipeline you want from the dropdown.
Map portal phases to HubSpot deal stages
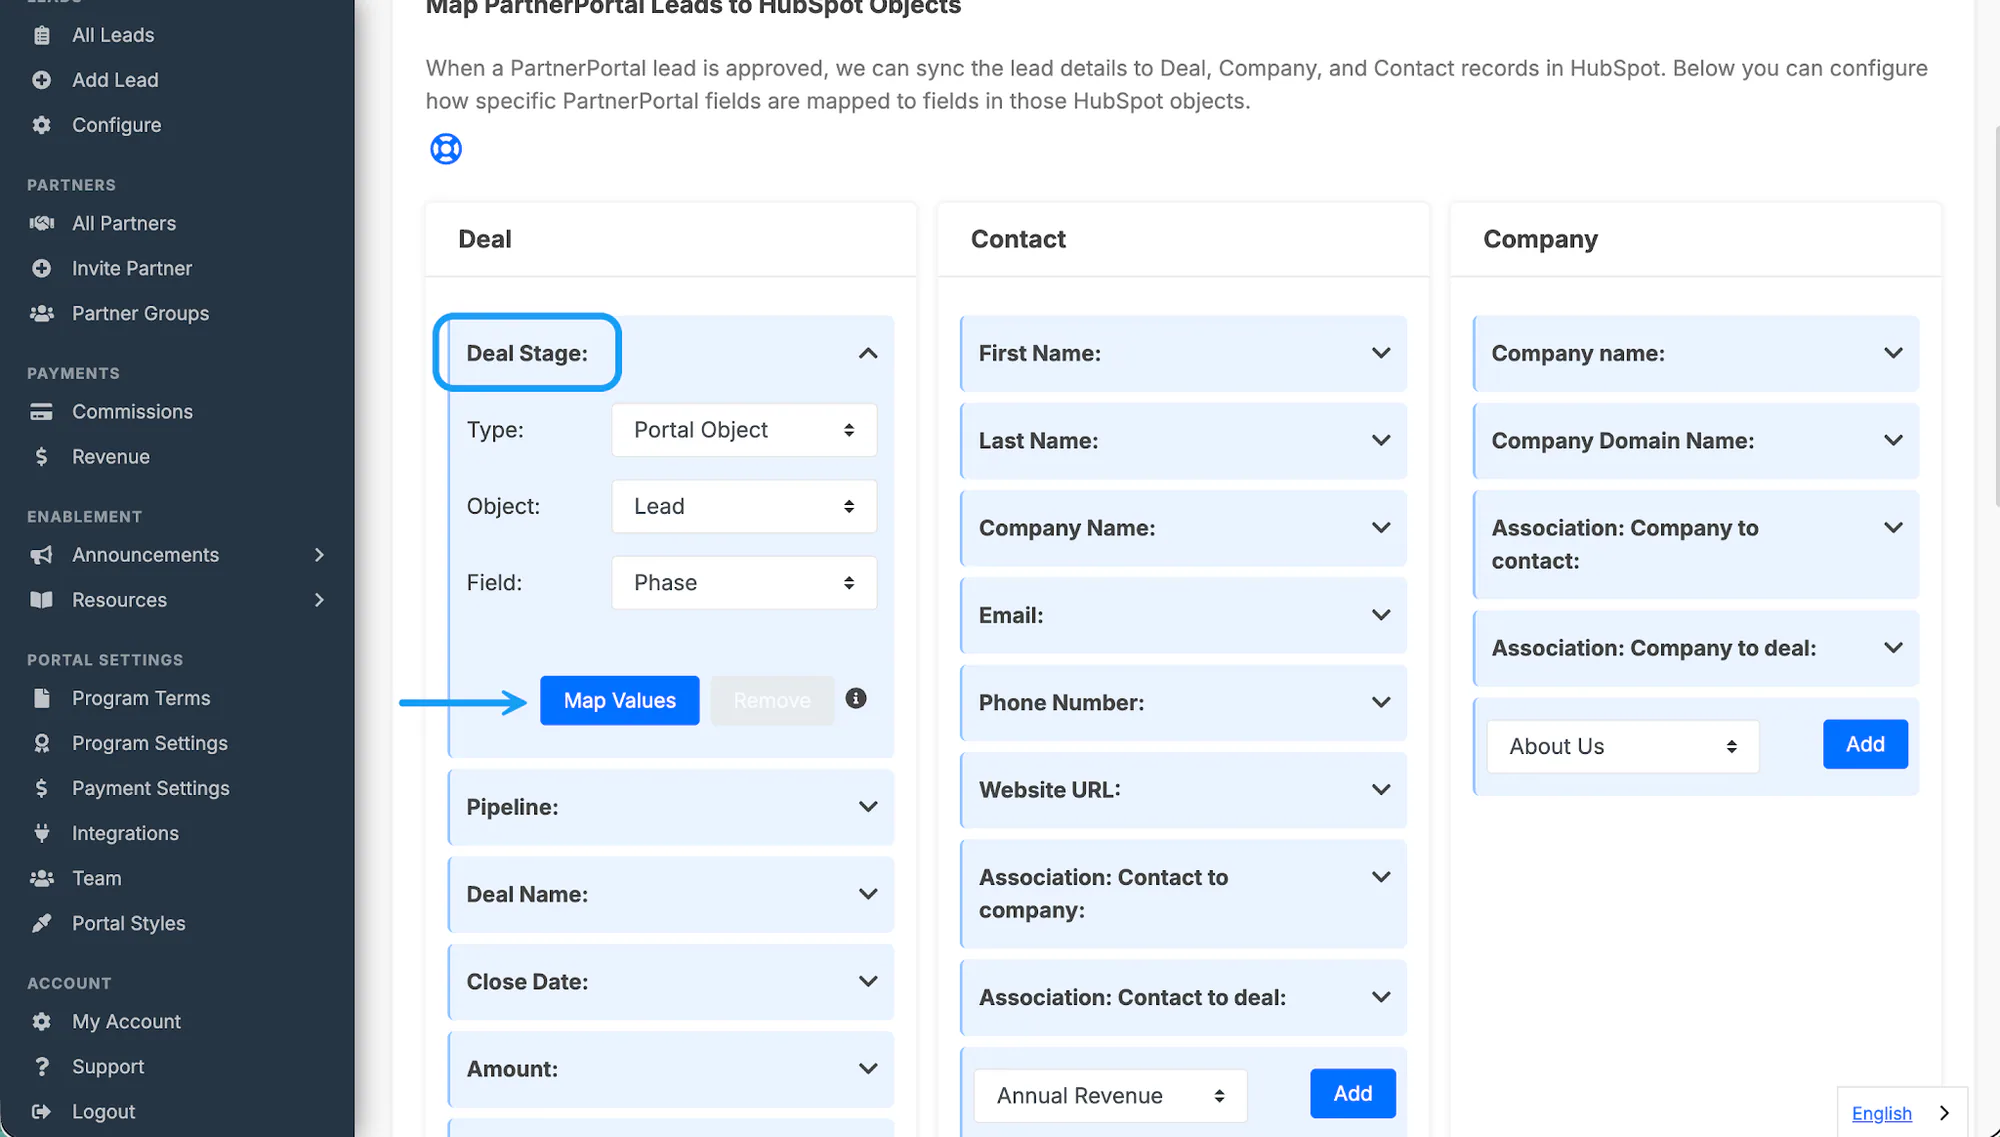
Section titled “Map portal phases to HubSpot deal stages”The Deal Stage mapping controls what partners can see as a deal moves through your sales process.
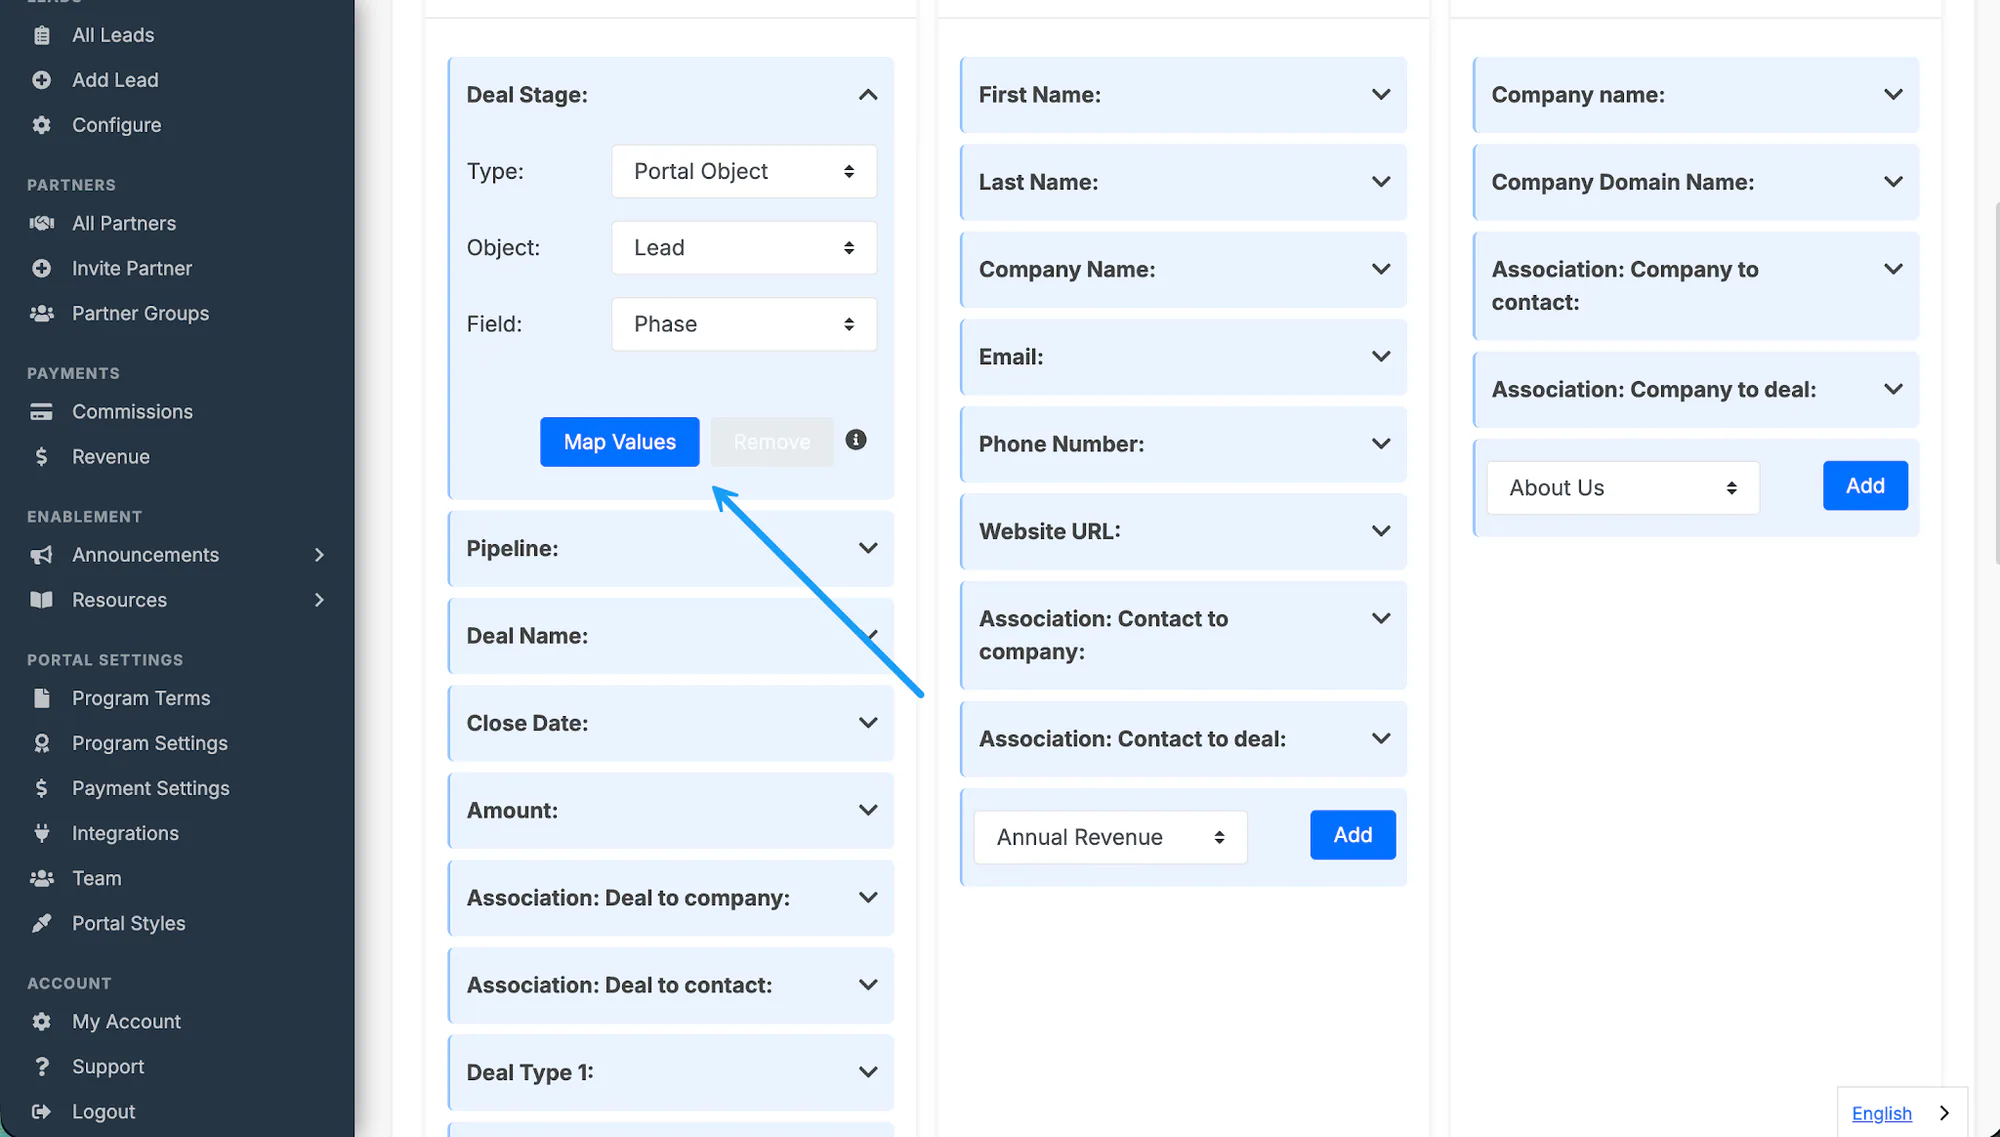
Open the Deal Stage object.
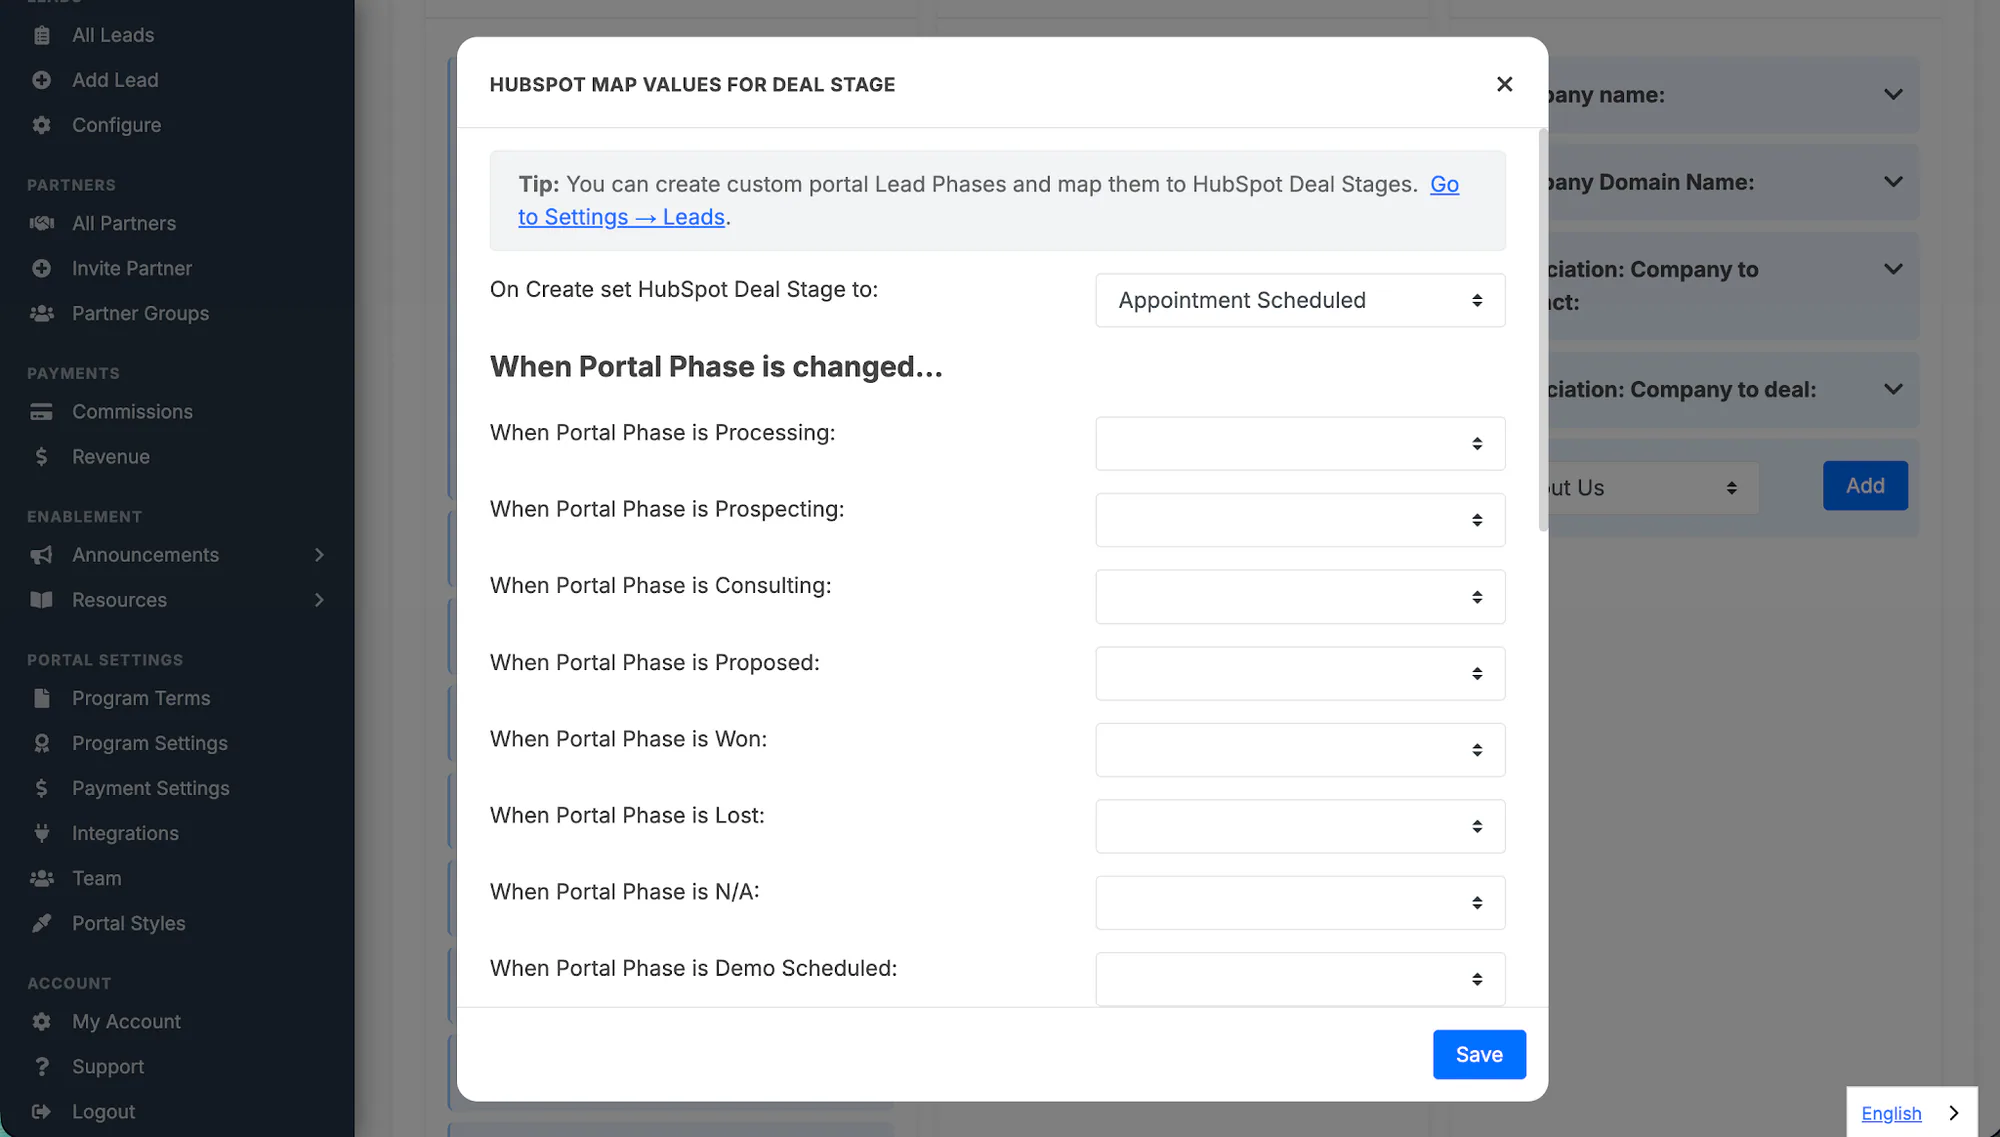
Click Map Values.
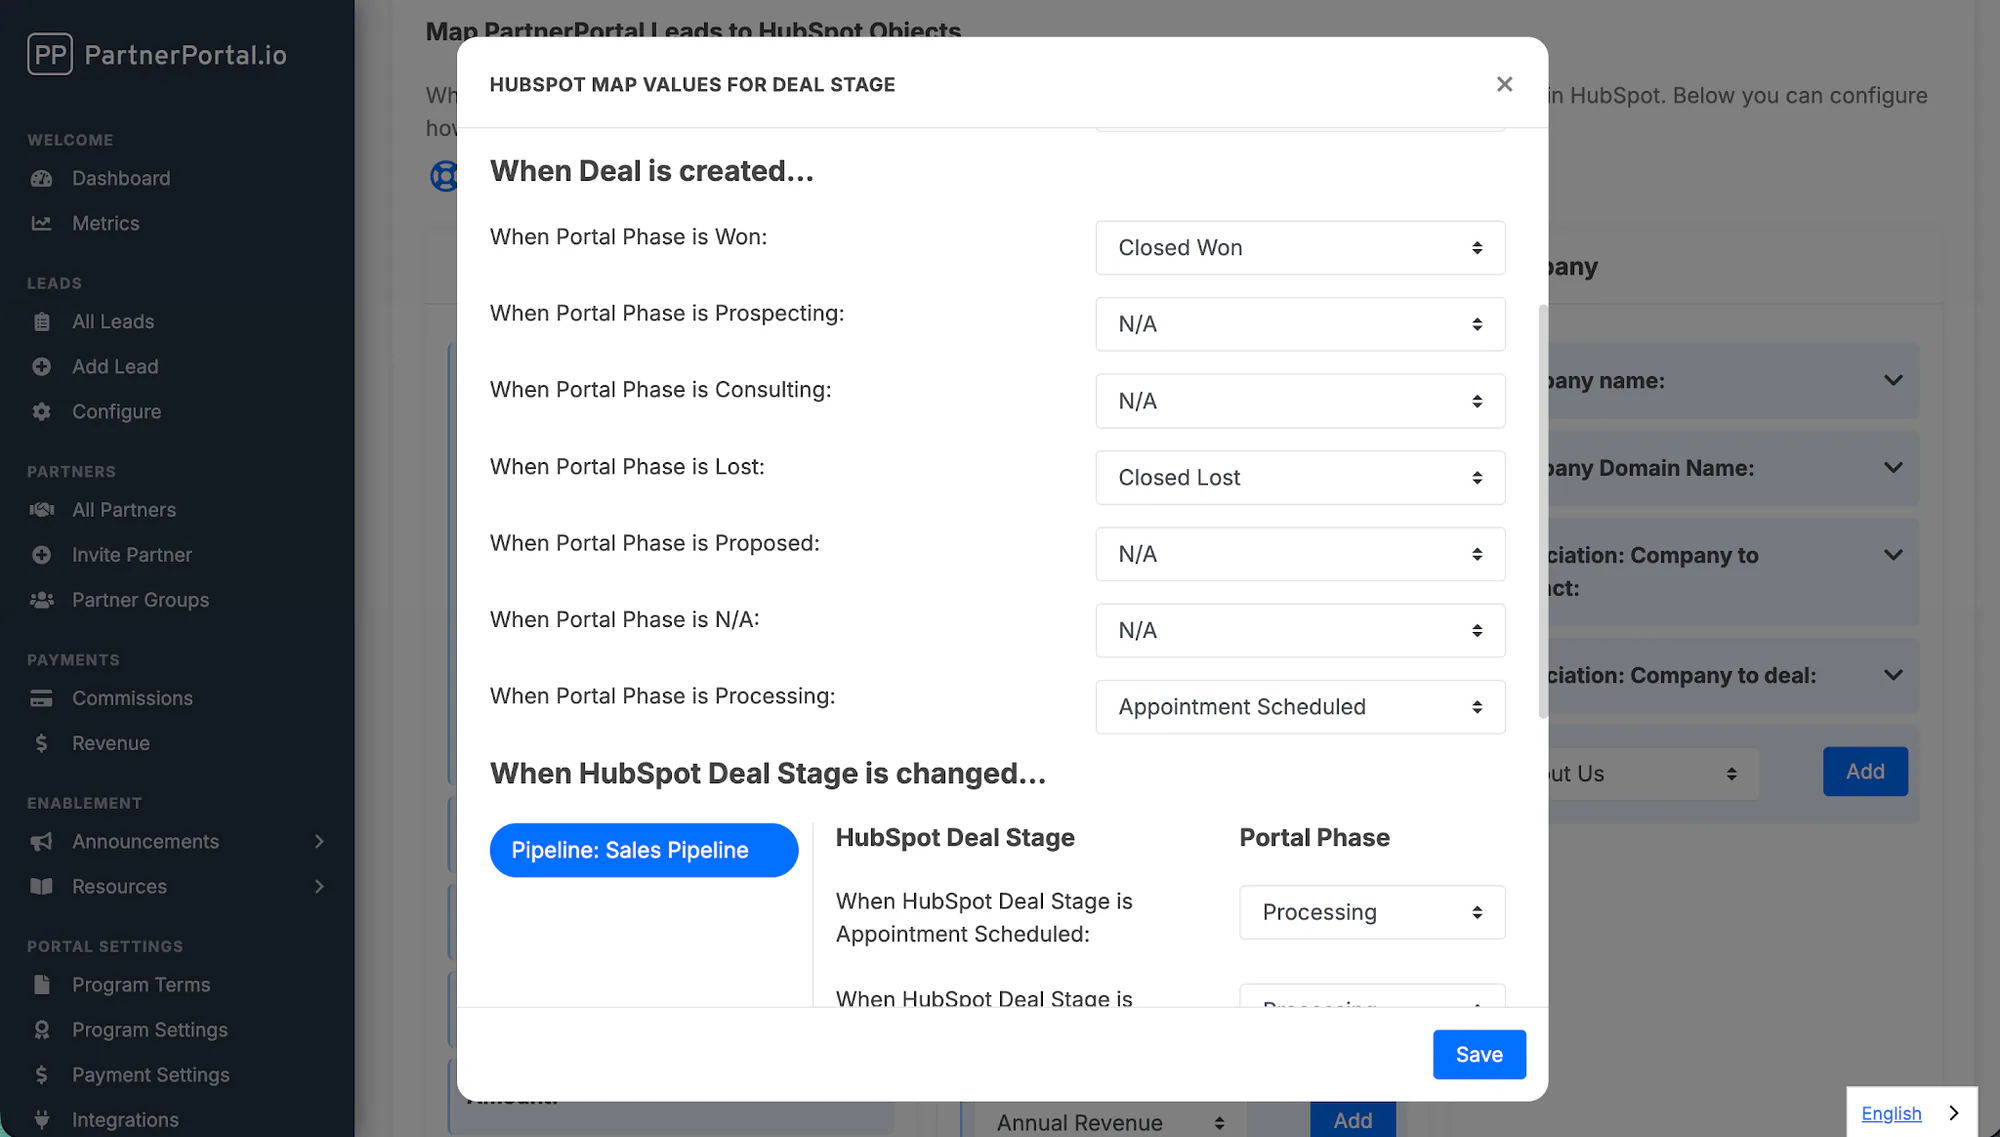
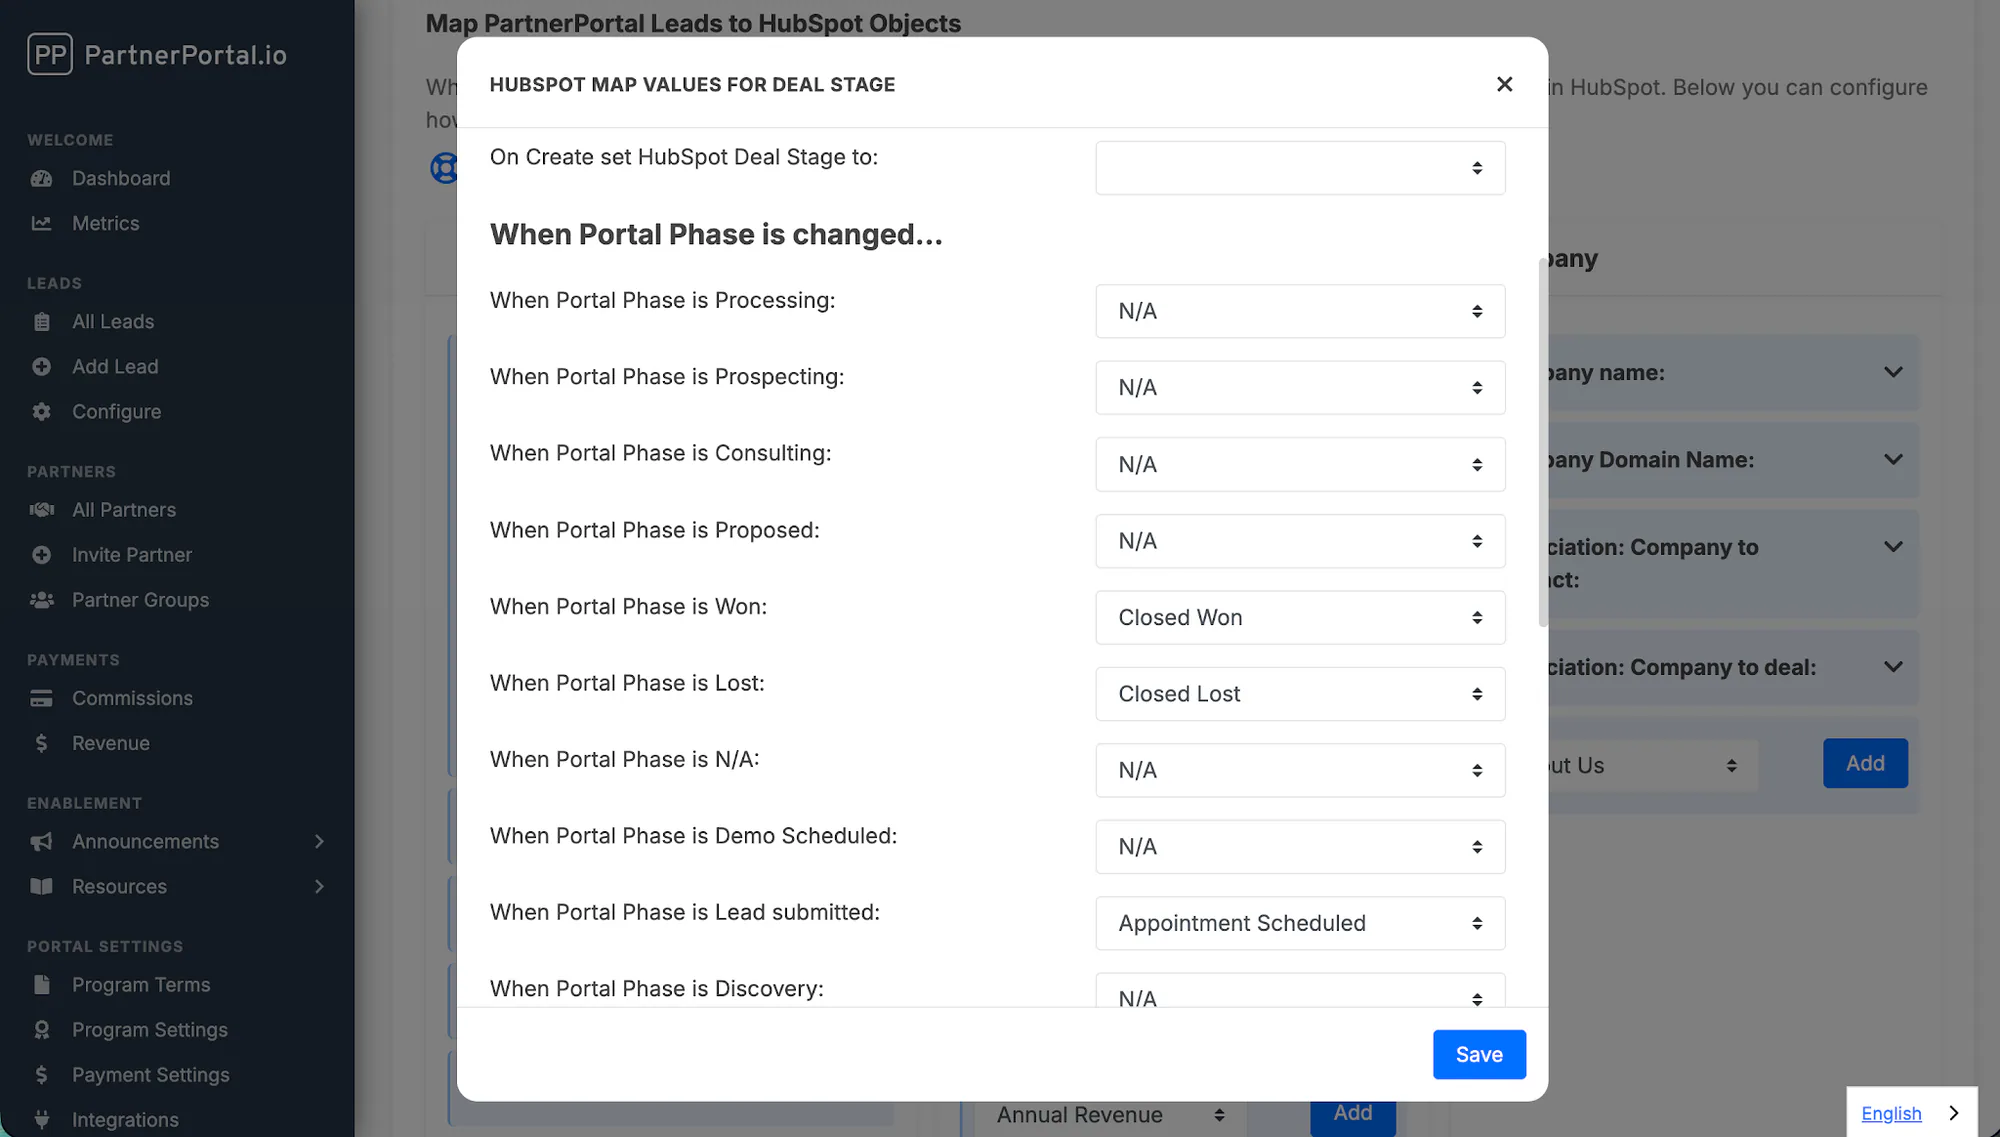
Map each PartnerPortal phase to the HubSpot deal stage that should represent it.
Map the starting HubSpot deal stage
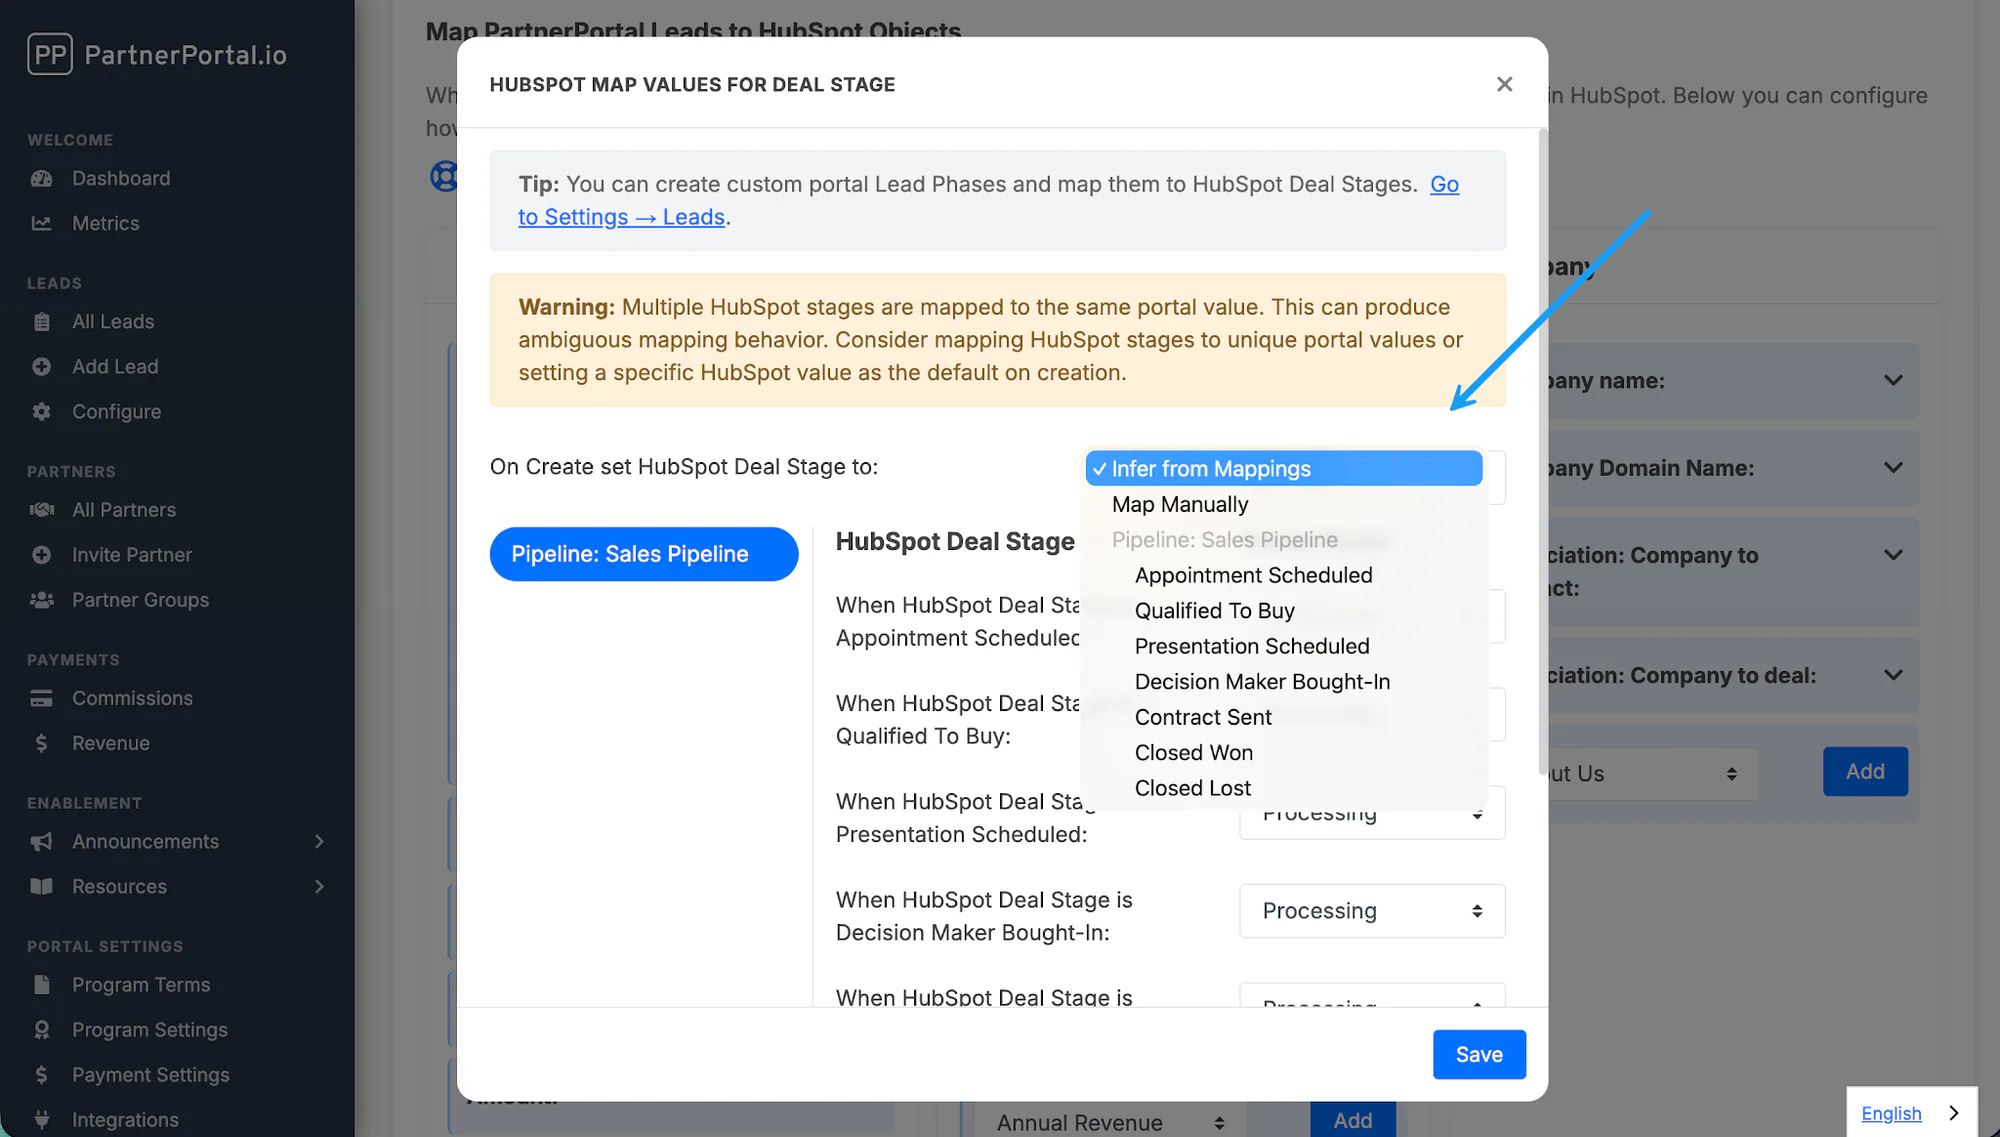
Section titled “Map the starting HubSpot deal stage”When a deal is first created in HubSpot, PartnerPortal can decide its starting stage in one of two ways:
| Option | How it works | Best for |
|---|---|---|
| Infer from mapping | PartnerPortal reads the phase-to-stage mapping and chooses the starting HubSpot stage automatically | Simple one-to-one mappings |
| Map manually | You pick the exact HubSpot stage the new deal should start in | More controlled setups or flows where the starting stage should not be derived automatically |
Save the HubSpot mapping
Section titled “Save the HubSpot mapping”Save the configuration when you are done. Once saved, new portal leads can start creating and updating deals in the selected HubSpot pipeline.
Map custom fields
Section titled “Map custom fields”Use this when you want lead-form fields beyond the standard defaults to flow into HubSpot.
Prepare the field in both systems
Section titled “Prepare the field in both systems”Add the custom field to your PartnerPortal lead registration form and make sure it is active.
Create the corresponding HubSpot deal property.
Open Integrations → HubSpot → Configure and scroll to the custom-field area in the Deal object.
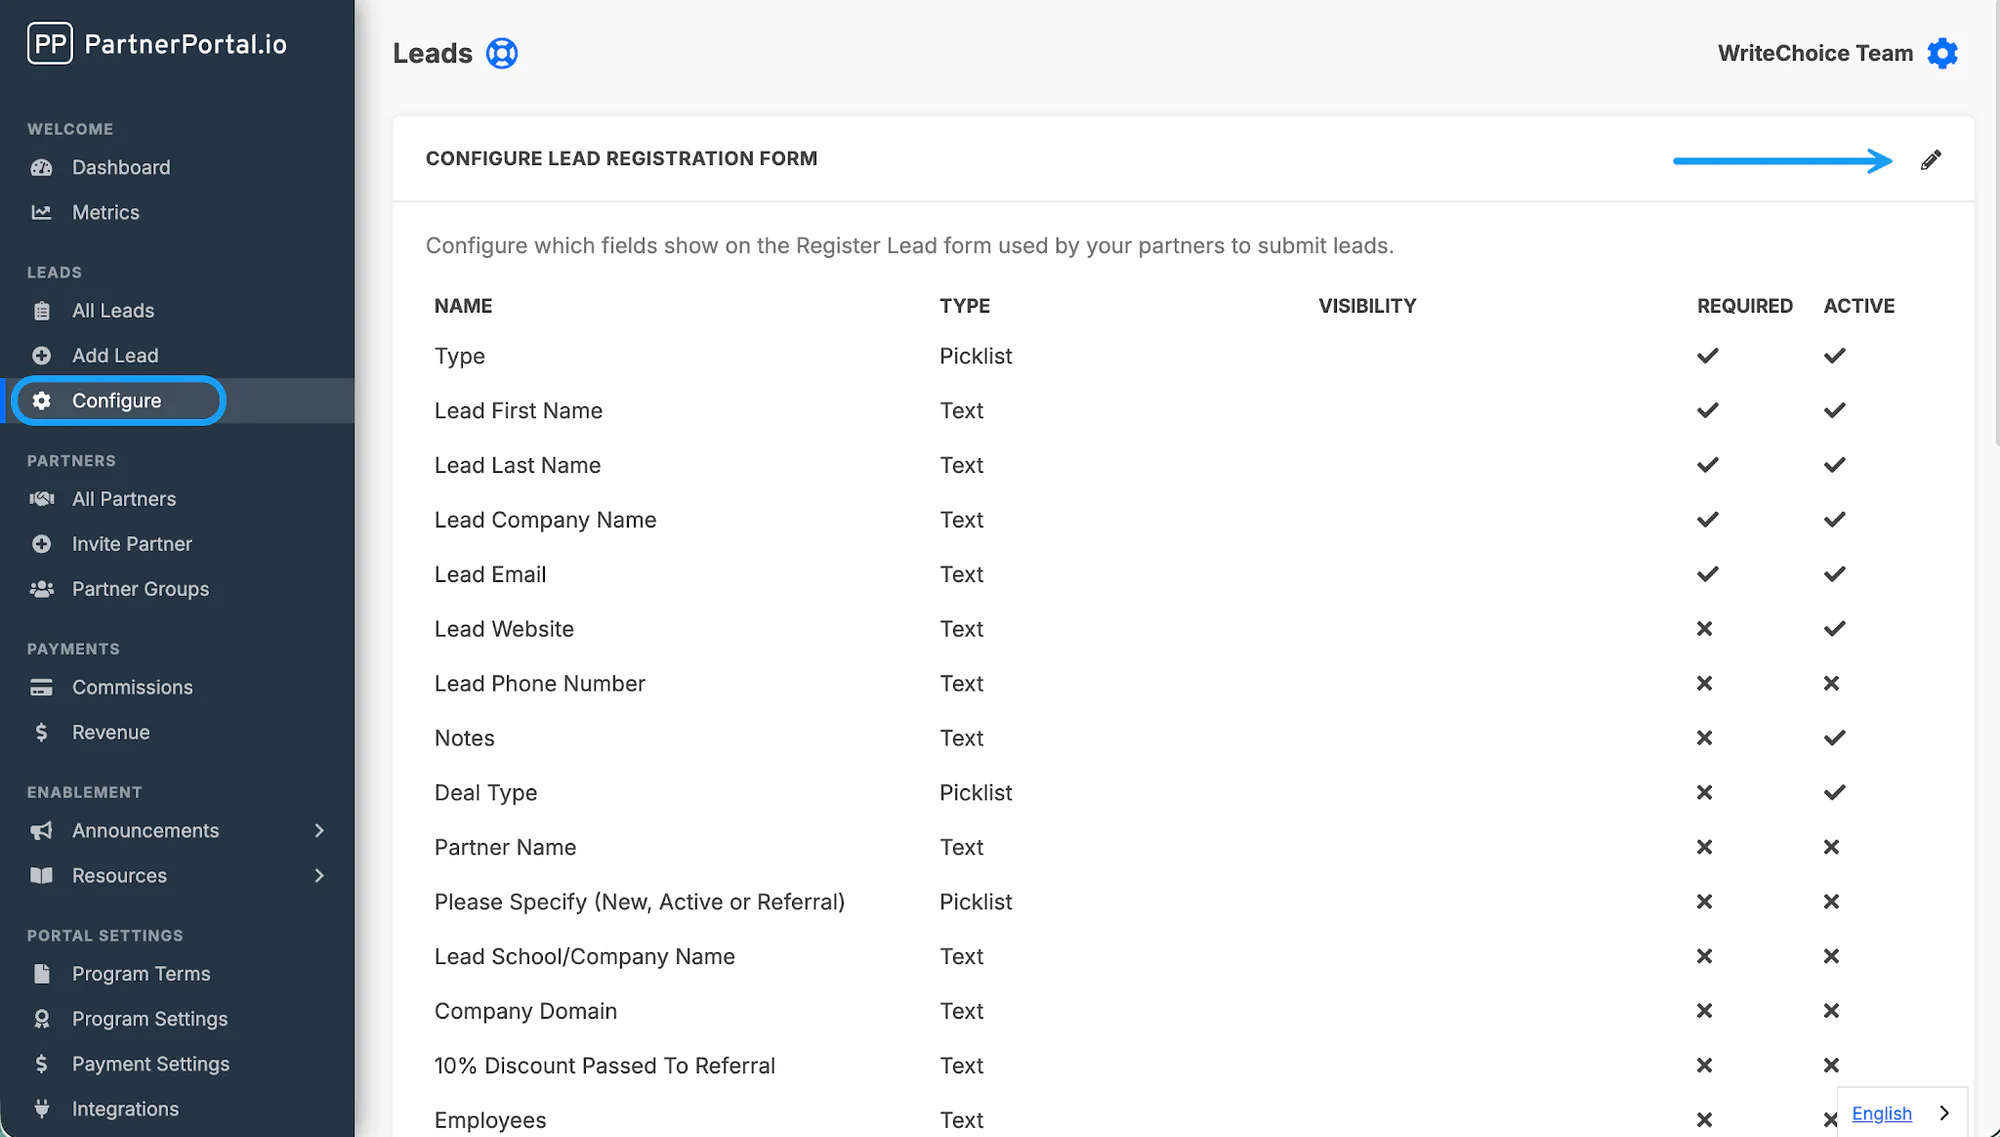
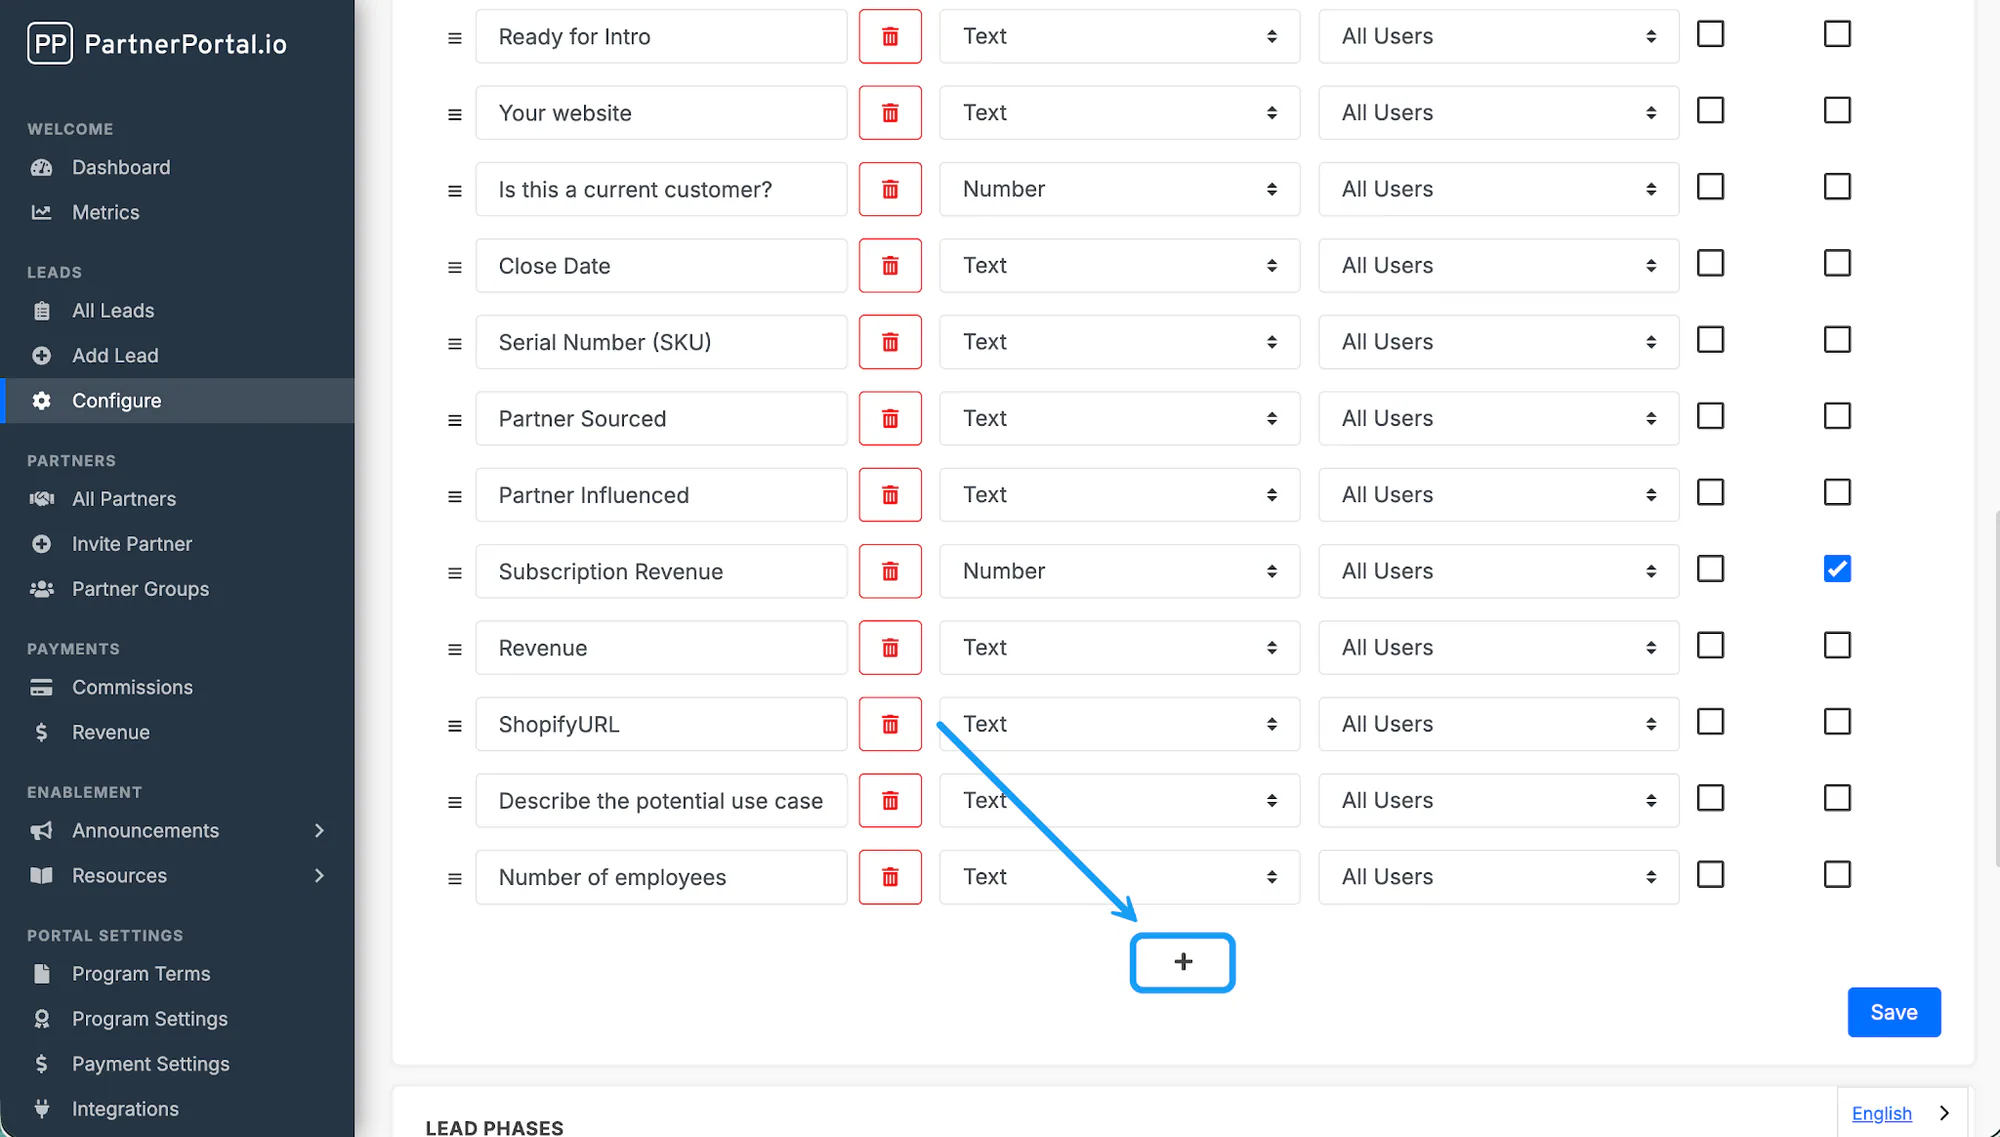
Map a single-line text field
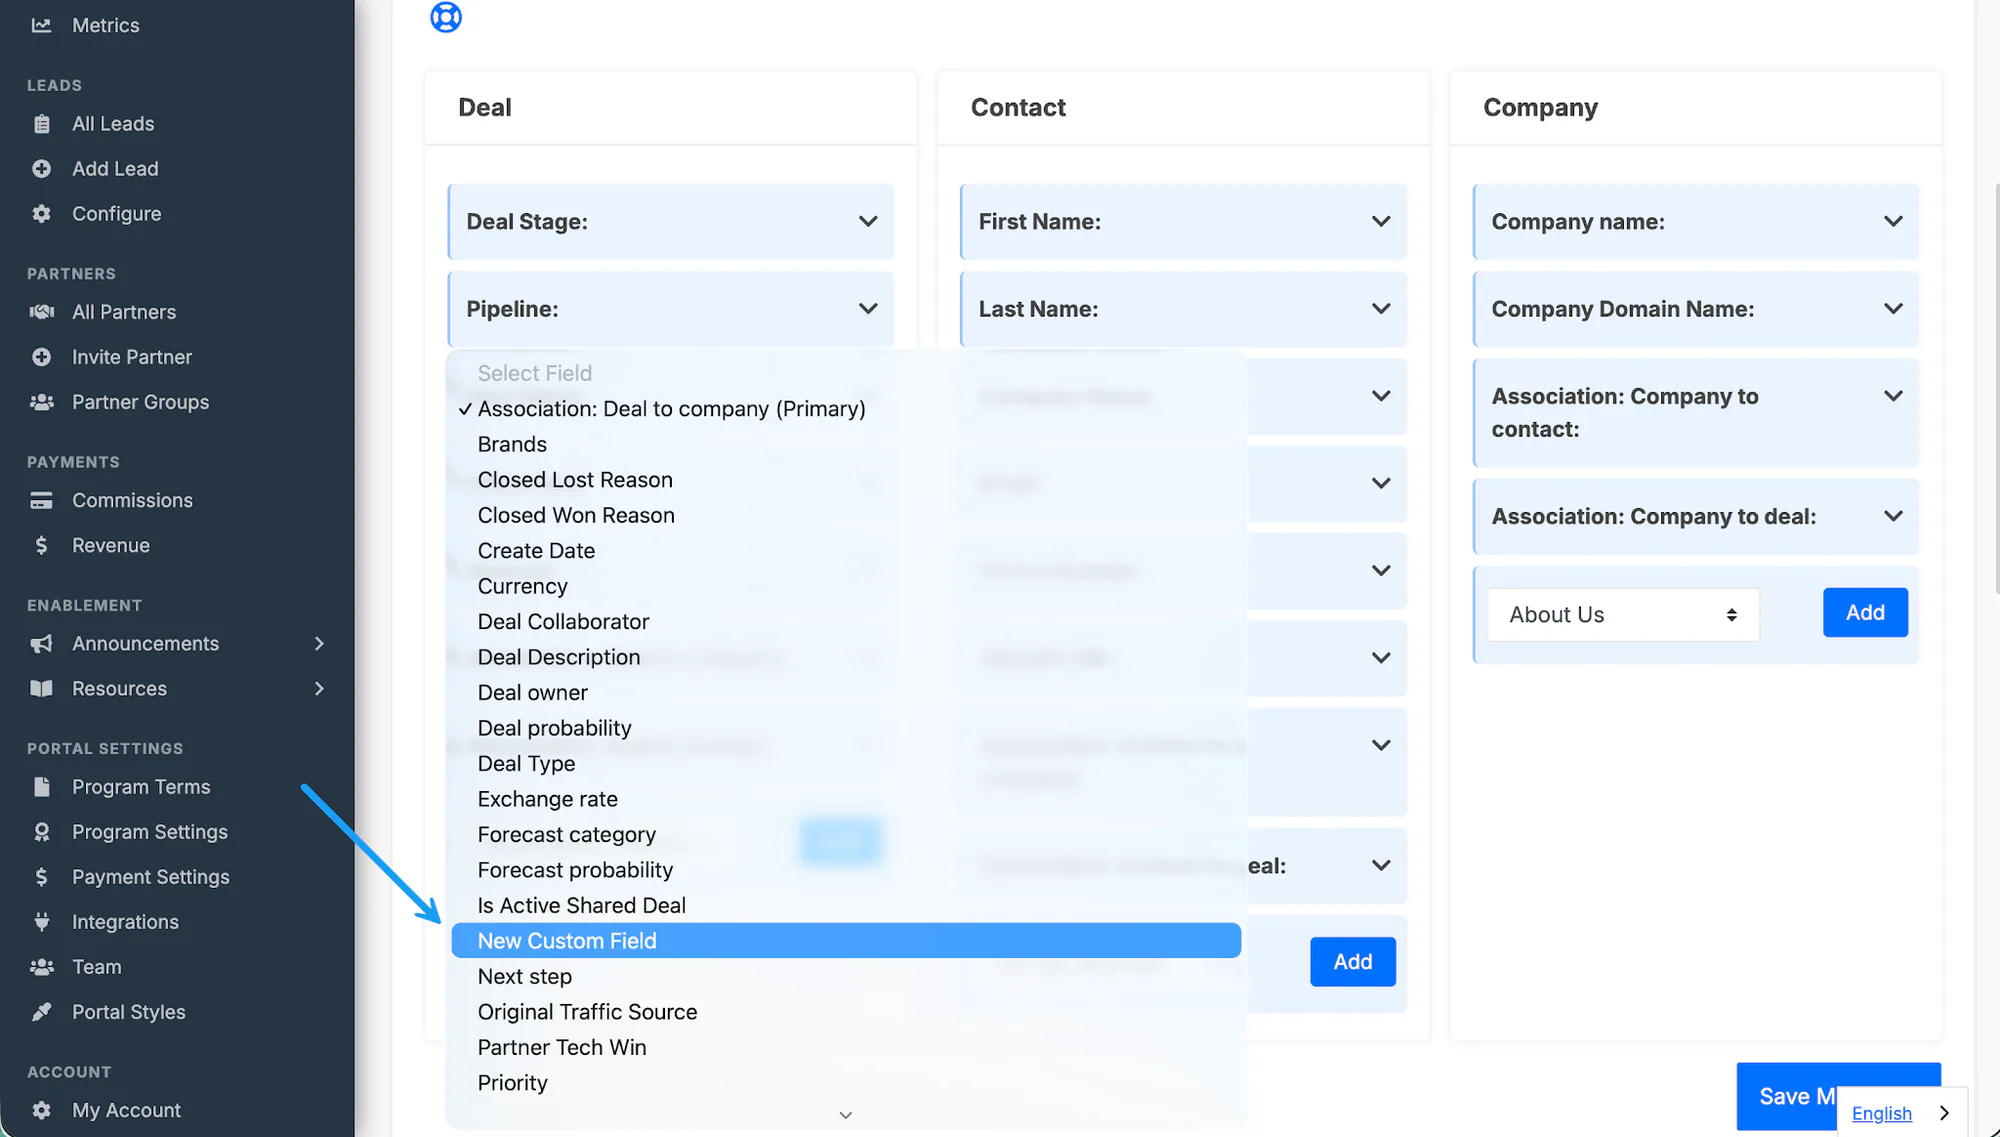
Section titled “Map a single-line text field”In the Deal object, select the HubSpot property from the dropdown and click Add.
Open the field and set:
- Type to Portal object
- Object to Lead
- Field to the PartnerPortal lead field you want to send
Save the mapping.
Map a picklist field
Section titled “Map a picklist field”Add the HubSpot picklist property in the same way.
Set:
- Type to Portal object
- Object to Lead
- Field to the matching PartnerPortal dropdown field
Click Map Values.
Match each PartnerPortal option to the correct HubSpot dropdown value.
Save the value mapping, then save the main configuration.
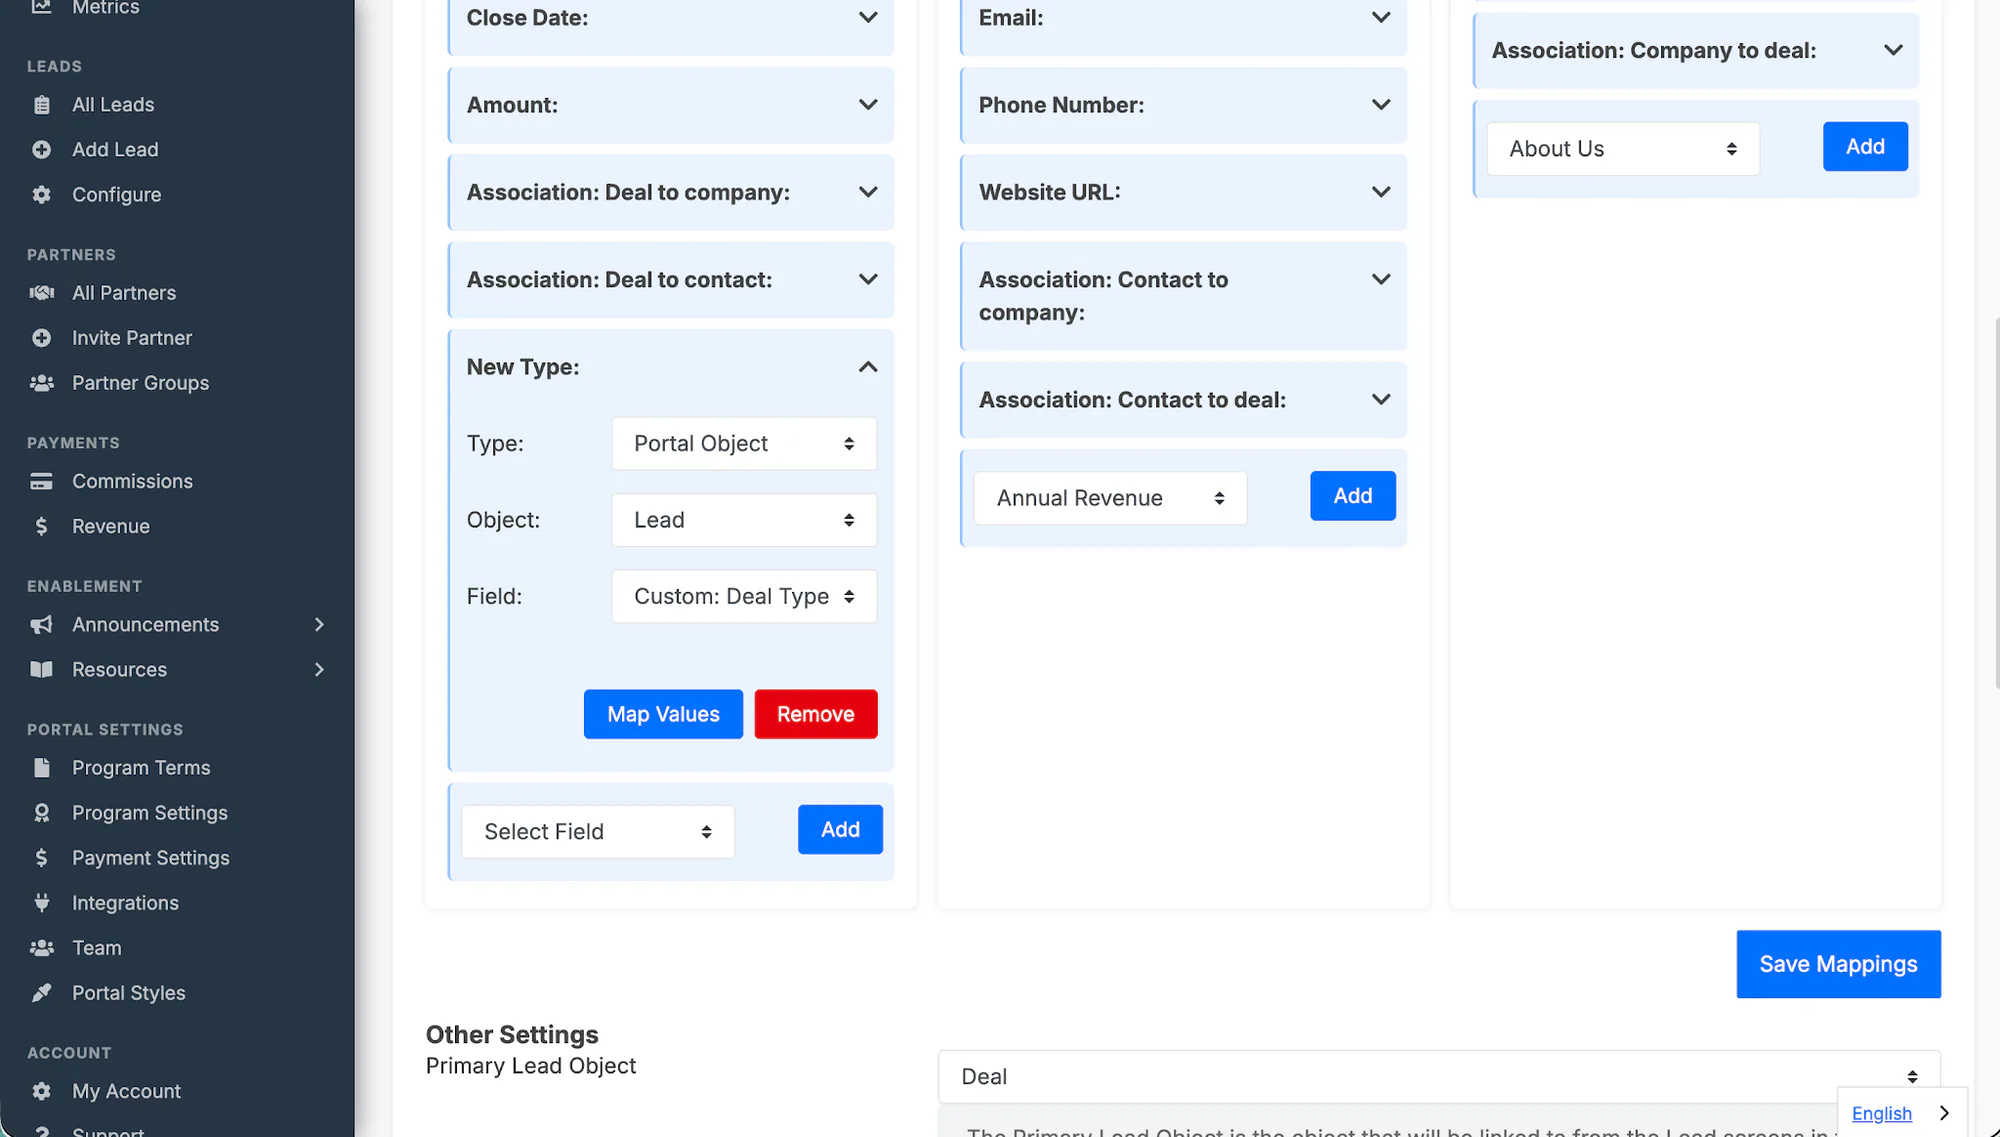
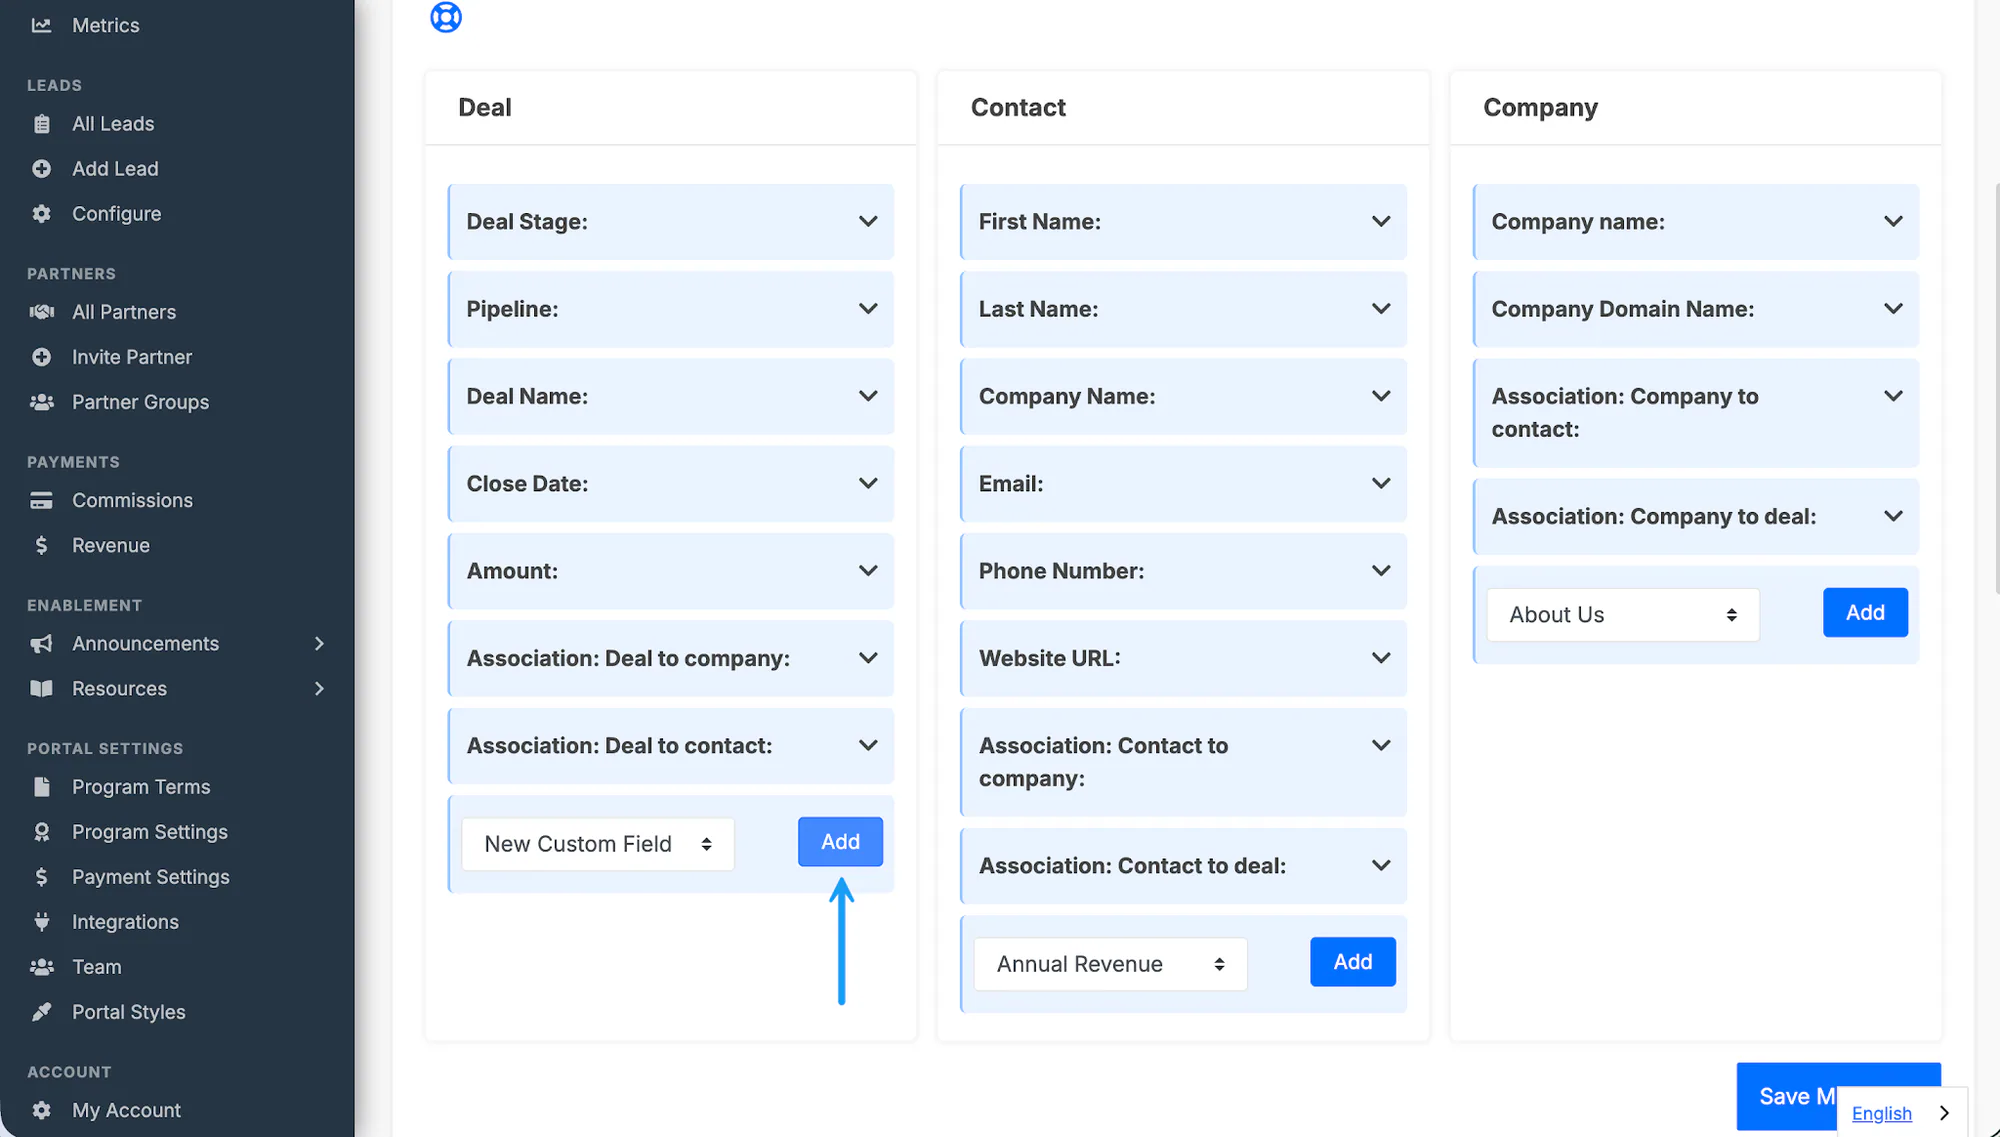
If the field does not appear in the mapping dropdown, first confirm it exists both as a HubSpot deal property and as an active field on the PartnerPortal lead registration form.
Map partner data
Section titled “Map partner data”Use this when you want the HubSpot deal to include data about the submitting partner company or the submitting partner user.
In Integrations → HubSpot → Configure, scroll to the custom-field add-on area at the bottom of the Deal object.
Select the HubSpot property that should receive the partner data and click Add.
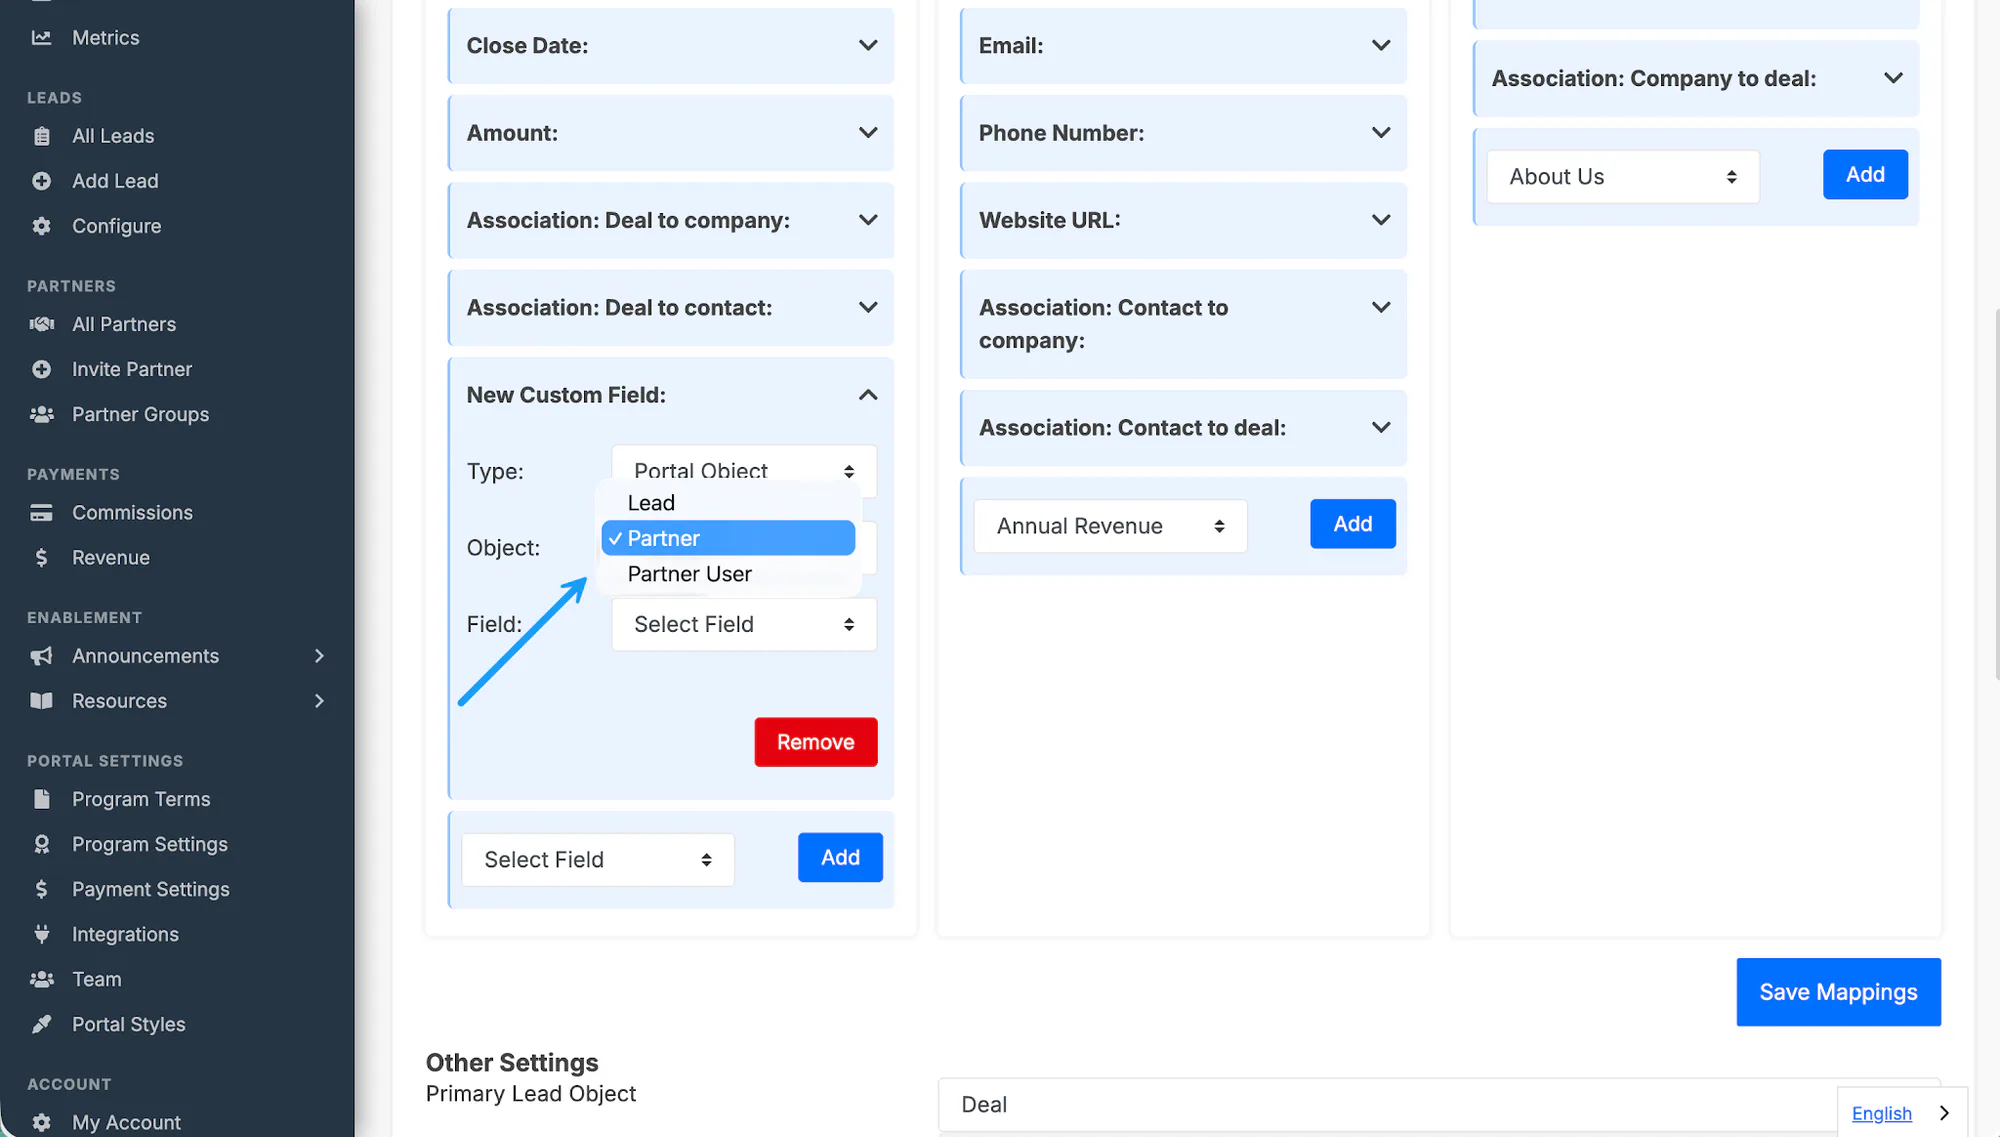
Open the new mapping and set Type to Portal object.
Choose the source object:
- Partner for partner-company details
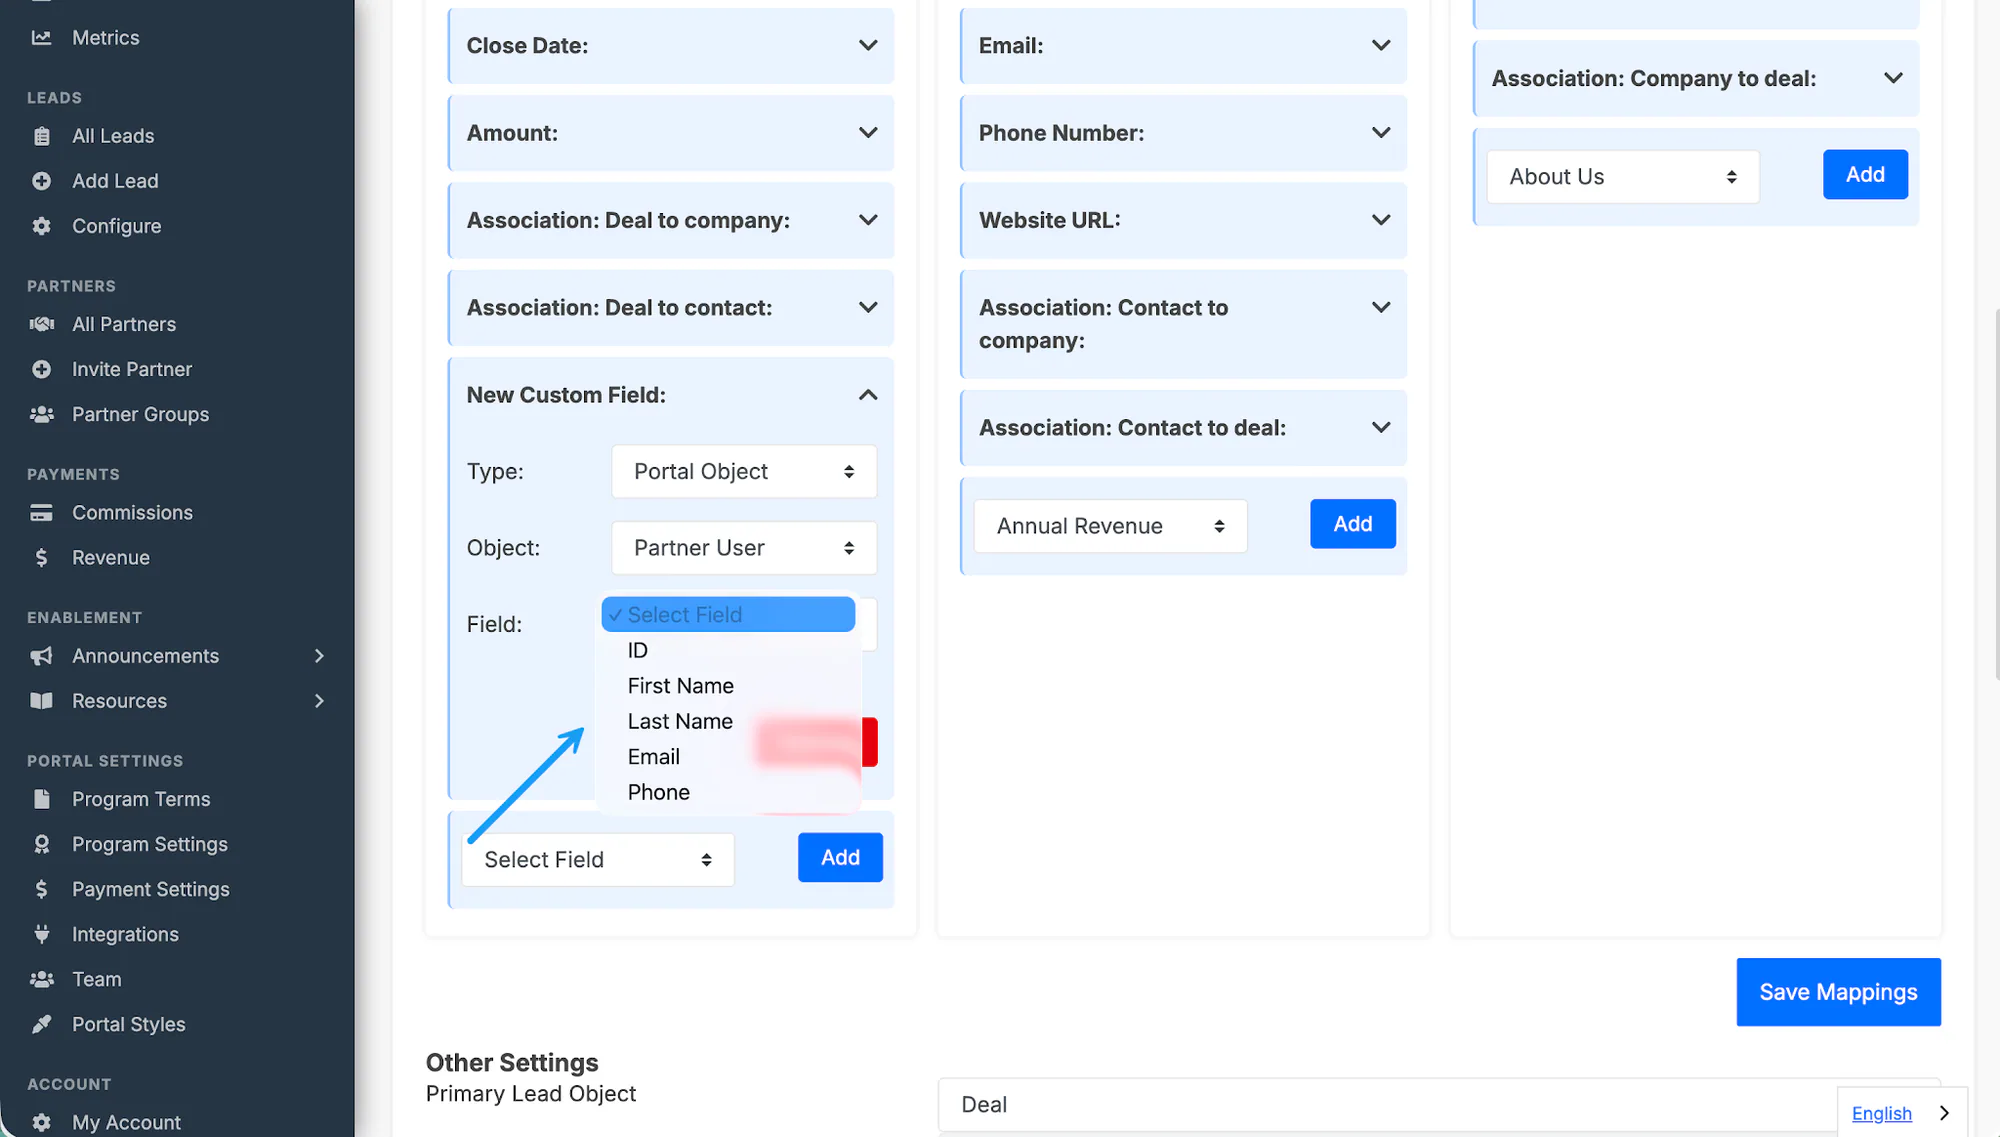
- Partner User for the submitting user’s Full Name, first name, last name, email, phone, or ID
- Lead for lead details that are not mapped by default, such as Submission Date (when the partner registered the lead) and Notes (what the partner wrote when registering it)
Choose the specific field you want to send and save the mapping.
Partner data, Submission Date, and Notes are sent from PartnerPortal to HubSpot only. Changes made to those HubSpot properties never overwrite the portal’s record.
Show the HubSpot deal owner in PartnerPortal
Section titled “Show the HubSpot deal owner in PartnerPortal”Use this when your team wants to see, on the lead in PartnerPortal, which HubSpot user owns the linked deal. HubSpot stays the source of truth for the owner. PartnerPortal only displays the name and never changes the owner in HubSpot.
In Integrations → HubSpot → Configure, scroll to the custom-field add-on area at the bottom of the Deal object.
Select the Deal owner HubSpot property and click Add.
Open the new mapping, set Type to Portal object, and choose Lead as the source object.
Choose CRM Deal Owner as the field and save the mapping.
From then on, whenever the deal owner is set or changed in HubSpot, PartnerPortal looks up that HubSpot user’s name and shows it on the lead detail screen as a Deal Owner line beneath the HubSpot Deal link. If the deal has no owner, the line is hidden.
Map lead comments
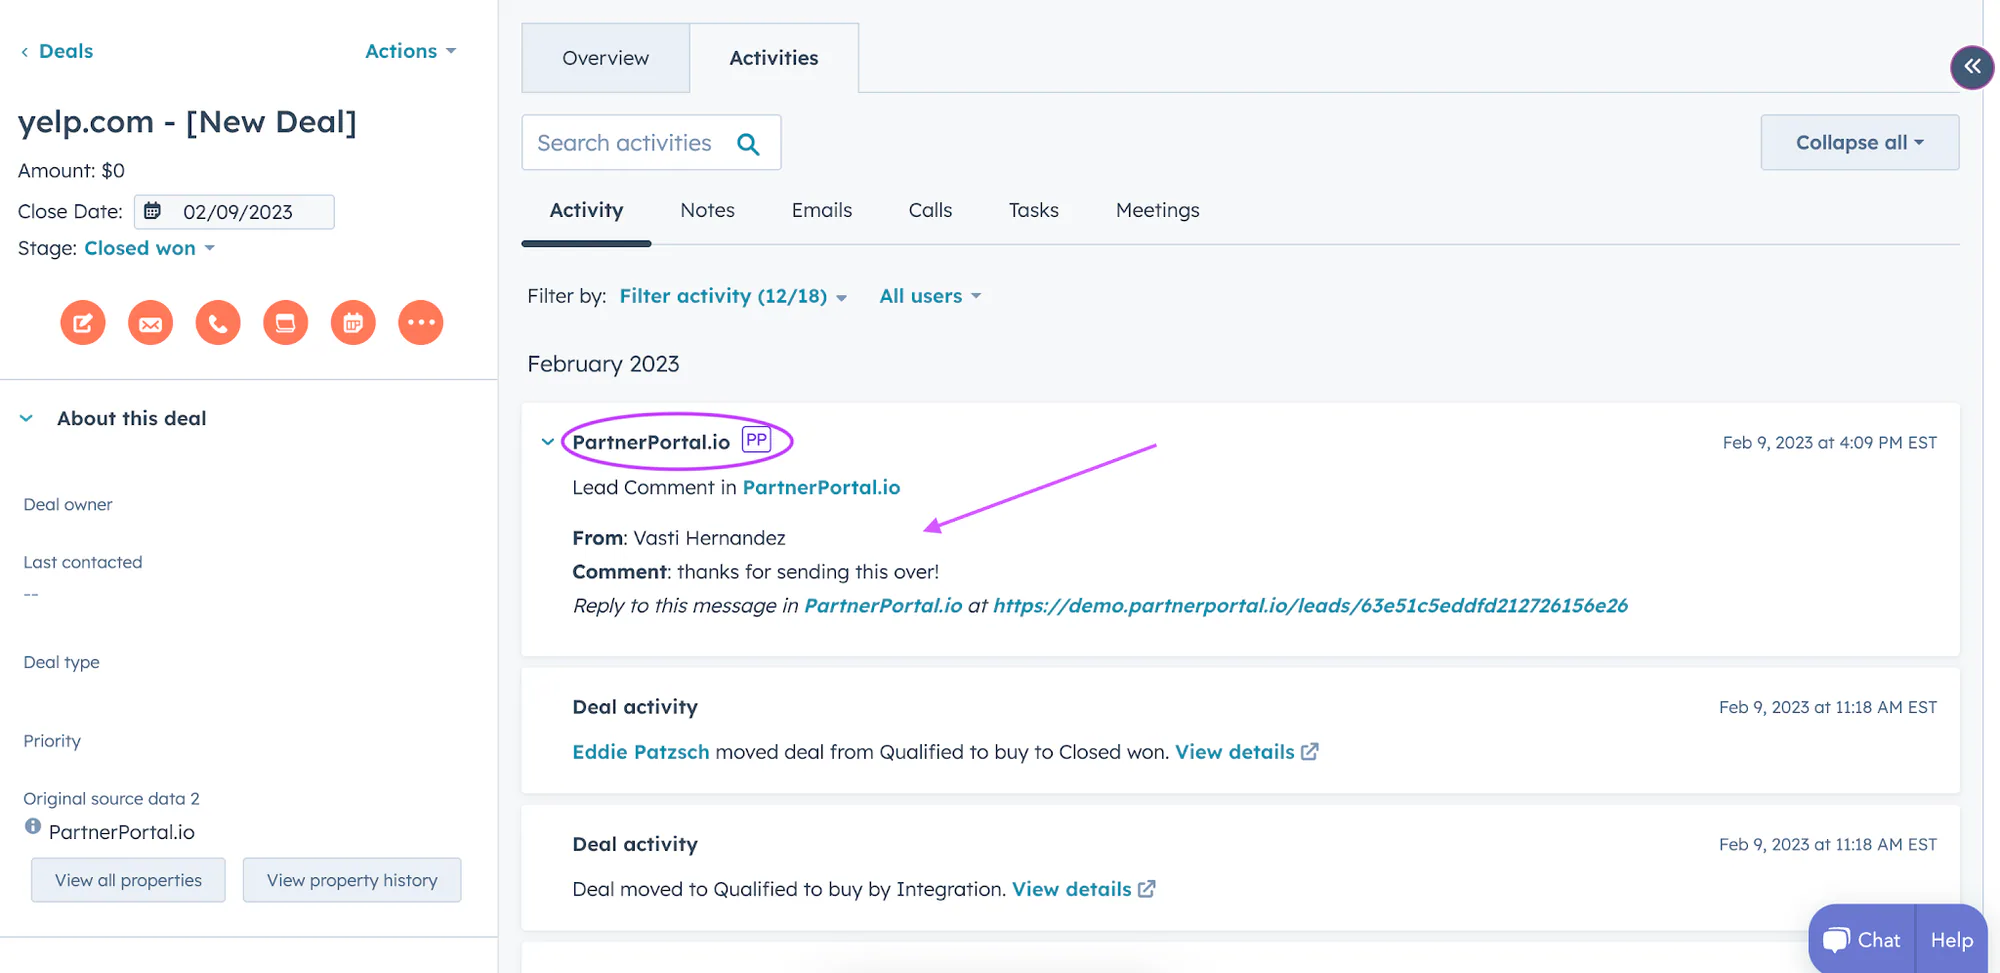
Section titled “Map lead comments”PartnerPortal can log lead comments as HubSpot deal activity.
To use comment syncing:
- Turn on Comment / Activity Tracking in CRM Settings below.
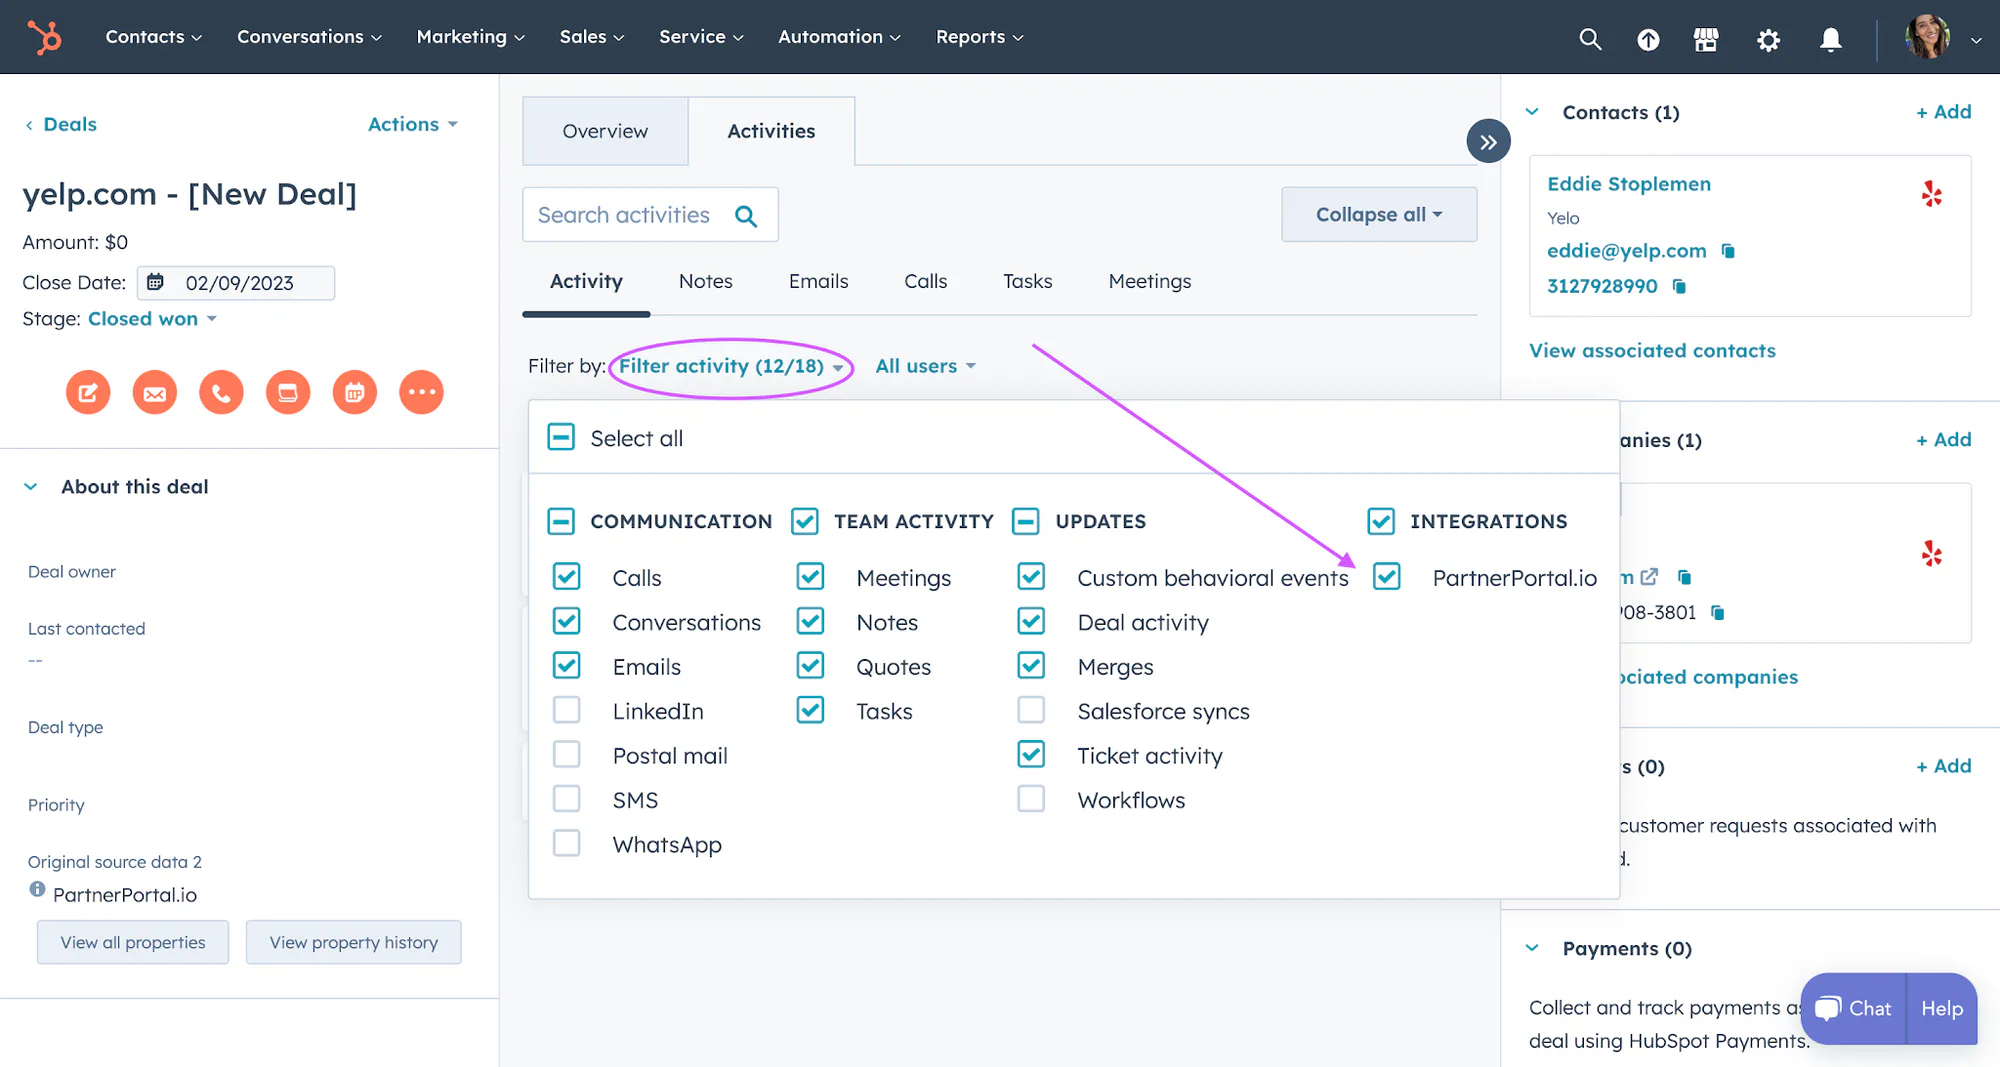
- Open a HubSpot deal that came from PartnerPortal.
- In the activity feed, click Filter Activity.
- Under Integrations, select PartnerPortal.io.
Route leads to multiple pipelines
Section titled “Route leads to multiple pipelines”Use this when different kinds of leads should land in different HubSpot pipelines automatically.
Set up lead types
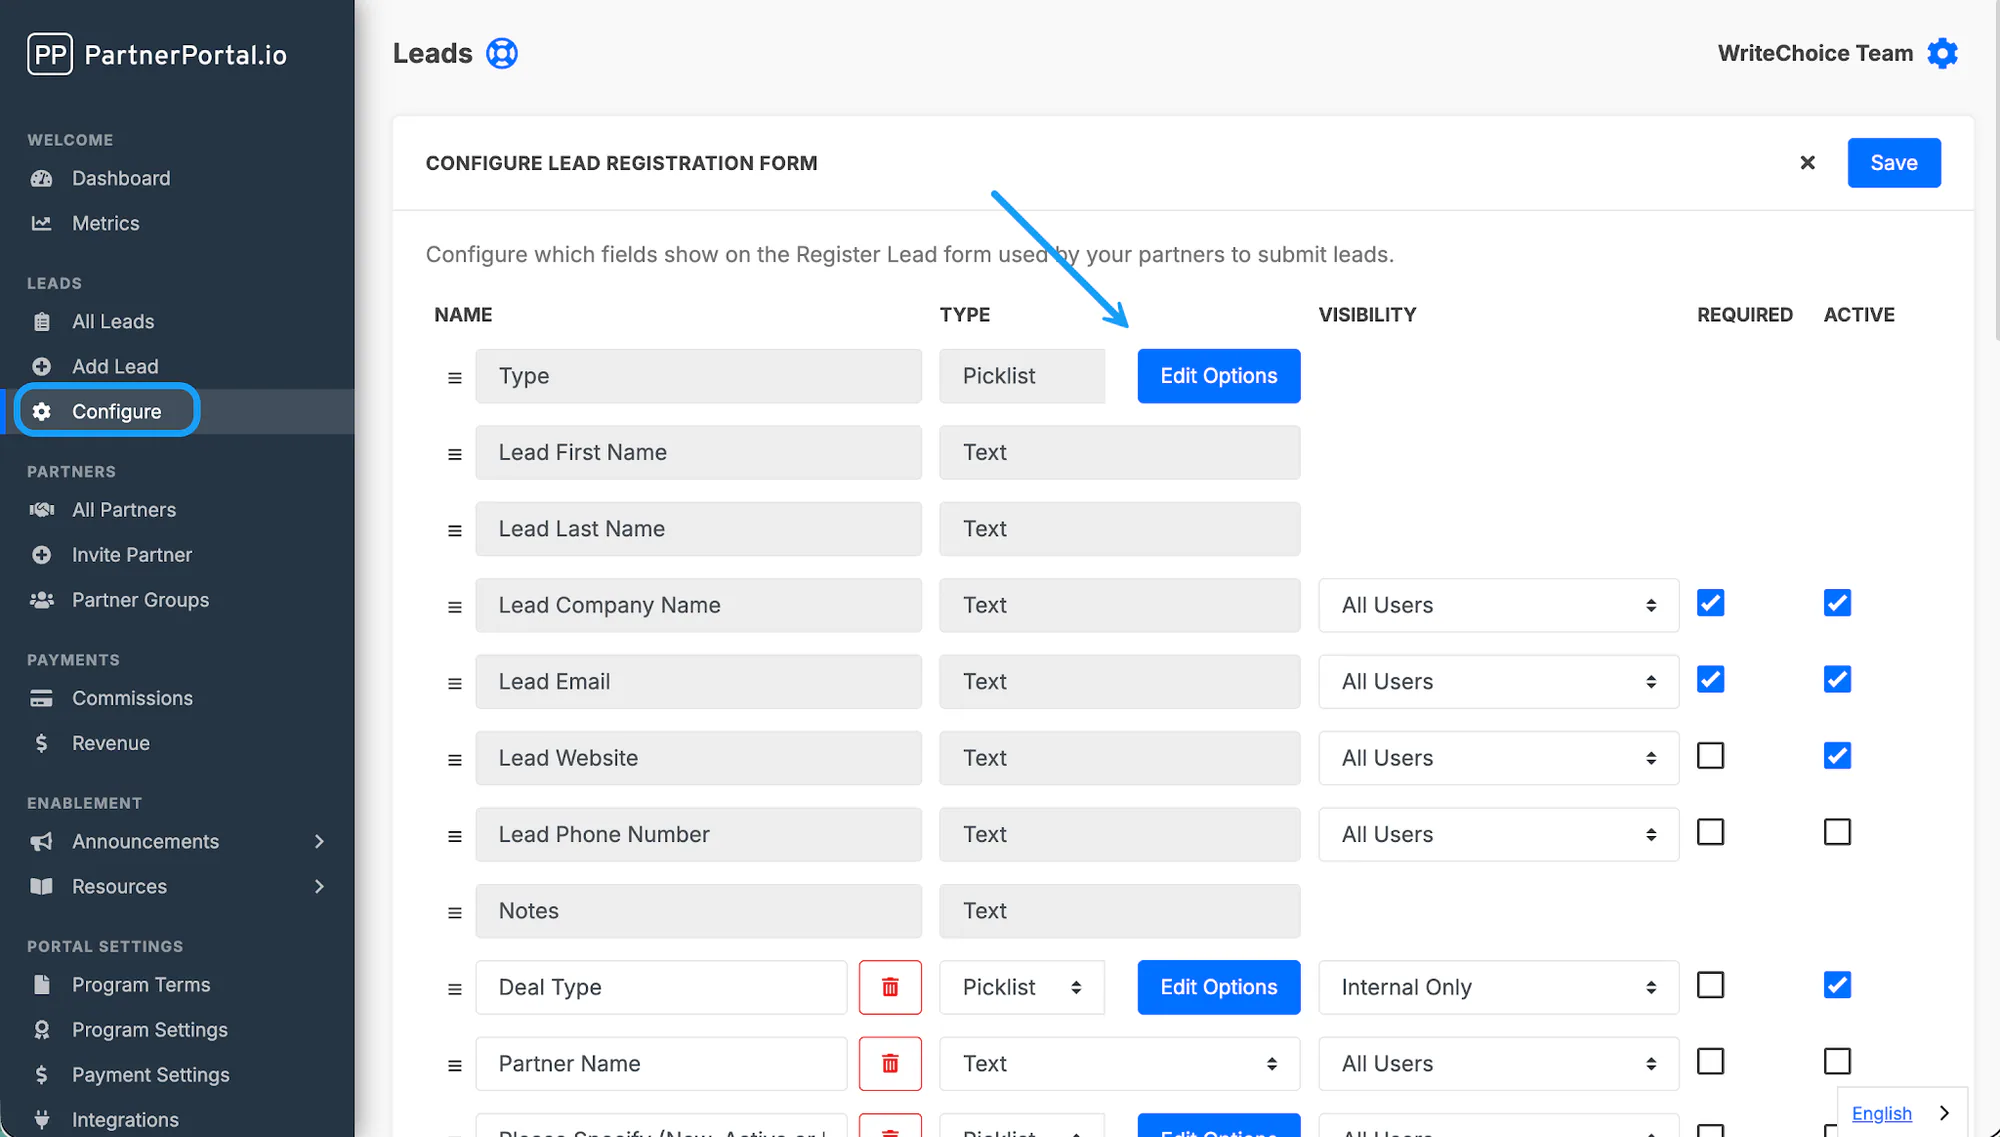
Section titled “Set up lead types”Lead-type routing depends on a dropdown field on your PartnerPortal lead form, usually the built-in Type field.
Open the lead settings in PartnerPortal.
Edit the options for the Type field.
Add the lead types you want to route separately.
Map lead types to HubSpot pipelines
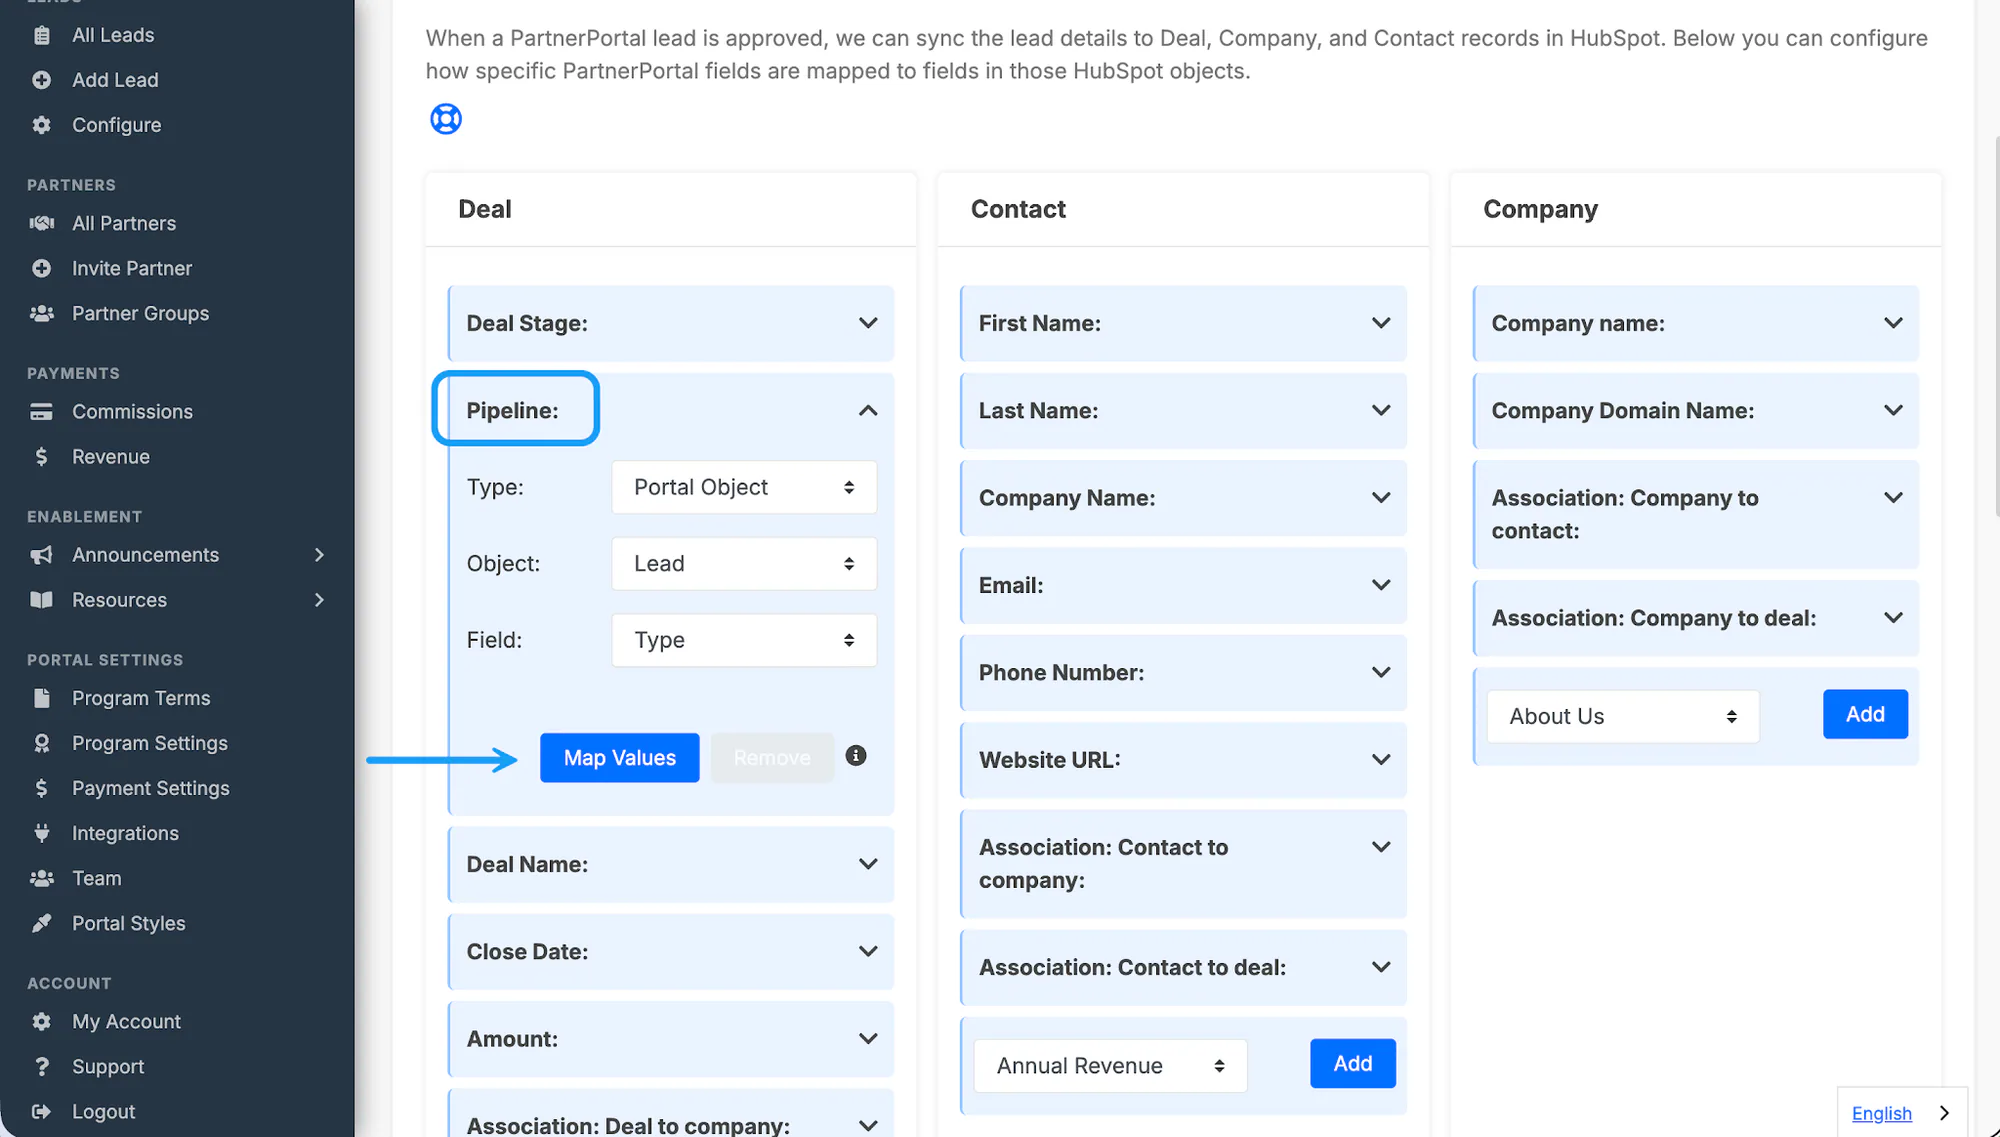
Section titled “Map lead types to HubSpot pipelines”Open Integrations → HubSpot → Configure.
In the Pipeline object, set:
- Type to Portal Object
- Field to Type
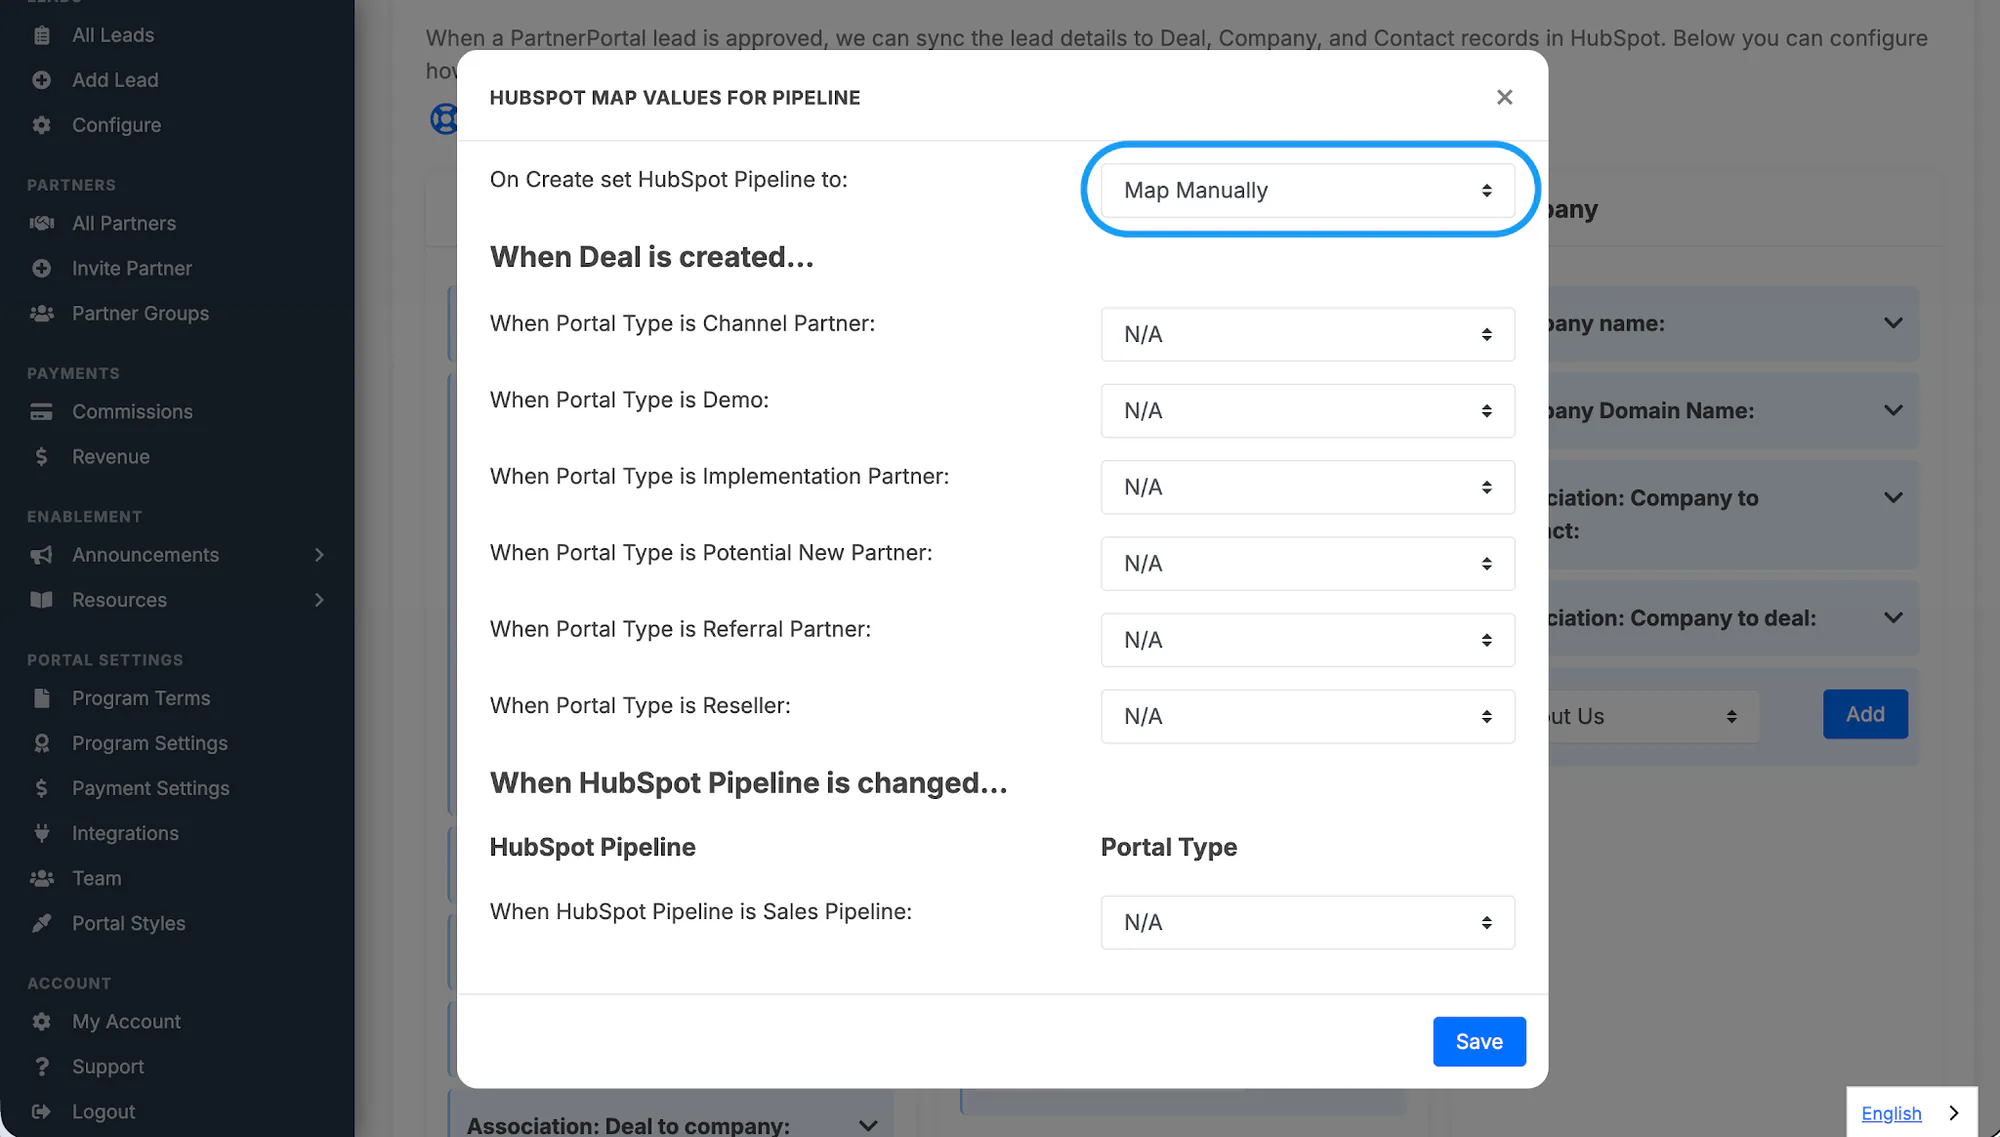
Click Map Values.
For On Create set HubSpot Pipeline to, choose Map Manually.
Map each PartnerPortal lead type to the correct HubSpot pipeline.
Save the mapping.
Map stages for each pipeline
Section titled “Map stages for each pipeline”Because the pipeline now changes by lead type, you also need to configure stage mappings for each one.
Open Deal Stage → Map Values.
Choose each lead type on the left and map the portal phases for that pipeline.
Complete the reverse mapping as well if you later turn on Two-Way Sync in CRM Settings below.
Use Copy to All if multiple lead types should share the same stage mapping.
CRM Settings
Section titled “CRM Settings”These settings live below the mapping interface on the HubSpot configuration screen.
Primary Object
Section titled “Primary Object”HubSpot works best when Deal remains the primary object. That keeps the linked record in PartnerPortal centered on the deal while still creating the related contact and company records alongside it.
Duplicate Handling
Section titled “Duplicate Handling”This setting controls what PartnerPortal should do if HubSpot says the record already exists.
| Option | What happens |
|---|---|
| Error | PartnerPortal stops the create action and returns an error when HubSpot detects a duplicate |
| Adopt | PartnerPortal uses the existing HubSpot record and continues tracking it |
Error Handling
Section titled “Error Handling”This setting controls what happens if one part of the multi-object create flow fails.
| Option | What happens |
|---|---|
| Don’t Cleanup | Objects created earlier in the flow stay in HubSpot even if a later object fails |
| Cleanup | PartnerPortal deletes the records it created in that flow if a later object fails |
Comment / Activity Tracking
Section titled “Comment / Activity Tracking”Turn this on when you want PartnerPortal lead comments copied into HubSpot as deal activity.
Enable two-way sync and reseller permissions
Section titled “Enable two-way sync and reseller permissions”Use this when partners should be able to update deal progress from inside PartnerPortal and have those changes sync back to HubSpot.
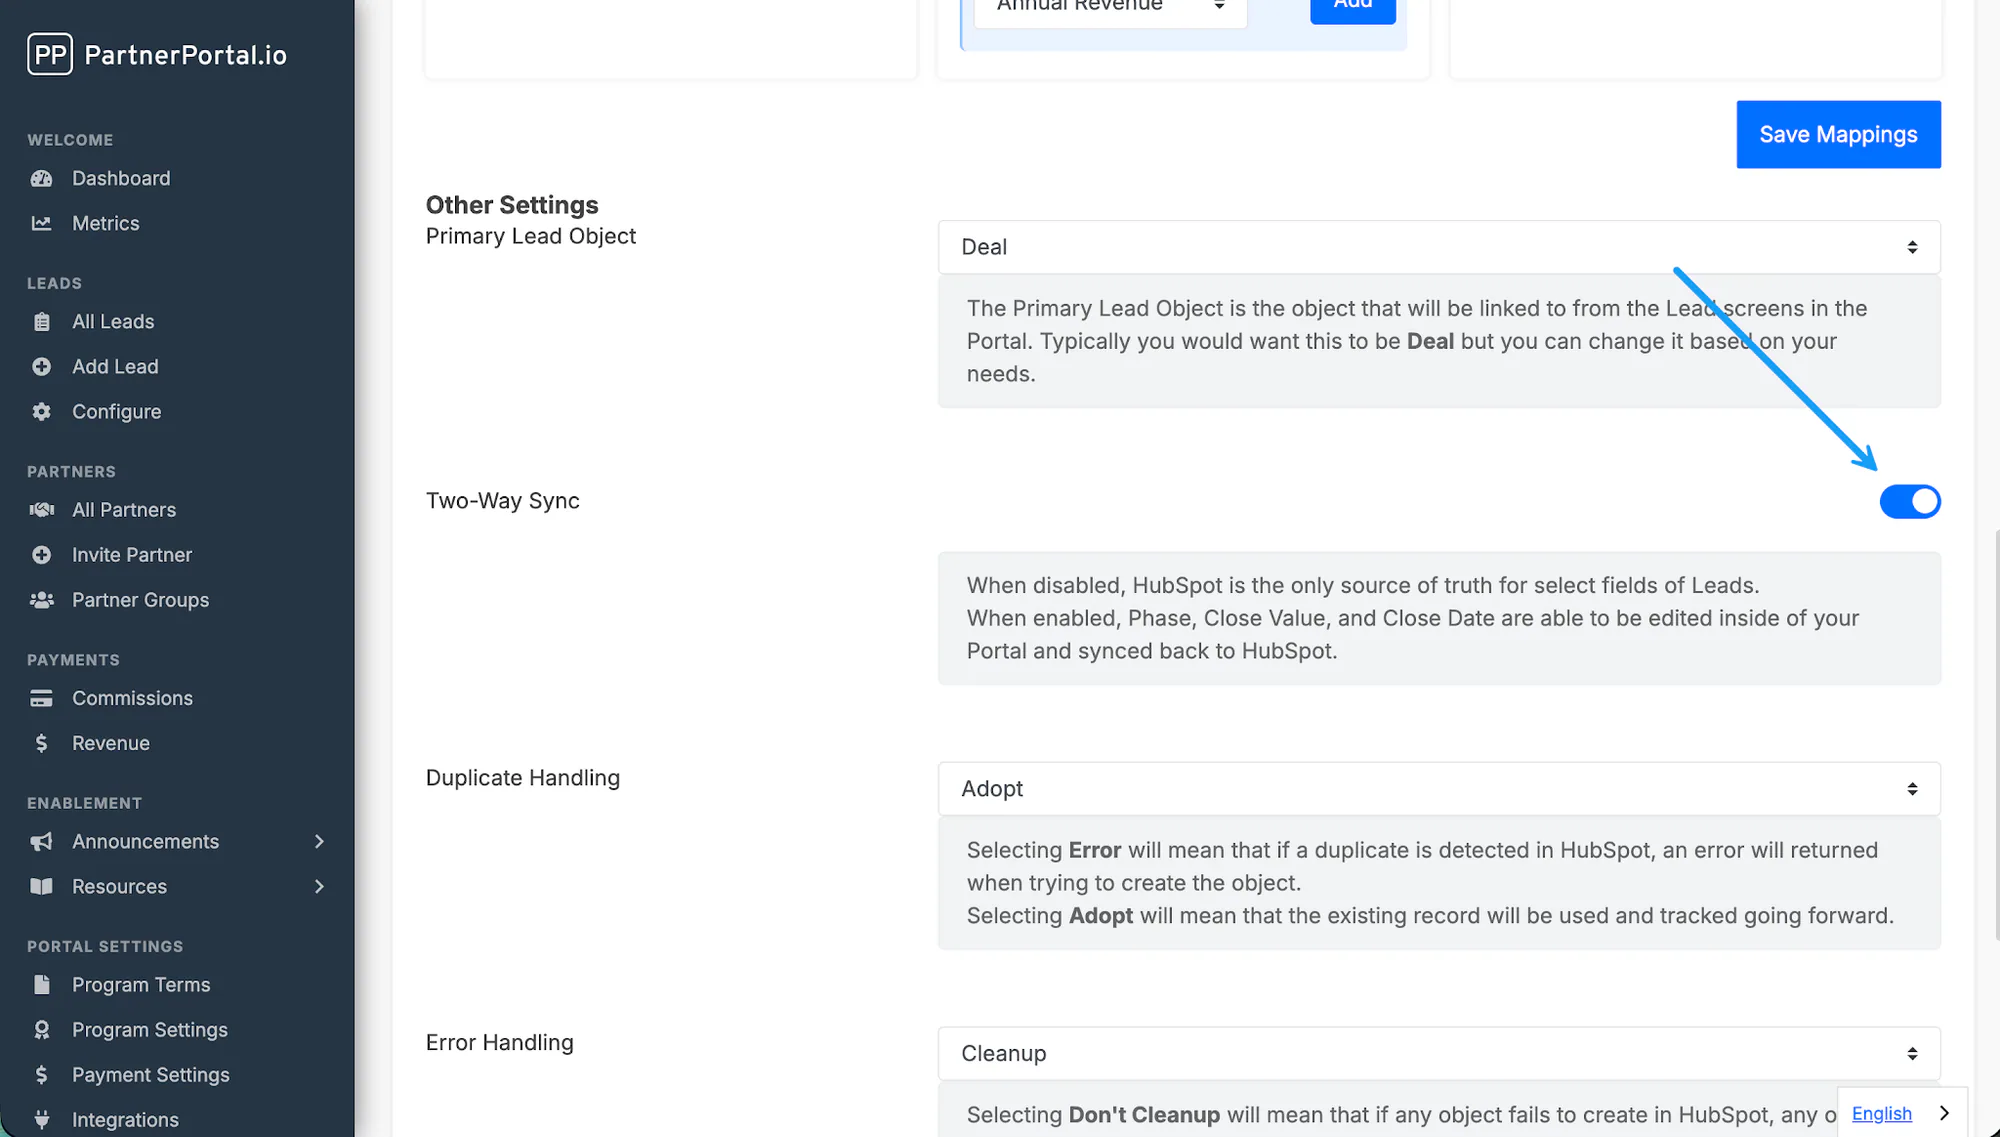
Two-way sync lets updates to Phase, Close Value, and Close Date move from PartnerPortal back to HubSpot. Reseller permissions then determine which partners are allowed to make those updates.
Turn on two-way sync
Section titled “Turn on two-way sync”Open Integrations → HubSpot → Configure.
In Other Settings, turn on Two-Way Sync.
Open Deal Stage → Map Values and complete both directions of the stage mapping:
- what HubSpot stage should be set when the portal phase changes
- what portal phase should be set when the HubSpot stage changes
Make sure the On Create deal-stage setting is still configured.
Save the mapping.
Turn on reseller permissions for a partner
Section titled “Turn on reseller permissions for a partner”Open the partner you want to update.
Go to their detailed settings and find the Permissions area.
Turn Reseller Permissions on.
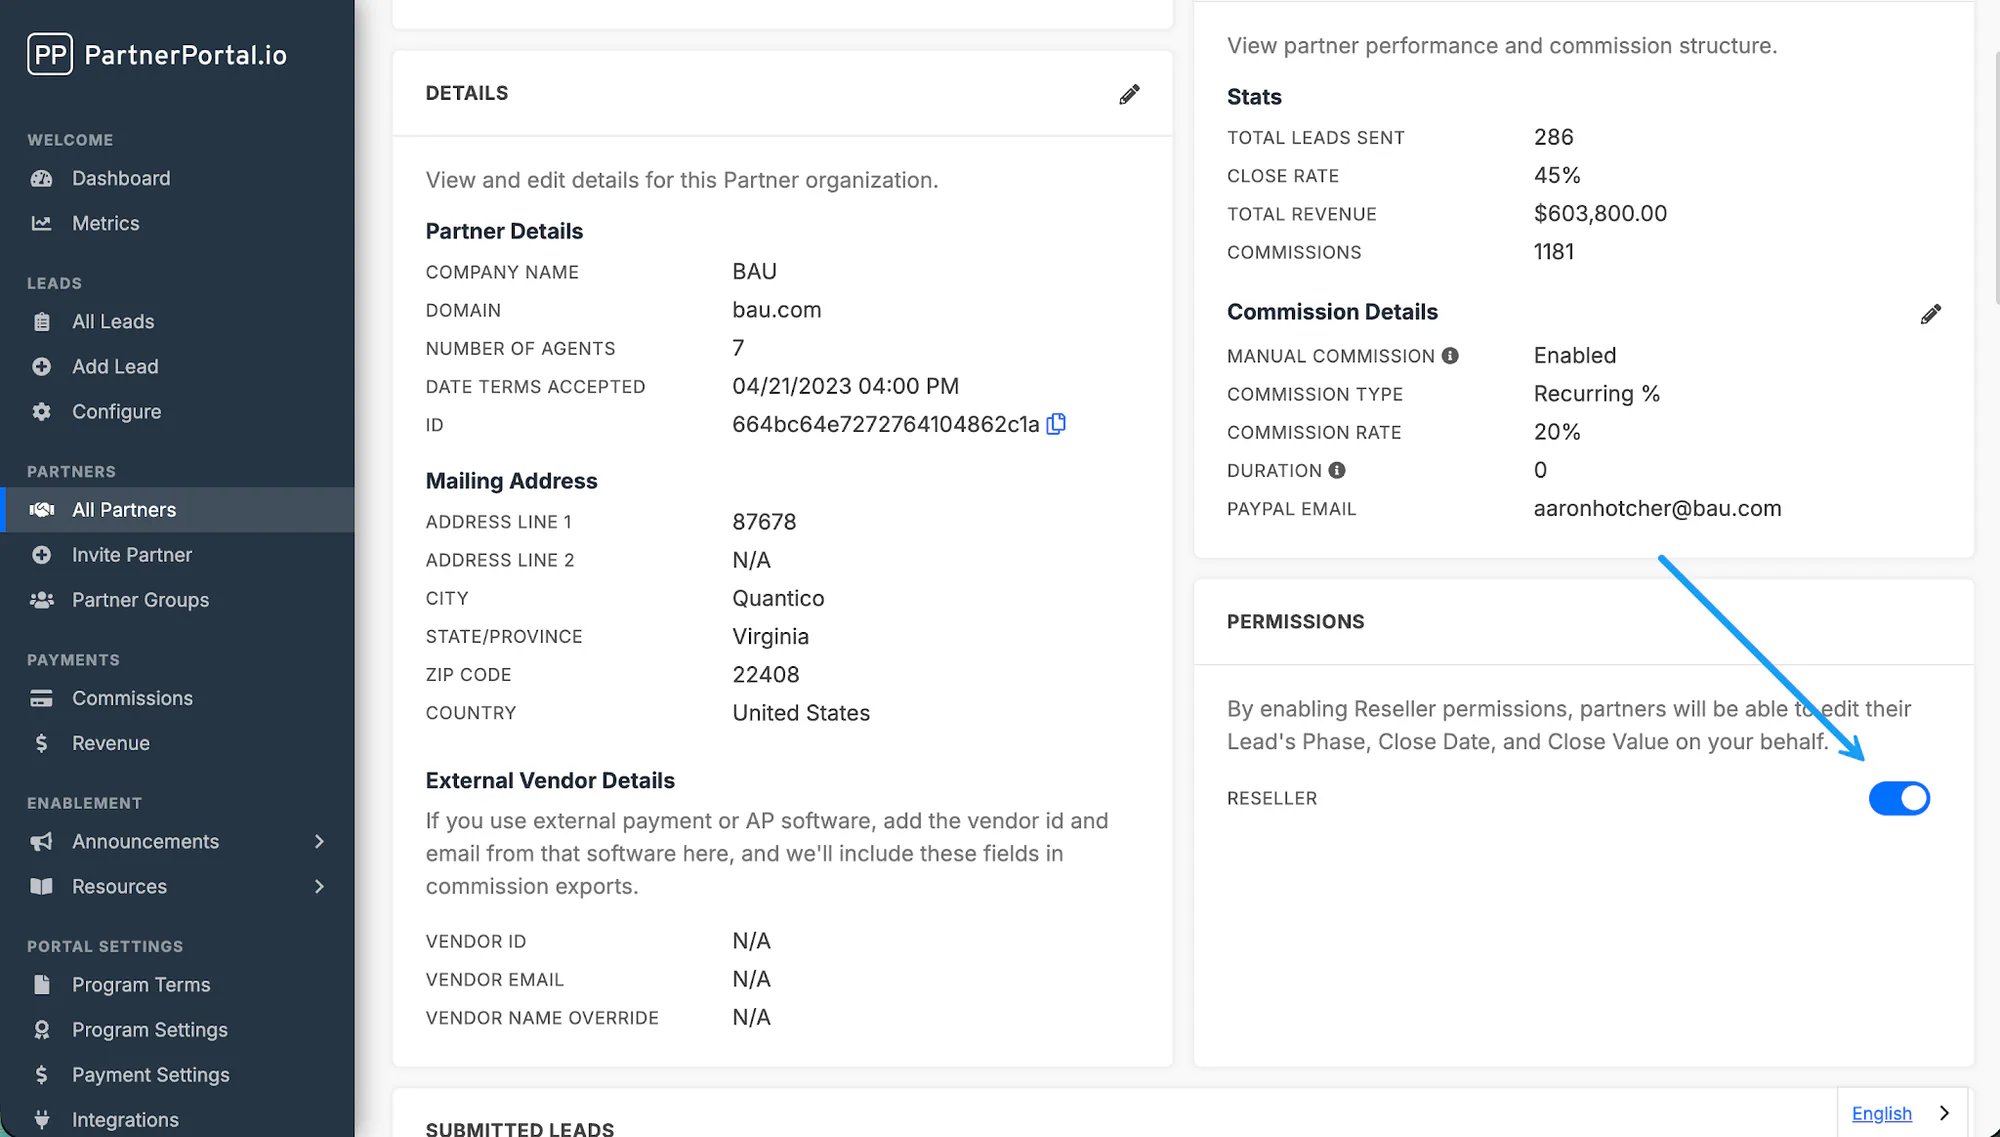
Once enabled, that partner and their users can update portal phases on your behalf and have those changes sync back to HubSpot.
Import HubSpot Deals as Leads
Section titled “Import HubSpot Deals as Leads”The integration can also work in the opposite direction from the rest of this guide. Instead of only pushing approved PartnerPortal leads out to HubSpot, it can watch your HubSpot deals and automatically create PartnerPortal leads from them, attributing each new lead to the partner it belongs to.
The Lead Import settings appear below the mapping interface on the HubSpot configuration screen, in the same area as CRM Settings.
How lead import works
Section titled “How lead import works”When lead import is on, PartnerPortal watches the HubSpot pipelines you choose. As deals appear in those pipelines, the integration tries to identify which partner each deal belongs to using the signal you configure, then:
- If it can confidently match a partner, it creates a PartnerPortal lead for that deal, attributes it to the matched partner, and links the two records so future HubSpot updates keep flowing into the lead.
- If it can’t confidently match a partner, it holds the deal for review instead of creating a mis-attributed lead. Those deals appear under Deals pending import (see below).
Turn on lead import
Section titled “Turn on lead import”Open Integrations → HubSpot → Configure and scroll to the Lead Import section.
Set Import Deals as Leads to the scope you want:
Option What it does Off No deals are imported. This is the default. Import all deals Every new deal in HubSpot is considered for import. Import deals in specific pipelines Only deals in the pipelines you select are considered for import. If you chose Import deals in specific pipelines, check the pipelines that should feed lead import.
Configure how partners are identified (next section), then save the configuration.
Identify the partner
Section titled “Identify the partner”This is the most important setting: it tells PartnerPortal how to figure out which partner a HubSpot deal belongs to. Choose one of two approaches under Identify the partner using.
Use a custom field on the deal
Section titled “Use a custom field on the deal”Use this when the partner’s identifier lives in a HubSpot deal property (for example a partner_website or partner_email field).
Set Identify the partner using to A custom field on the deal.
In Property name, enter the internal name of the HubSpot deal property that holds the partner’s domain, email, or identifier.
Set Match partners by to how that value should be matched:
Match on How it’s matched Domain (recommended) The value is read as a website domain and matched to the partner organization. Email address The value is read as an email and matched to the partner. Company name Matched by company name. Company-name matches are always sent to review rather than imported automatically, because names are ambiguous.
Use a custom association on the deal
Section titled “Use a custom association on the deal”Use this when you tag the partner on the deal with a labeled HubSpot association — for example a “Partner” Deal→Company or Deal→Contact association.
Set Identify the partner using to A custom association on the deal.
Choose the association label that represents the partner. PartnerPortal lists the custom association labels found on your deal object.
How the partner is matched depends on the association’s target:
- A company association matches the partner organization by the associated company’s domain.
- A contact association matches the specific partner user by the associated contact’s email, falling back to the partner organization by email domain.
Set a default lead type
Section titled “Set a default lead type”Use Default lead type to choose the lead type applied when an imported deal has no mapped lead type of its own. Leave it blank if you don’t route imported leads by type.
Review deals we couldn’t attribute
Section titled “Review deals we couldn’t attribute”When a deal enters an import-enabled pipeline but PartnerPortal can’t confidently match it to a partner, the deal is held for review instead of creating a mis-attributed lead. Open Deals pending import from the bottom of the Lead Import settings to see them.
The review list shows each waiting deal along with the partner details PartnerPortal detected (domain, email, and name). To resolve a deal, fix the partner signal in HubSpot — correct the deal property or add or repair the partner association — and PartnerPortal re-attempts the import automatically. Use Refresh to re-check the list.