
How to Track Revenue
Revenue is the input behind every commission in PartnerPortal. This page covers each way to bring revenue into the app and keep it attached to the correct lead, so your commissions are always based on accurate numbers.
The settings that control these workflows live in Payment Settings, especially Revenue Tracking and Commission Generation.
Choose Your Revenue Model
Section titled “Choose Your Revenue Model”Most portals use one of these three models:
| Model | Best for | What happens in PartnerPortal |
|---|---|---|
| Manual | Lower-volume portals or teams that want full manual control | Your team adds revenue directly on the lead, and the revenue shows up as part of the resulting commission/payment workflow |
| Legacy Stripe / QuickBooks | Older integration-based workflows | PartnerPortal reads revenue from Stripe or QuickBooks when commissions are created or synced, without relying on the separate Revenue page |
| Modern in-app revenue | Teams that want a local revenue ledger and review step inside PartnerPortal | Revenue appears on the separate Revenue page and can later drive commission generation |
The rest of this page follows that same order: manual, then legacy, then modern.
1. Manual Revenue Workflow
Section titled “1. Manual Revenue Workflow”Use the manual workflow when you are not connecting Stripe or QuickBooks for partner revenue.
In this setup:
- there is no automated revenue tracking
- revenue is entered directly on the lead
- there is no separate in-app revenue ledger or revenue list page
- commissions can still be created manually or generated later from that manually entered revenue
Add Revenue Manually
Section titled “Add Revenue Manually”Open Leads and select the lead you want to update.
In the Revenue and Partner Payments section, click Add Revenue.
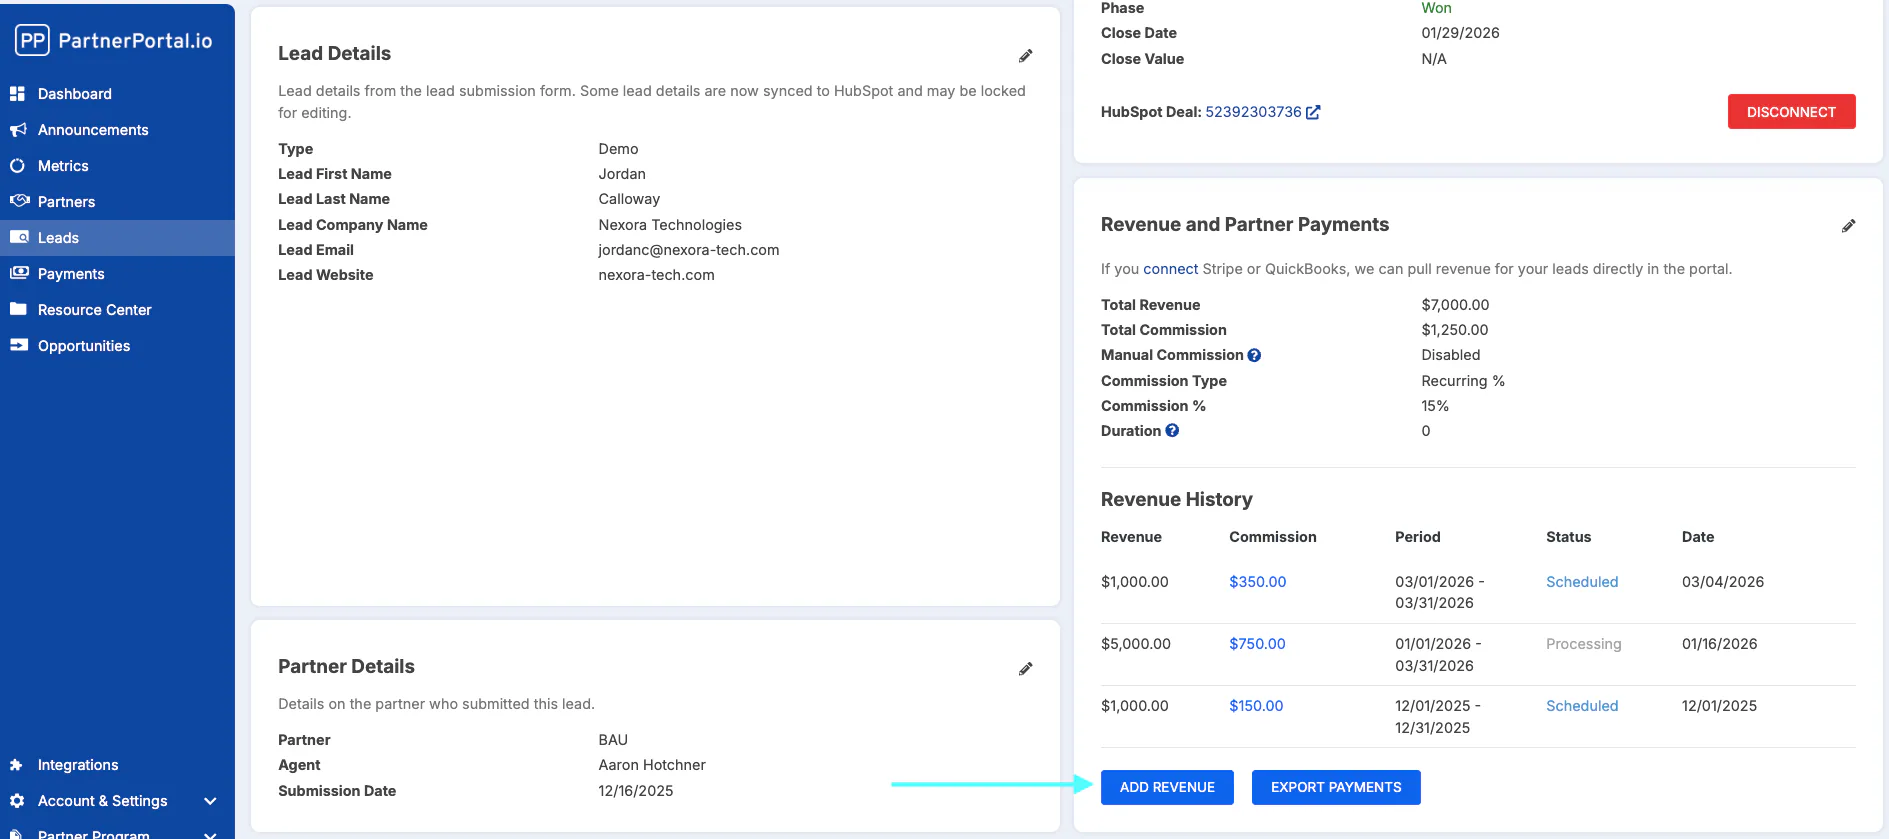
Enter the revenue details:
- period start and end dates
- issue date
- total revenue
- payment IDs, if you use them internally
- commission type
PartnerPortal calculates the commission amount automatically based on the lead’s commission setup.
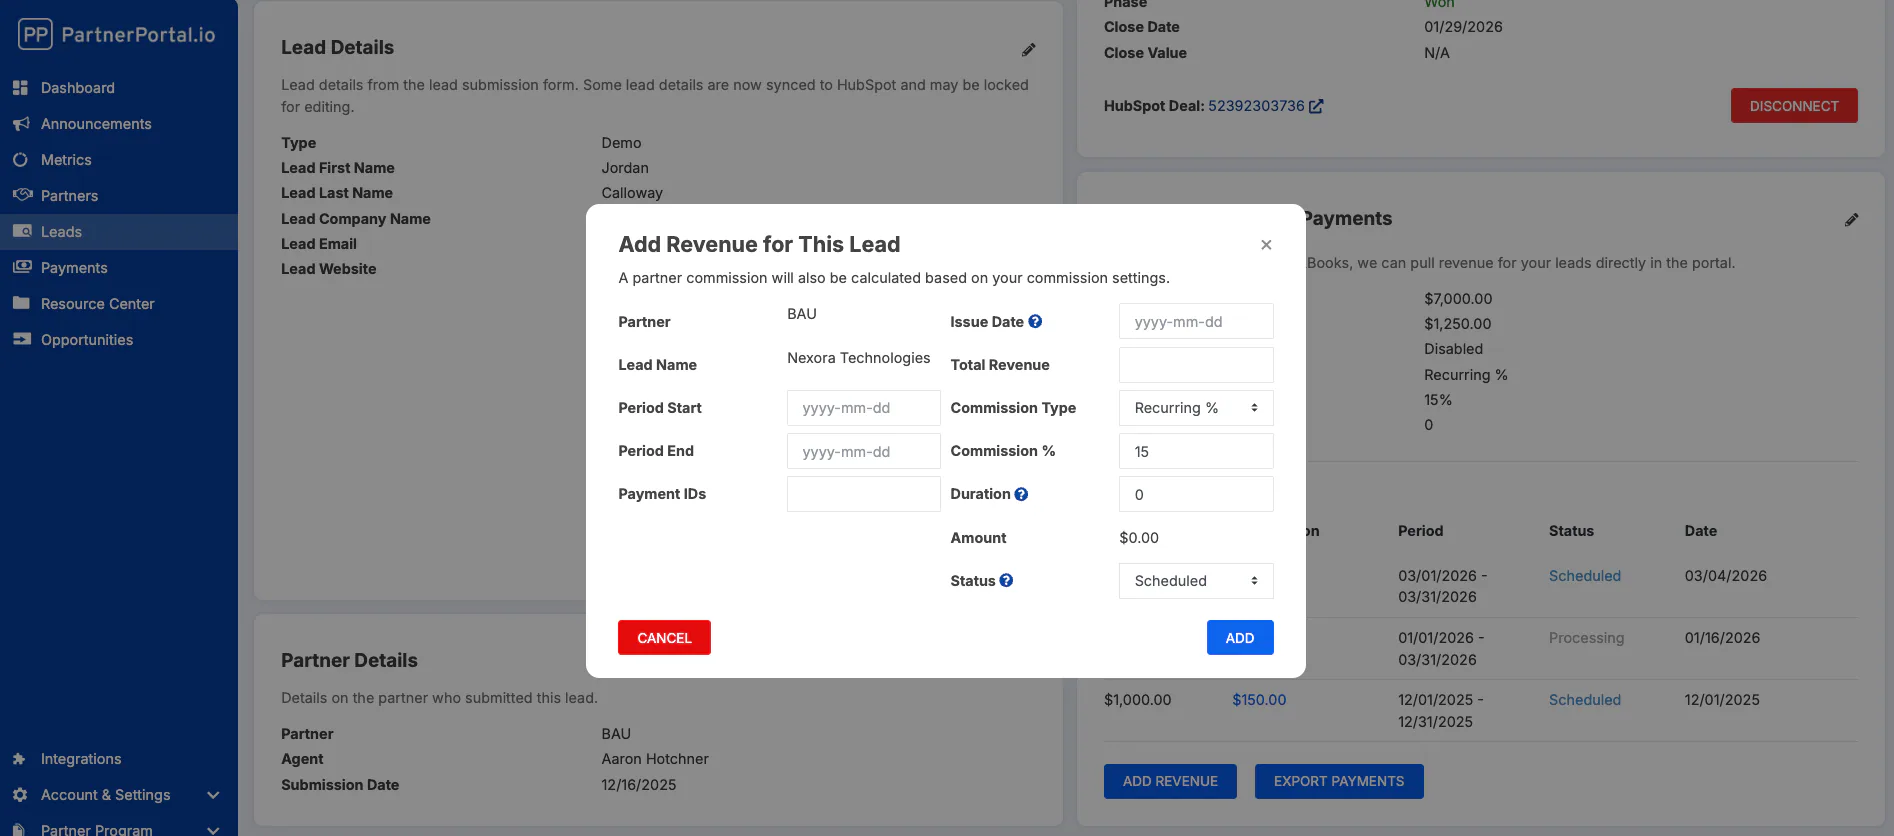
Save the record.
2. Legacy Stripe or QuickBooks Workflow
Section titled “2. Legacy Stripe or QuickBooks Workflow”Use the legacy workflow when your portal connects Stripe or QuickBooks, but still relies on PartnerPortal pulling revenue directly from that system rather than from the in-app Revenue page.
In this setup:
- your accounting system is still the source of truth for revenue lookup
- PartnerPortal reads that revenue when it needs it for commissions
- the revenue amount normally shows up as part of the commission/payment record, not in a separate local revenue ledger
- your focus is on keeping mappings accurate, rather than maintaining a local revenue ledger
Set up the legacy workflow
Section titled “Set up the legacy workflow”Connect Stripe or QuickBooks from Integrations.
Open the provider’s settings page:
- Stripe:
/integration/stripe/settings - QuickBooks:
/integration/quickbooks/settings
- Stripe:
Set up your lead-to-customer mappings.
Use those mappings when PartnerPortal pulls revenue from the accounting system for commission workflows.
Mapping leads to Stripe or QuickBooks customers
Section titled “Mapping leads to Stripe or QuickBooks customers”Lead-to-customer mapping is critical in the legacy workflow because this is how PartnerPortal knows which revenue belongs to which lead when it reads directly from Stripe or QuickBooks.
On the Stripe mapping screen, each row is a portal lead and you choose the matching Stripe customer on the right, then click Save Mappings.
Two details matter:
- one lead can have more than one saved customer ID when needed
- one customer can only be mapped to one lead at a time
Without this mapping, legacy commission generation may not know which lead a Stripe customer belongs to.
What “importing” means in legacy mode
Section titled “What “importing” means in legacy mode”In legacy mode, bringing revenue in usually means syncing or pulling revenue from the accounting system for the lead or commission period you are working on.
That is different from the modern in-app model:
- Legacy: revenue is pulled from Stripe or QuickBooks when needed
- Modern: revenue is stored in PartnerPortal’s local Revenue ledger first
If you stay fully legacy, PartnerPortal reads revenue from your accounting system when it is needed, rather than building a separate in-app revenue history for every event.
3. Modern In-App Revenue Workflow
Section titled “3. Modern In-App Revenue Workflow”Use the modern workflow when you want PartnerPortal to store revenue inside the app and let your team review it before or while commissions are created.
In this setup:
- Stripe or QuickBooks sends revenue activity into PartnerPortal
- PartnerPortal shows those records on the Revenue page
- PartnerPortal tries to auto-match the records to leads before your team touches them
- your team can review, confirm, or correct those records inside the app
Turn on in-app revenue capture
Section titled “Turn on in-app revenue capture”Connect your accounting integration from Integrations.
Set up lead-to-customer mappings on the provider settings page if needed:
- Stripe:
/integration/stripe/settings - QuickBooks:
/integration/quickbooks/settings
- Stripe:
Open Portal Setup → Payment Settings and go to Revenue Tracking.
In Revenue Tracking, turn on Capture Stripe Revenue or Capture QuickBooks Revenue.
Open the Revenue page to review the captured records.
When capture is enabled, new revenue starts flowing into PartnerPortal’s in-app revenue ledger.
If you also want scheduled commissions to use that in-app ledger, set Commission Source to In-App Revenue in Commission Generation.
Import historical revenue in modern mode
Section titled “Import historical revenue in modern mode”If you enabled automatic capture after revenue already existed in Stripe or QuickBooks, use the import tools on the Revenue page to backfill older data.
This is especially important if:
- you want older revenue to appear in the in-app ledger
- you want older periods available for in-app commission generation
- you need a complete revenue audit trail inside PartnerPortal
Review and correct captured revenue
Section titled “Review and correct captured revenue”The Revenue page is where your team reviews captured revenue before or after it is used for commission generation.
How automatic matching works
Section titled “How automatic matching works”Unlike the legacy workflow, the modern in-app revenue flow does not depend only on a manual mapping grid up front.
When captured revenue arrives, PartnerPortal tries to match it in this order:
- Saved customer mapping first. If the Stripe or QuickBooks customer is already saved on a lead, PartnerPortal assigns the revenue to that lead immediately.
- Exact email match next. If there is no saved customer mapping yet, PartnerPortal checks whether the customer email exactly matches a lead email.
- Website domain match last. If there is still no match, PartnerPortal compares the email domain to lead website domains.
Domain matching is more cautious:
- common email domains are ignored
- if more than one lead shares the same domain, PartnerPortal does not auto-pick one
Email and domain matches are still treated as suggested matches that need review on the Revenue page.
Depending on the record and your permissions, your team can usually:
- confirm a suggested match
- assign or reassign revenue to a different lead
- unassign revenue that matched incorrectly
- delete revenue that should not stay in the ledger
This review step matters most when the source system does not provide a clean customer mapping or when the record was matched by email or company domain rather than by a known customer ID.
When you confirm an auto-matched revenue entry, PartnerPortal saves that customer-to-lead mapping for future use when the source provides a reusable customer ID. That means later revenue from the same customer can go straight to the correct lead without relying on email or domain matching again.
If a saved mapping is wrong, you can unassign the revenue and remove that mapping so future revenue from the same customer stops auto-matching to that lead.
Troubleshooting
Section titled “Troubleshooting”Revenue not on the Revenue screen
Section titled “Revenue not on the Revenue screen”You are on the manual workflow. If your portal does not connect Stripe or QuickBooks for revenue, nothing will appear on the Revenue page automatically. Your team needs to add revenue directly on the lead.
You are on the legacy workflow. If your portal stays on the legacy model, PartnerPortal may still calculate commissions correctly by reading Stripe or QuickBooks directly, even if the Revenue page is not central to your workflow.
In that setup, first check:
- whether the lead is mapped to the correct customer on the integration settings page
- whether the accounting source actually contains the expected revenue for that lead or period
Capture is off in the modern workflow. If you want to use the in-app Revenue page, confirm that Revenue Tracking is enabled in Payment Settings.
The revenue is older than the day capture was enabled. Modern capture handles new incoming revenue. Older revenue usually needs a manual import or backfill from the Revenue page.
The record needs review. Revenue can land in PartnerPortal before it is attached to the correct lead. Review the record from the Revenue page and confirm or reassign it if needed.
If you want to understand when PartnerPortal uses the local revenue ledger versus the legacy accounting pull, see Understanding Payments, Revenue Tracking, and Commission Generation.